solutions for e-commerce

13 years of business 2555 reviews 4.9 average rating
User guide

Point of sale - extension for Magento

According to Google: «This year 46% of retail sales will be influenced by the web, but 90% of all retail sales will be effected in shops - from local retailers to the big chains».

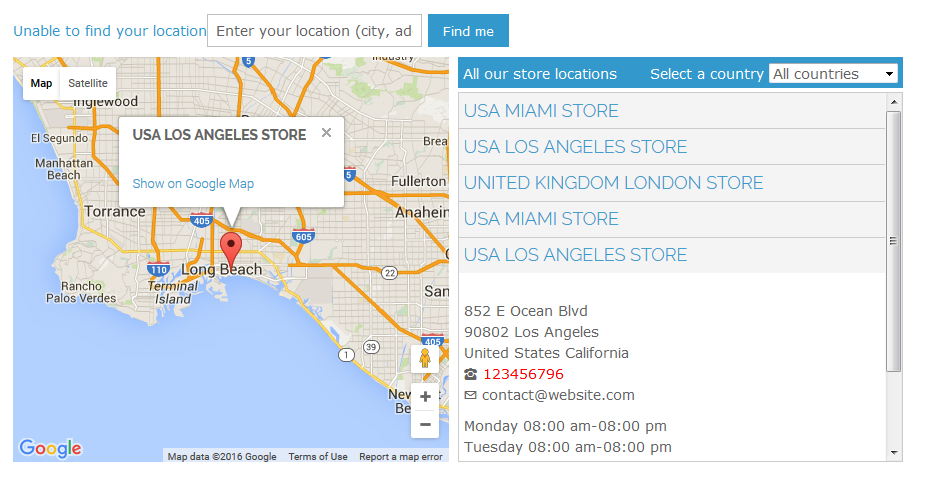
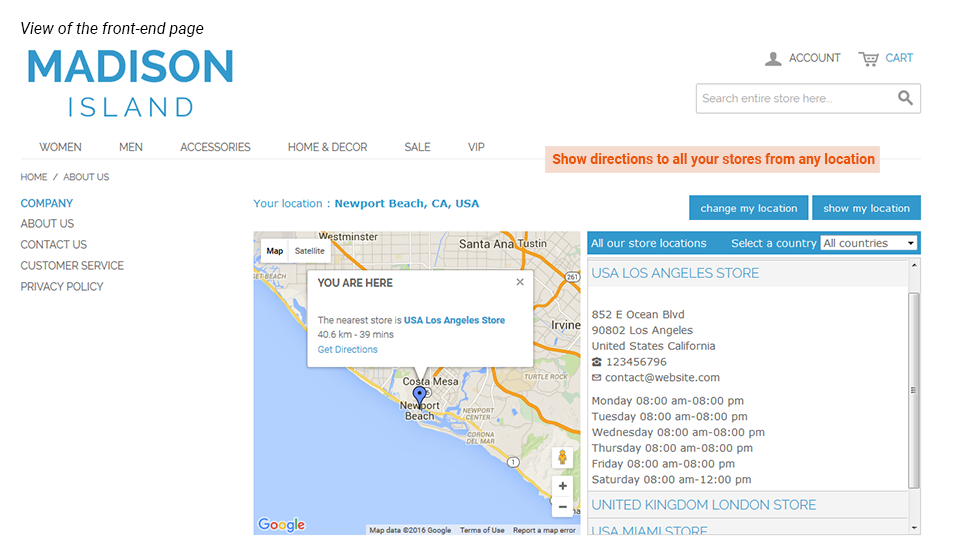
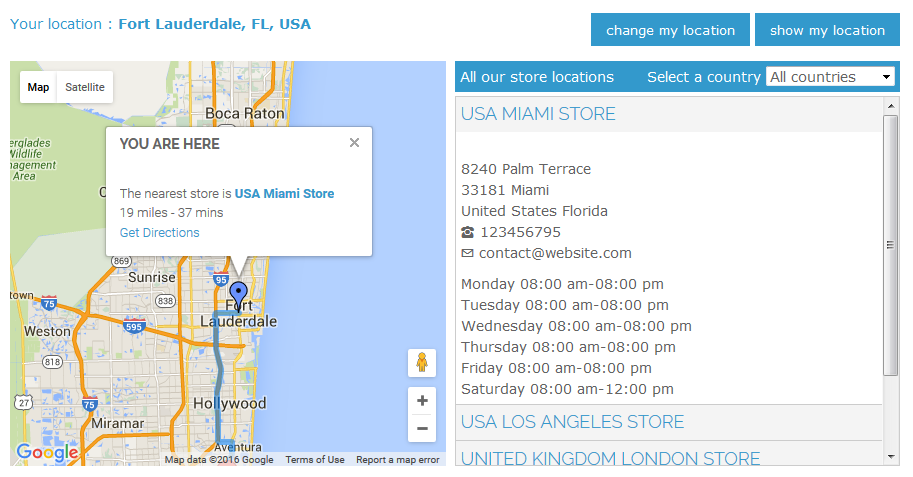
The Point of Sale extension will increase awareness of all your retail outlets by allowing you to highlight them on a customized Google Map which is then placed on any page of your Magento site.

This map uses HTML5 code which helps the customer by providing, on the same webpage, their current position, and a route map to their nearest retail outlet.

Specific information relative to each retail outlet is easily customizable from the Magento back-office, eg. opening times, postal and website addresses.

STEP 1: Manage your Points of Sale

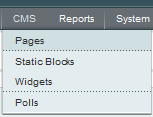
First of all, you need to create your points of sale. For this, go to:

SalesPOS / WAREHOUSESManage POS / Warehouses

Add your points of sale

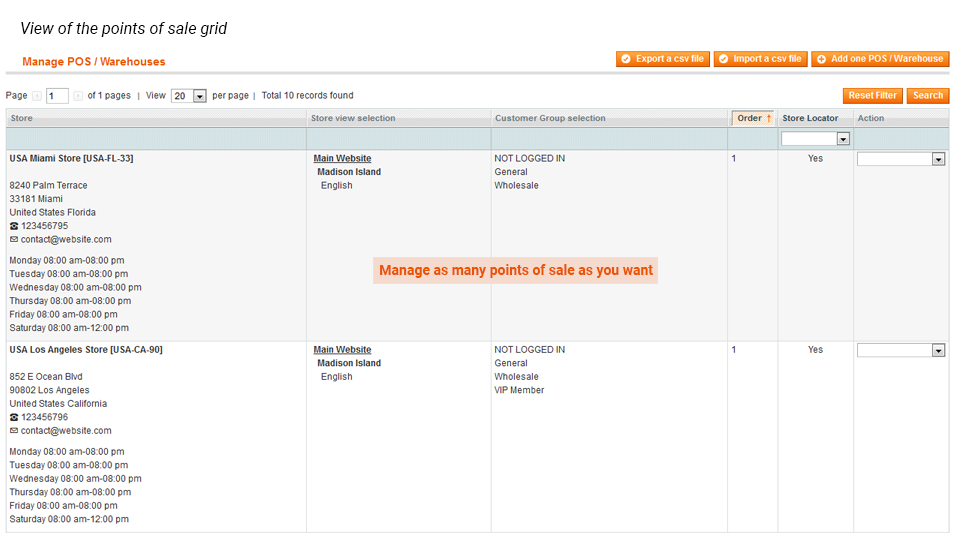
With Point of Sale, you can manage as many warehouses or points of sale as you want in the backend of Magento. 

To configure your points of sale, click on Add one POS / Warehouse.

General information

Each POS must have at least a name, a code, an order of display, a latitude, and longitude. Other information is additional, however, we recommend you to fill in a maximum of fields. 
You will also be able to reuse these fields in the Google map display.

  • Code (internal use)
    This is a unique, back-office identification code for each point of sale. This code is also used by Google Addresses to identify points of sale if data files are exported to a Google Places account.
  • Name
    This is the name that appears on the front-office of your web-site in Google Maps. It can be a shop sign or used help to localize the point of sale, for example, «USA Washington Store».  
  • Visible in store locator on CMS page
    Display the point of sale in the store locator available from the CMS page.  
  • Order of display
    This is the order of display on the Google Map.
  • Latitude & Longitude
    This information is essential to allow the point of sale to be displayed in Google Maps. You can find this information with Google maps.

Address & Hours

All the details specified in Address & Hours appear in the information section when a customer selects a particular point of sale. You must fill in:

  • Address (lines 1&2)
    Street number, street name, floor number...
  • City, Postal code, State
    The state code is essential if data files are exported to a Google Places account.
  • Country
    The country allows customers to filter their point of sale search results.
  • Main phone
    The telephone number is essential if data files are exported to a Google Places account.
  • Email
    It is the email to contact the website.
  • Image
    This is the image associated with a point of sale eg. the shop front, the logo etc... The image appears in the information section when a customer selects this particular point of sale. The image can be a .jpeg, .gif or .jpg file.
  • Description
    This is a description of the point of sale. The description appears in the information section when a customer selects this particular POS.
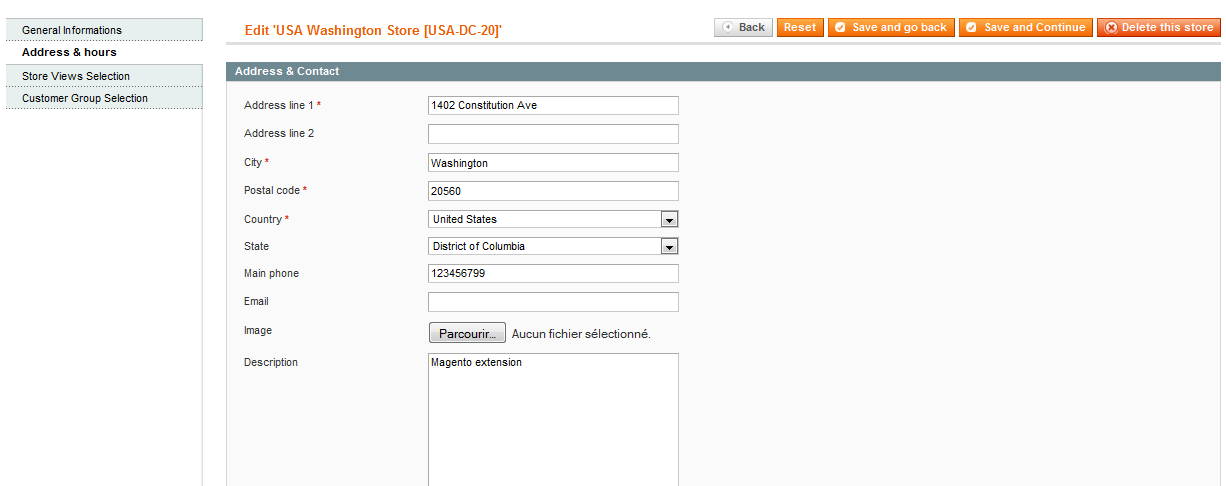
  • Hours
    The opening hours can be shown for each point of sale. You can also define lunchtime hours for each day. 
  • Days off 
    You can list all the days off. Each date must be on a new line formatted as follows:
    yyyy-mm-dd
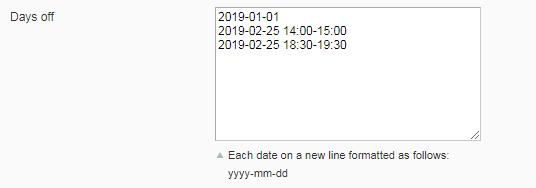
Note that you can also add hours off. Each date and hour must be on a new line formatted as follows:
    yyyy-mm-dd HH:ii-HH:ii 
    In the case where there are several breaks during the day, you'll need to add one line per break time, for example:
    2019-02-25 14:00-15:002019-02-25 18:30-19:30

Store views selection

A point of sale can be linked to one or more Magento store views. Only those points of sale linked to a store view are then displayed for customers in Google Maps.

If you select No Store View, the point of sale won't be available anywhere. 

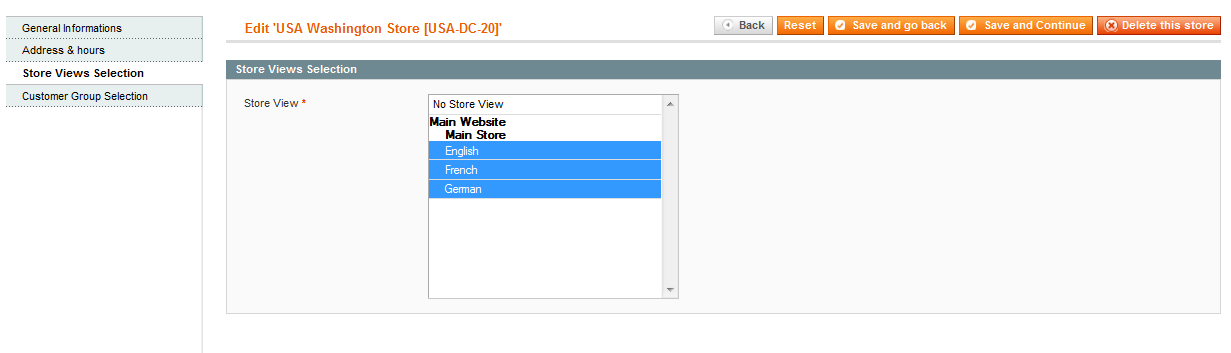
Customer group selection

You must then select in the Customer Group Selection tab, the customer group(s) that will be able to see the point of sale.

If you select No Customer Group, the point of sale won't be available for any customer. 


Extend the functionalities of Point of Sale thanks to the Advanced Inventory extension. Manage your stocks in several warehouses and across all your points of sale. Automatically assign each order to one inventory and create different stock levels for each store view.

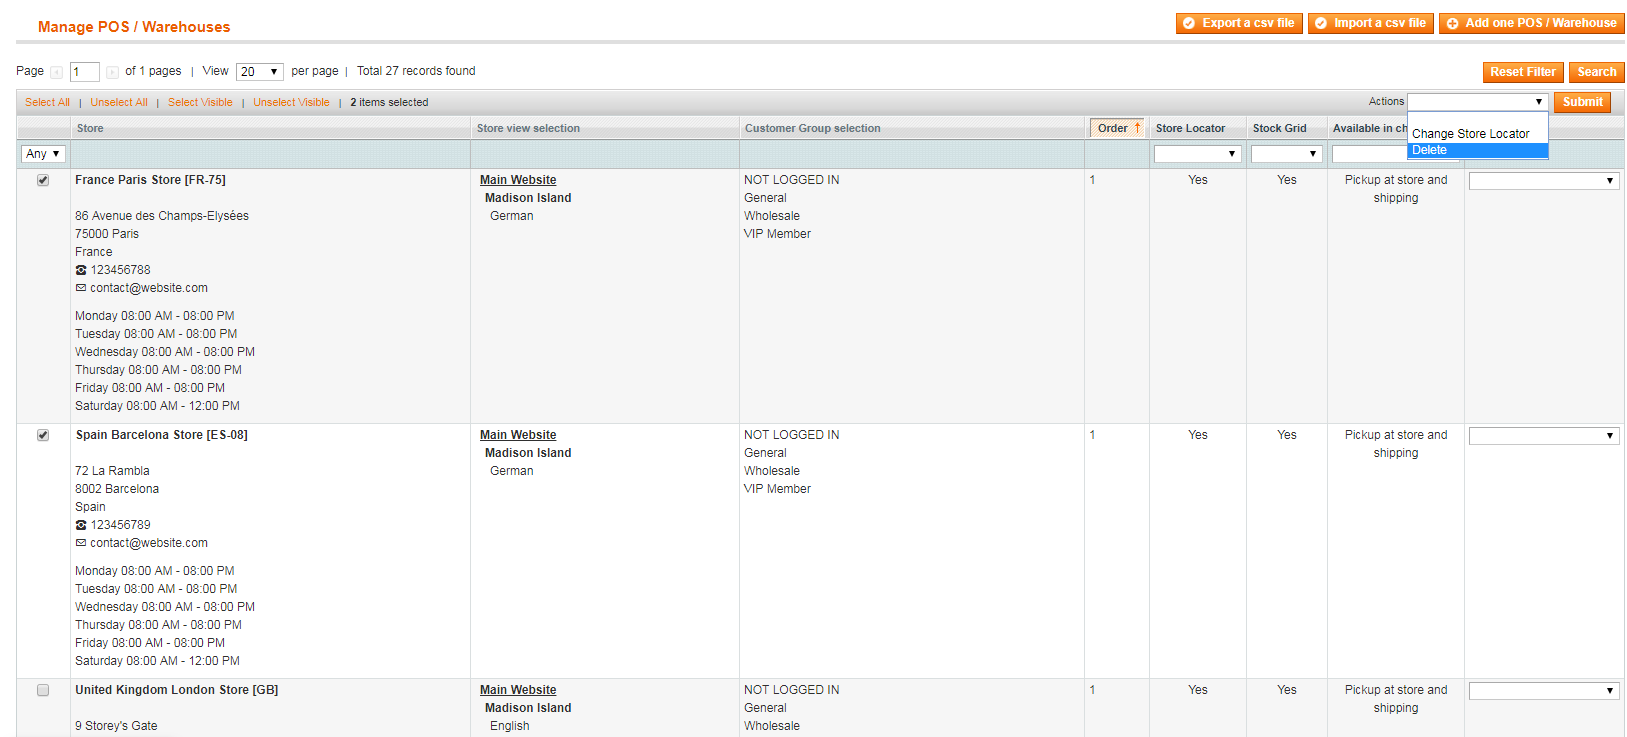
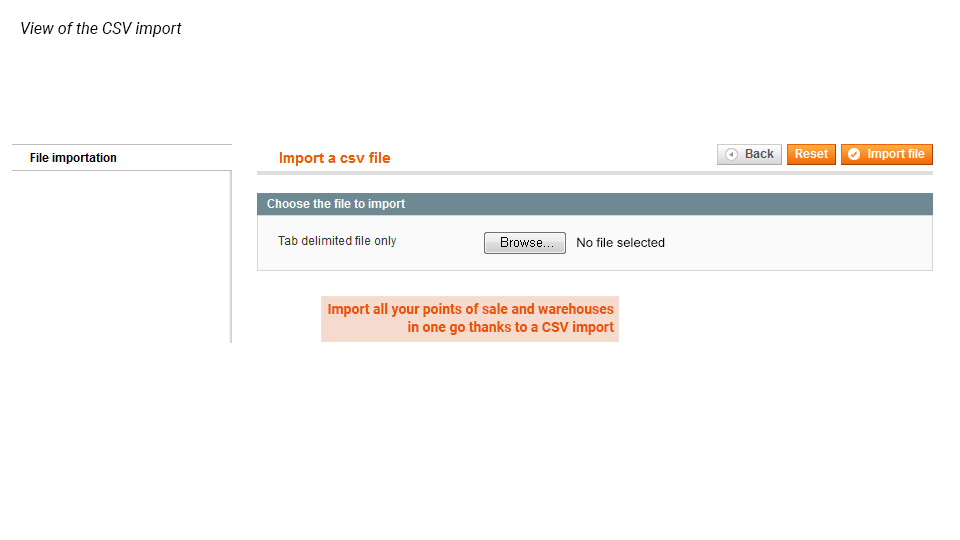
Import and export a CSV file

Import

To import a CSV file, click on Import a CSV file. You can then browse and upload your file in Magento. (Your file must be a CSV file). 
Once you have chosen your file, click on Import file.
You can click on Back to see the points of sale that have been added or go to:

SalesPOS / WarehousesManage POS / Warehouses
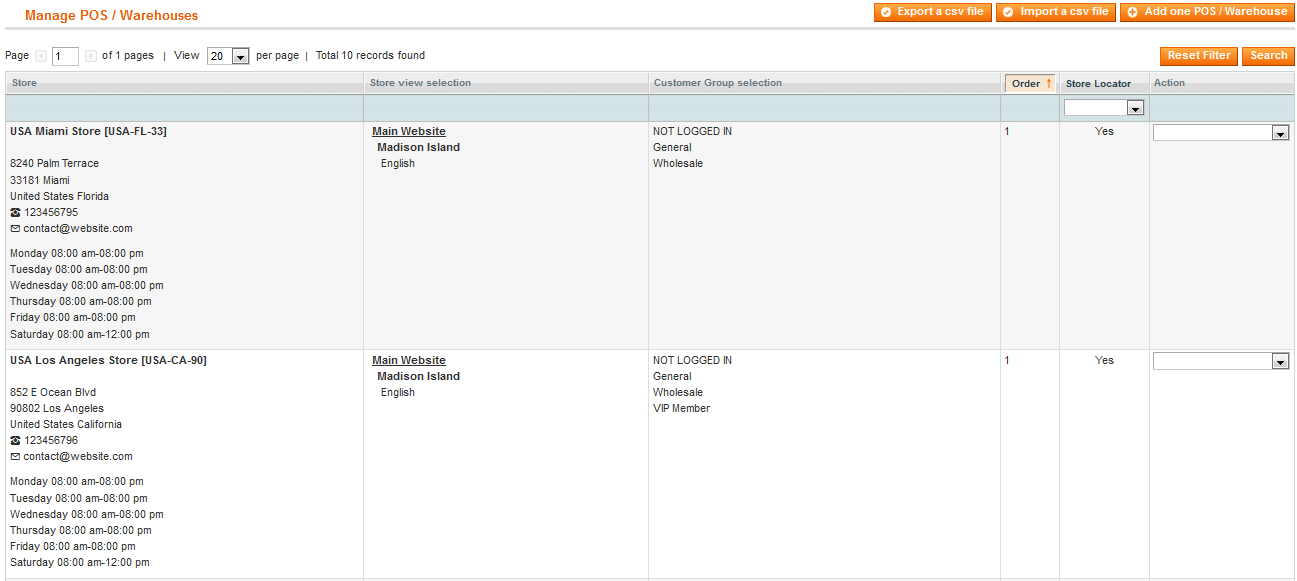
To import your POS/Warehouse, you must use a CSV file with \tab as Field separator and " as Field enclosure.

Export

To export a CSV file, it is quite easy, you need to click on Export a CSV file, and you will be able to download a CSV file that includes all information about the points of sale you've just created or imported.

In order to import a large number of points of sale more easily, you can first export a CSV file, fill it in Excel, and save it (in CSV format). Finally, import it as a CSV file.

Use the mass actions

You can delete and change the Store locator for several stores at a time. For this, select the stores you want to edit/delete and from the Actions dropdown select: 

  • Delete
  • Change Store Locator

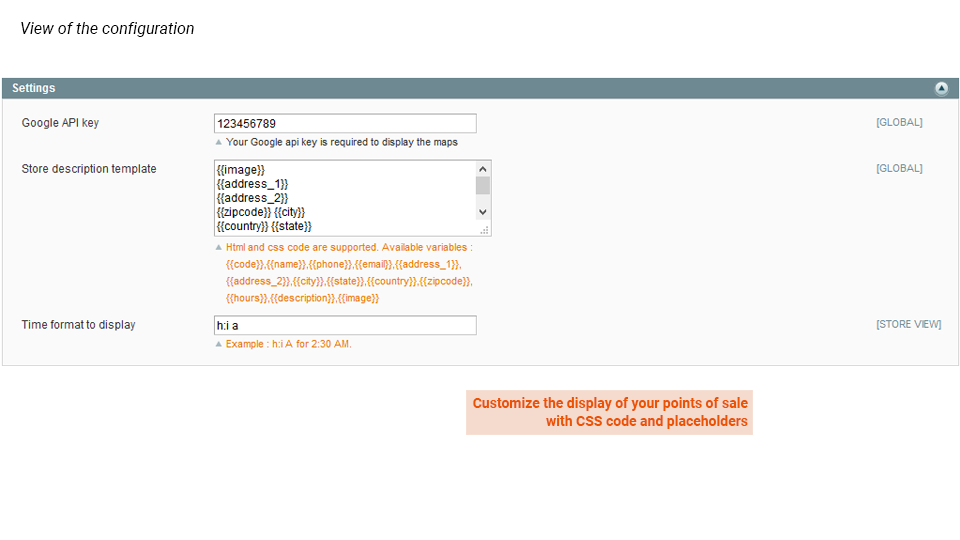
Configure the display of your points of sale

In order to edit the display of your points of sale in the Google map, go to:
SystemConfigurationWyomindPOS / Warehouses

You'll also be able to edit the store description template as well as the time format.

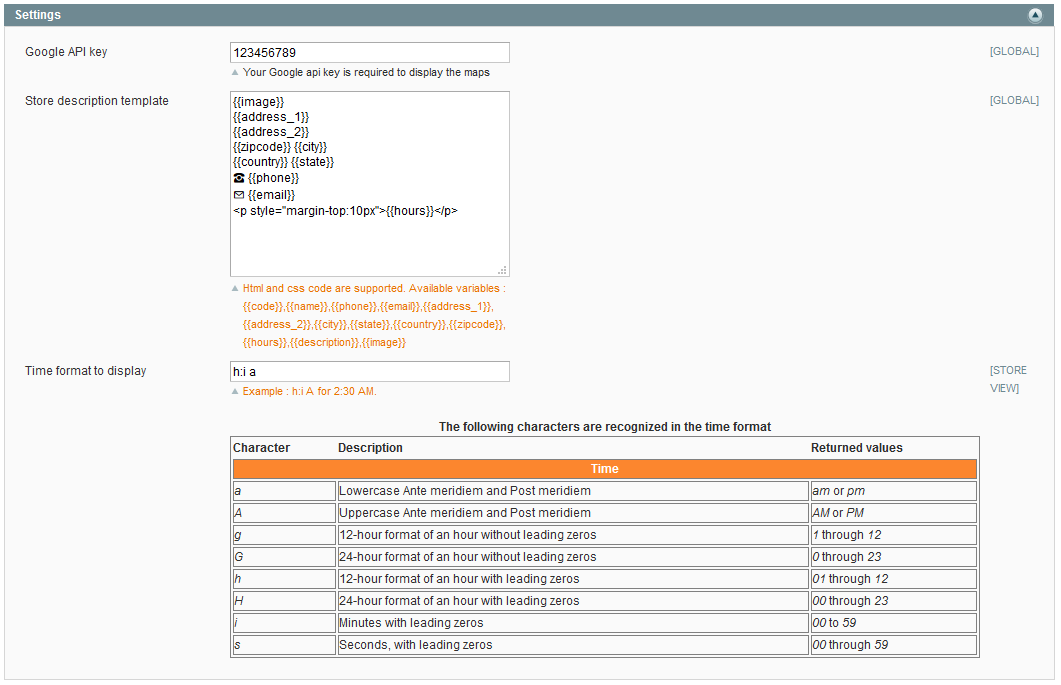
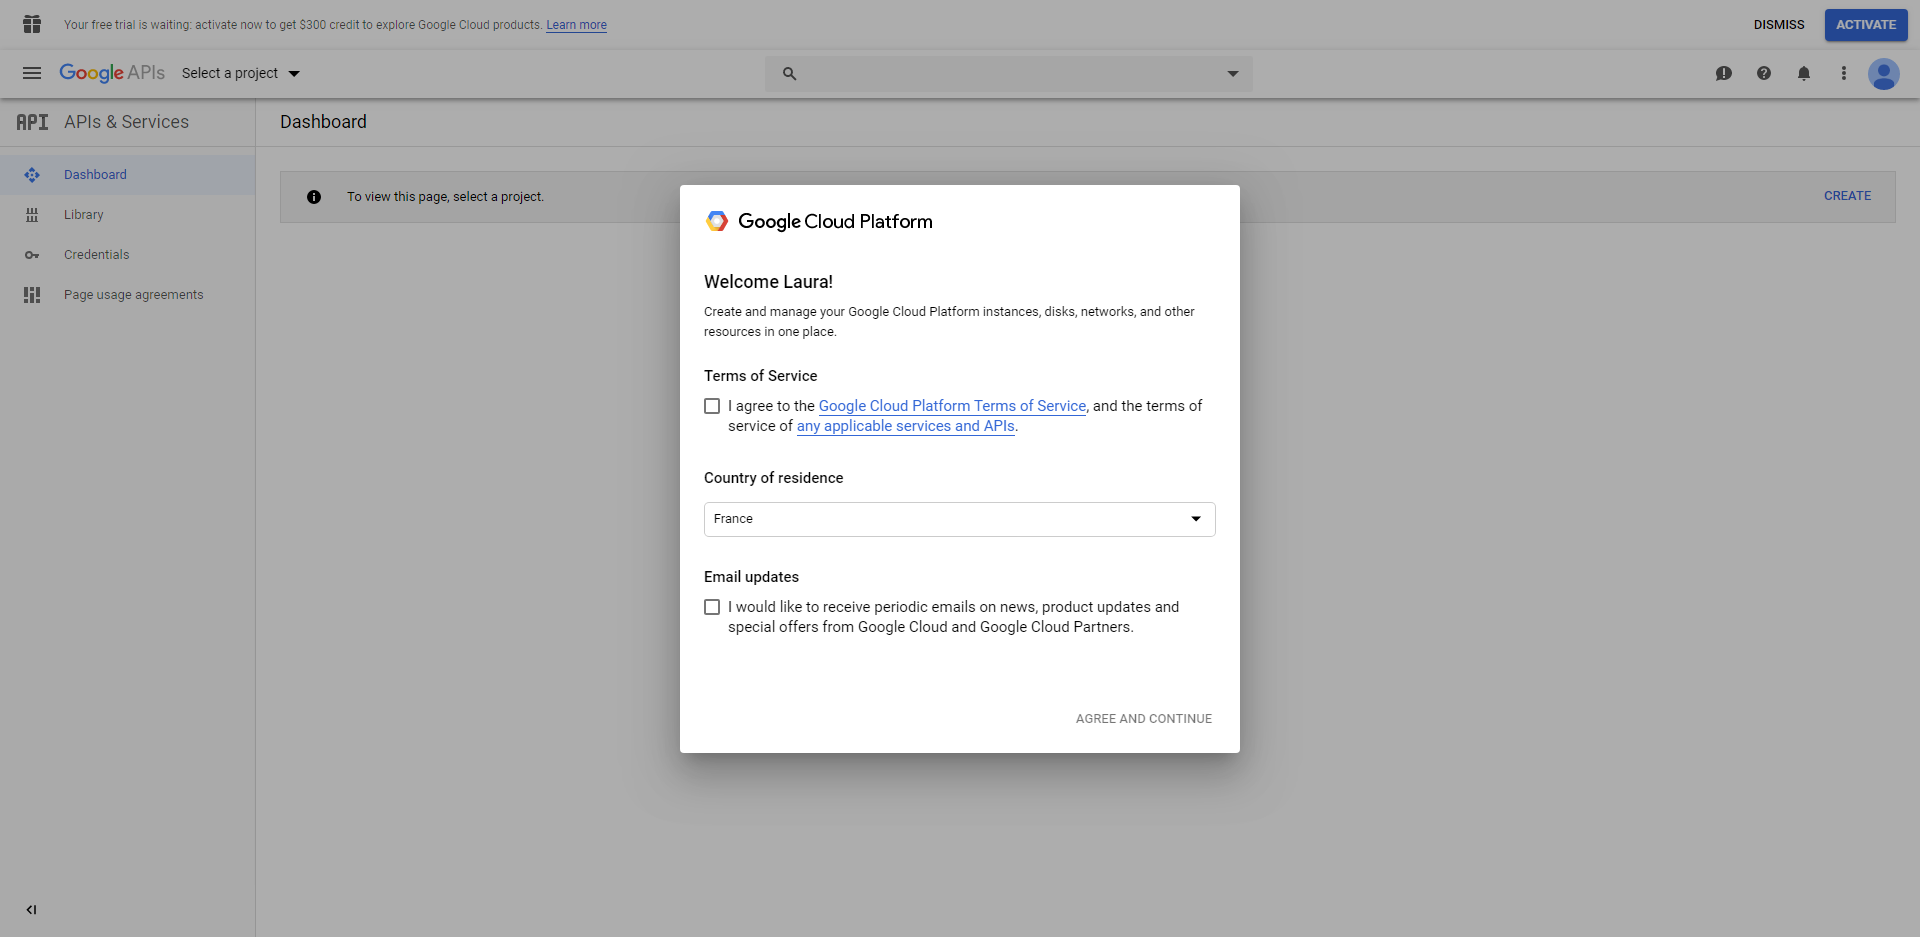
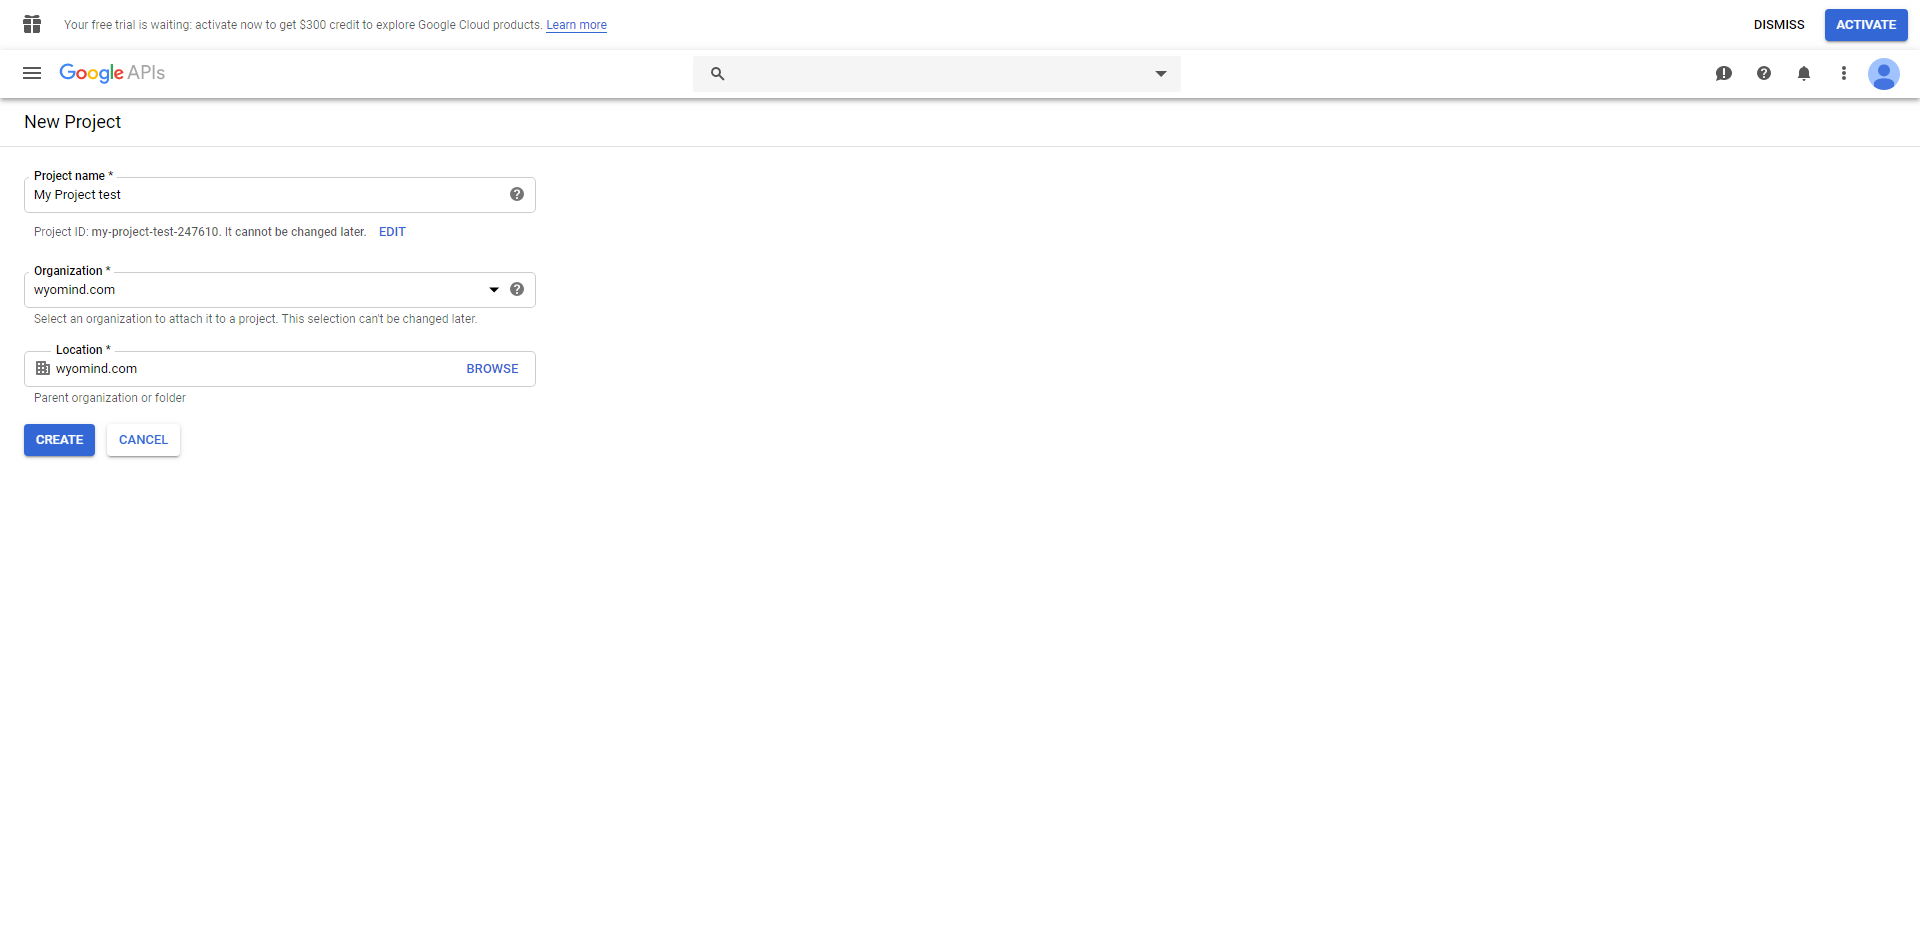
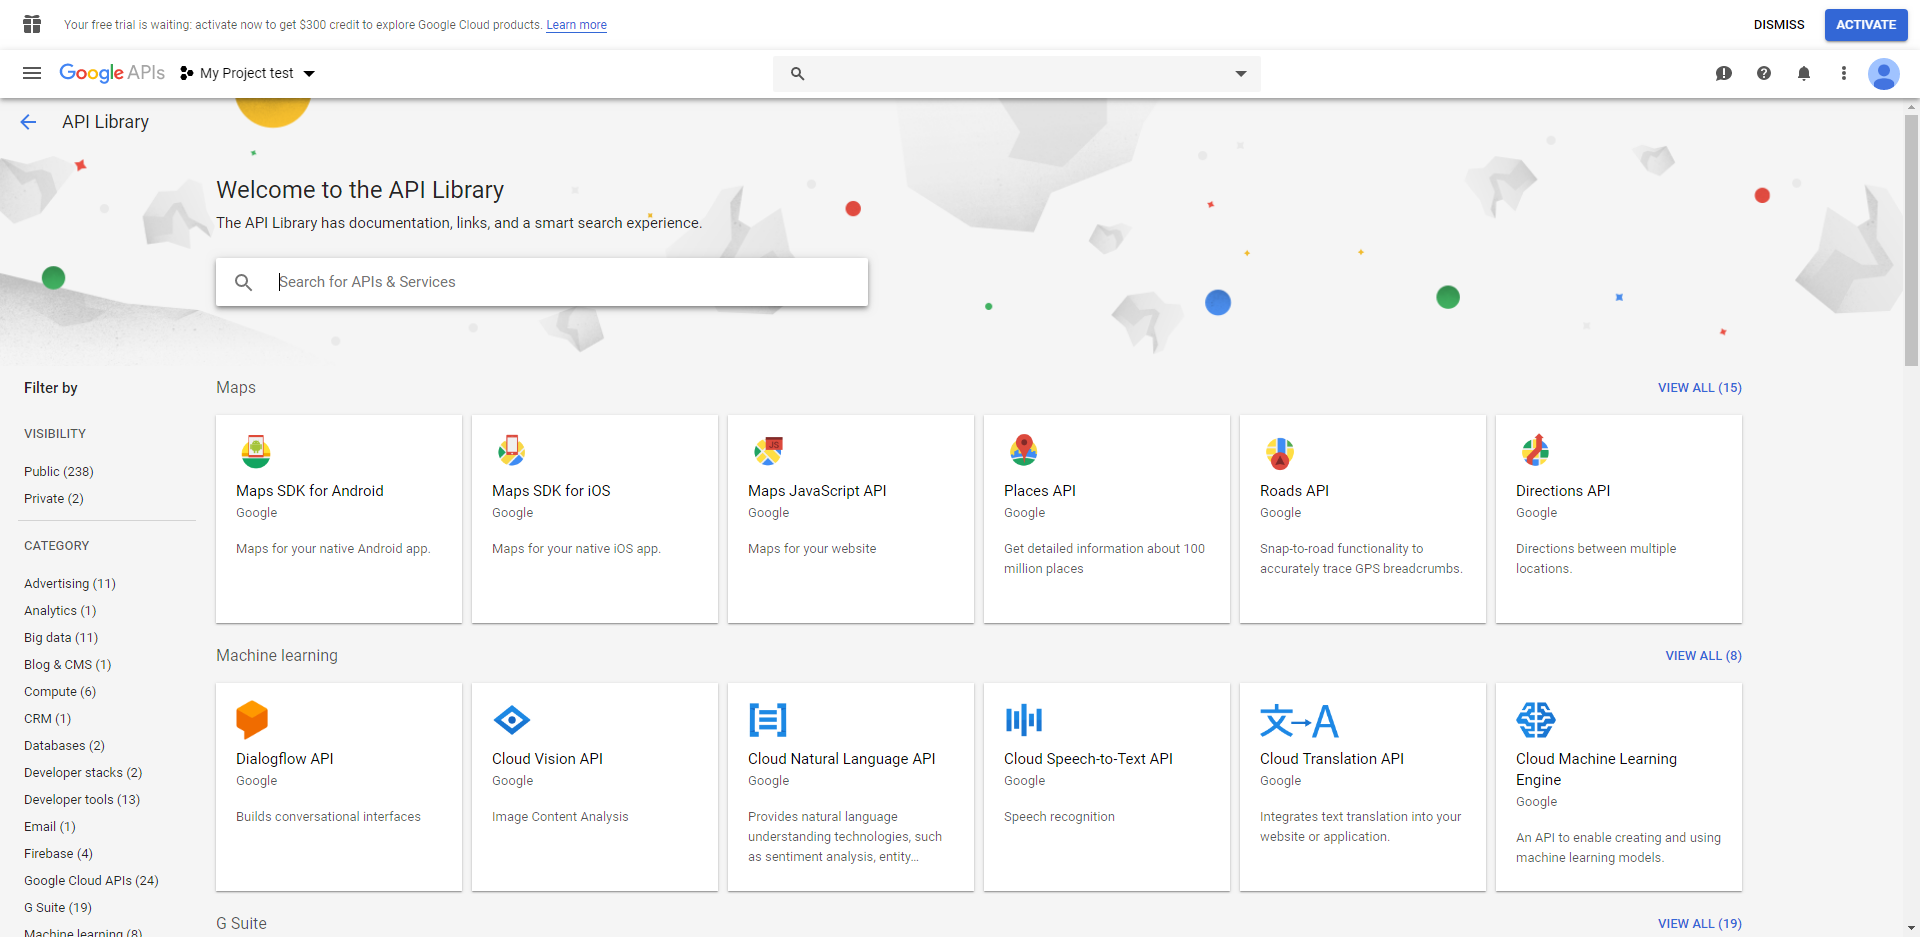
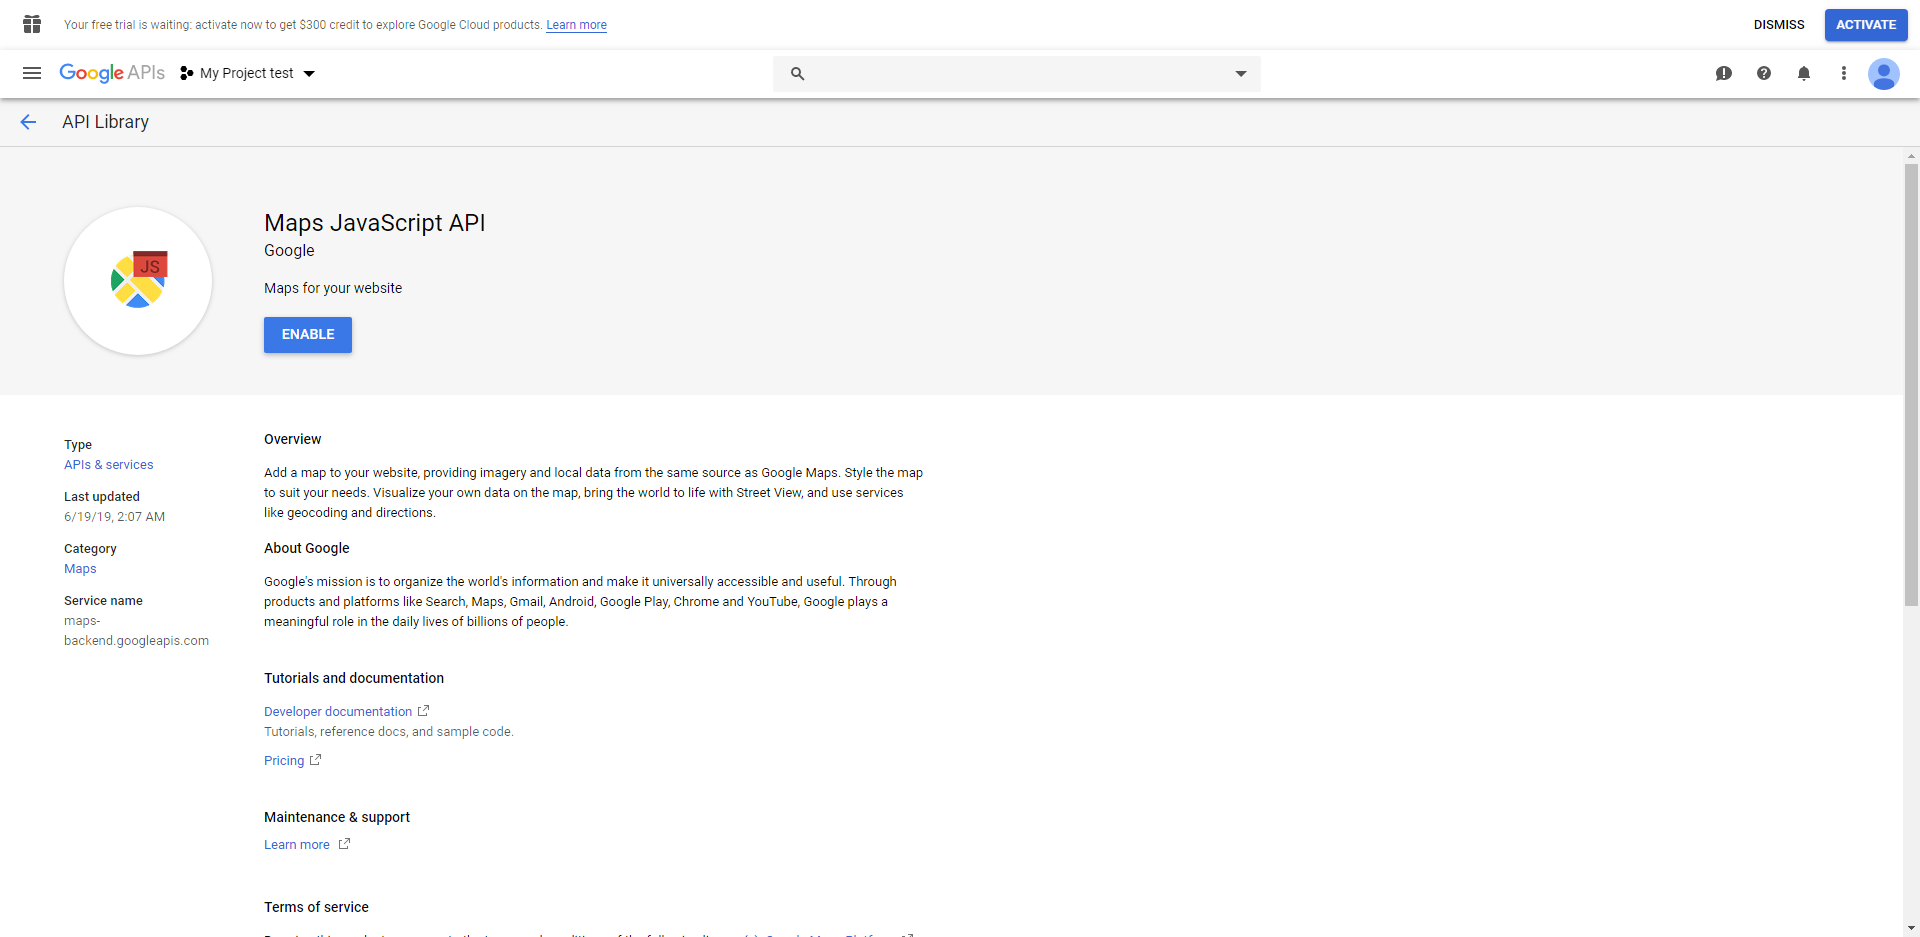
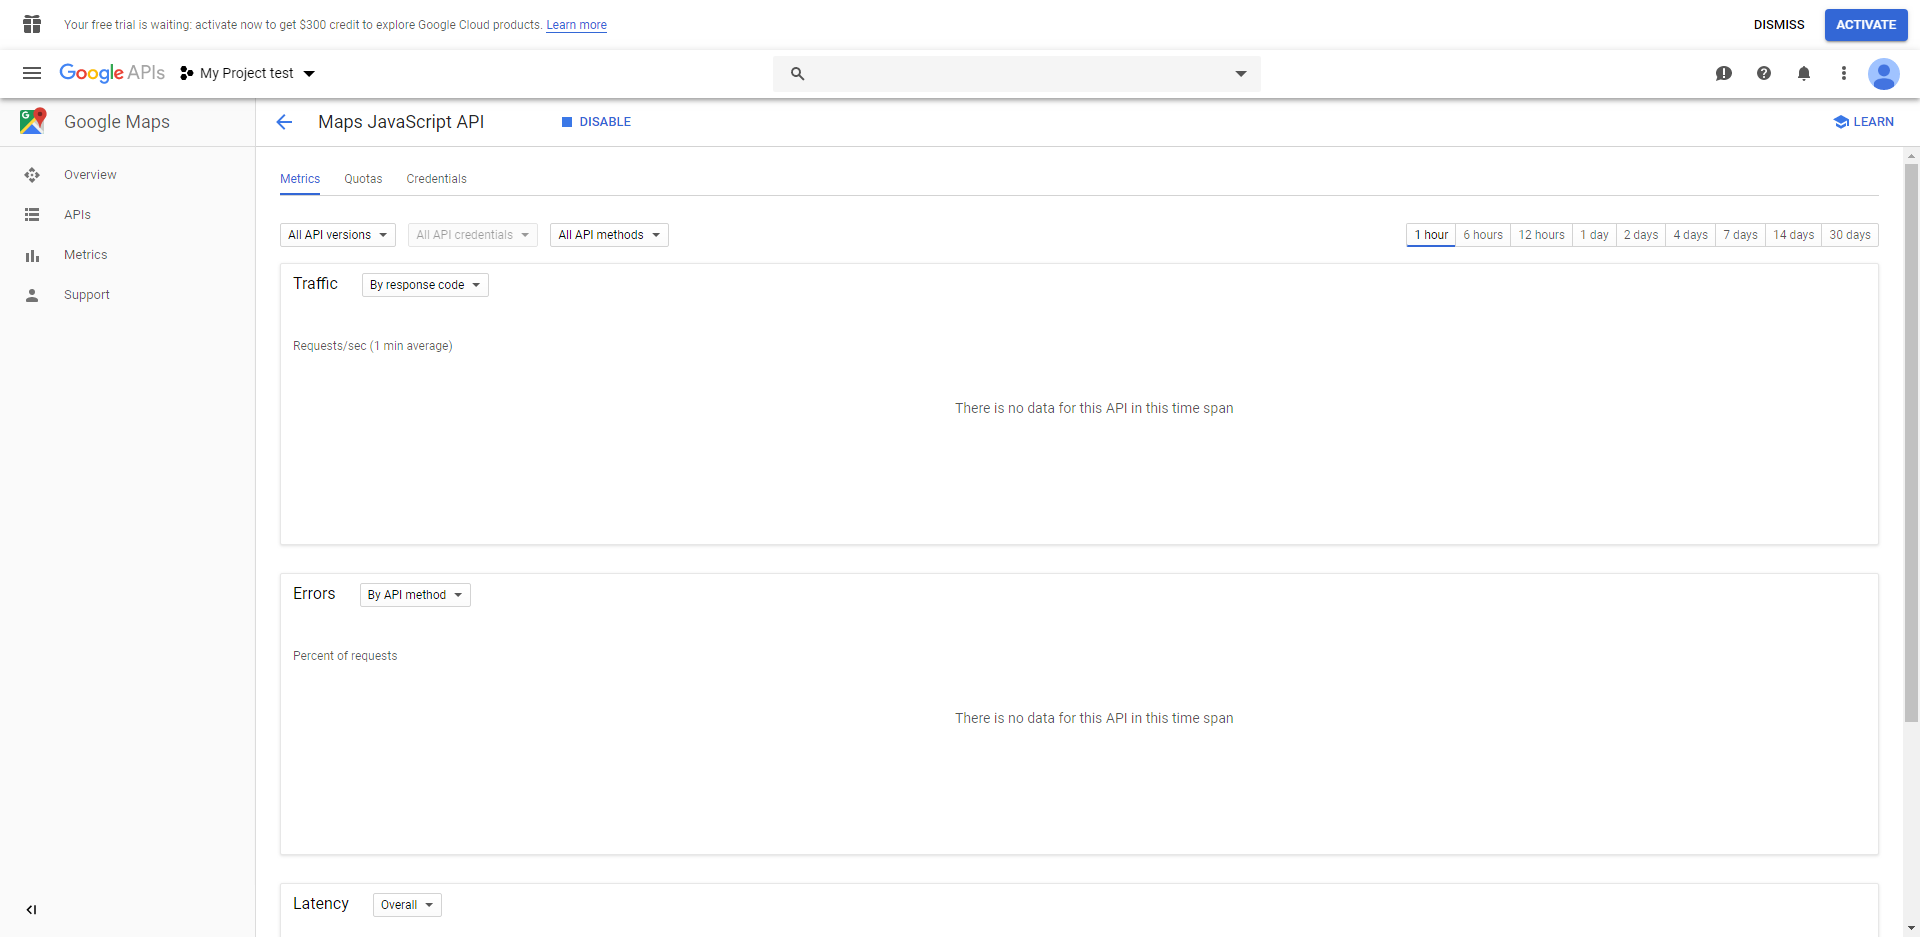
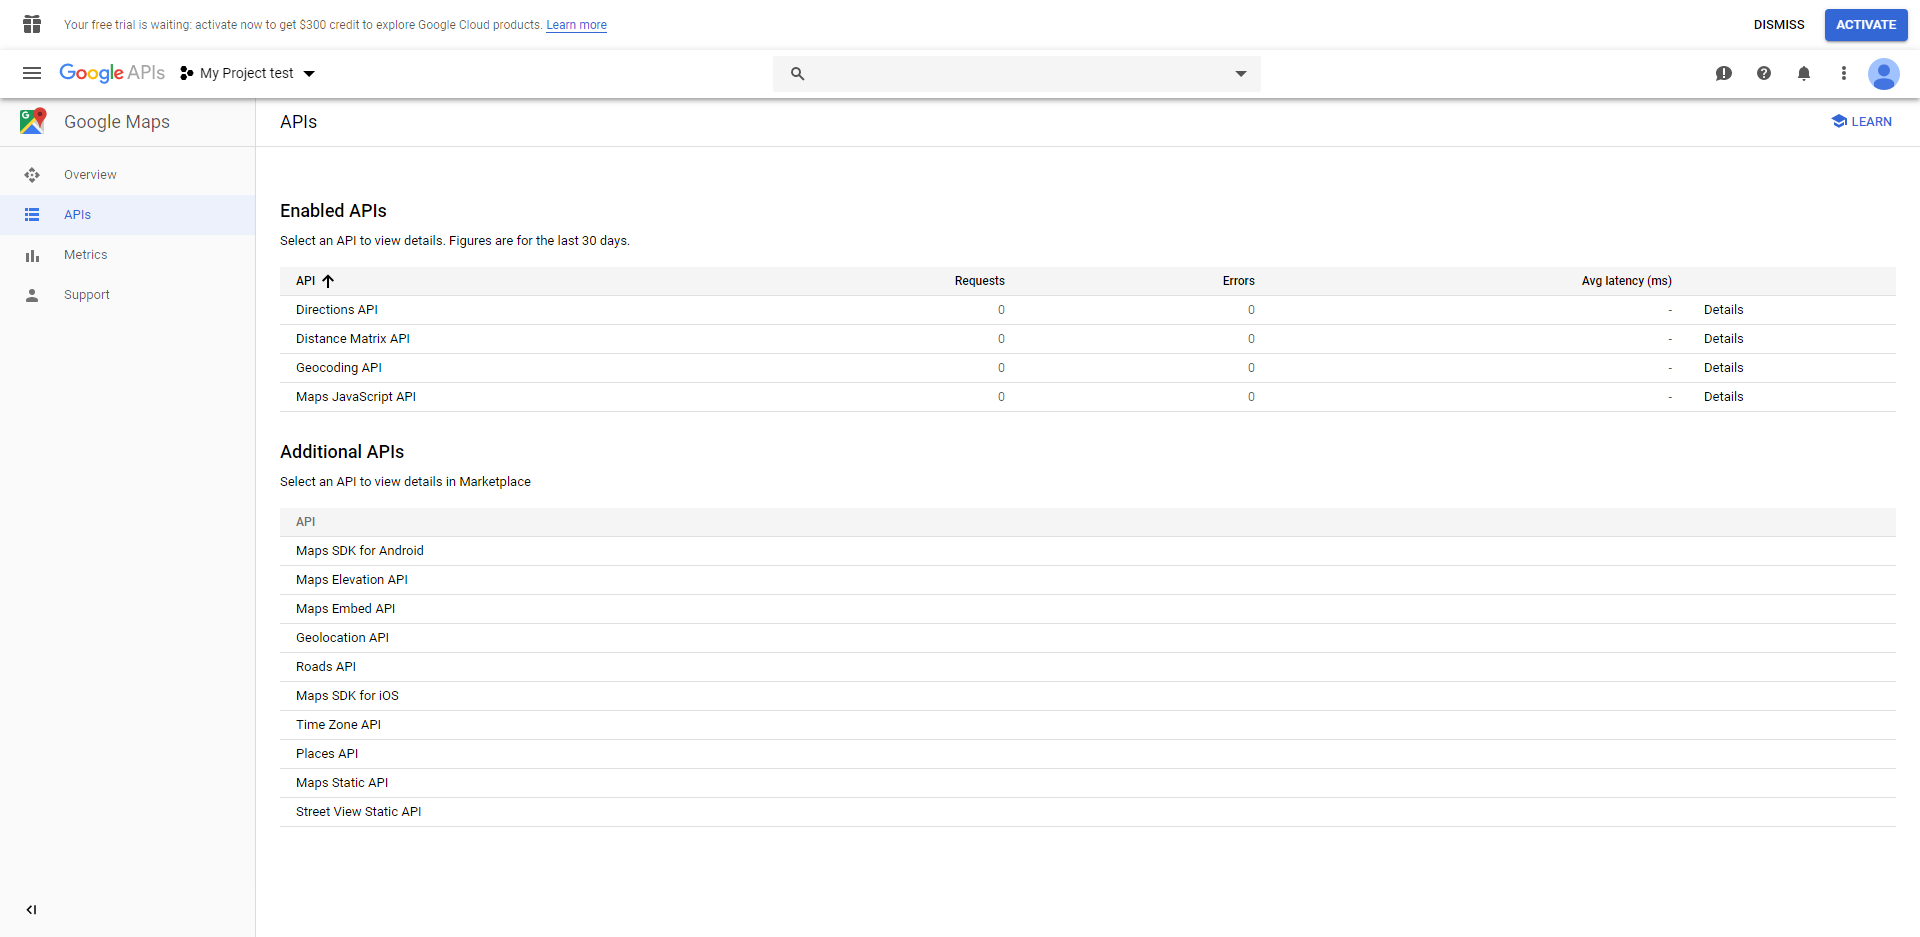
Add your Google API key

There you will be able to add your API key in the Google API key field.

Indeed, Google is now asking for an API key to display the Google map. If you don't have an API key yet, check our faq to know how to get your own key.

Note that distances and times will be displayed only if the geolocation is enabled. 

Edit the Store description template

Also, you'll be able to change the position of the information and add some PHP code.

For example, let's say you want to display the phone number in red. You'll just need to add:

<span style="color:red"> {{phone}} </span>

To see your points of sale in the map, go to http://www.yourwebsite.com/pointofsales.

Edit the Time format to display

You can also edit the time format. For example, to write 2:30 AM, use: 
h:i A

For more details, you can refer to the below table: 

STEP 2: Configure the Point of Sale map

Add the Point of Sale map to the CMS page

Add the Point of Sale map to any CMS page saved in the Magento back-office. Go to:
CMSPages

Add the following code in the Layout Update XML field in the Design tab of the CMS page concerned:

<action method="addItem">
 <type>skin_css</type>
 <name>pointofsale/css/pointofsale.css</name>
</action>
<reference name="head">
 <action method="addItem">
  <type>skin_css</type>
  <name>pointofsale/css/pointofsale.css</name>
 </action>
 <action method="addItem">
  <type>skin_js</type>
  <name>pointofsale/js/pointofsale.js</name>
 </action>
</reference>
<reference name="content">
 <block type="pointofsale/pointofsale" name="pointofsale" 
template="pointofsale/pointofsale.phtml">
 </block>
</reference>

Click on Save page.

Now your Point of Sale map must be displayed on the CMS page you have chosen. By default, it is displayed on the bottom of the page.

Note that the map is fully responsive from Point of Sale 5.3.0.

Change the position of the Point of Sale map in the CMS page

In order to display the map at the top of the page, you just need to add before='-' in the block item in the "layout update XML" field of the Design tab of the CMS page :

<action method="addItem">
 <type>skin_css</type>
 <name>pointofsale/css/pointofsale.css</name>
</action>
<reference name="head">
 <action method="addItem">
  <type>skin_css</type>
  <name>pointofsale/css/pointofsale.css</name>
 </action>
 <action method="addItem">
  <type>skin_js</type>
  <name>pointofsale/js/pointofsale.js</name>
 </action>
</reference>
<reference name="content">
 <block type="pointofsale/pointofsale" name="pointofsale" template="pointofsale/pointofsale.phtml" before='-'>
 </block>
</reference>

By default the map is displayed at the bottom of the page.

Add the Point of Sale map to any page

Add the Point of Sale map to any page by editing its own layout.xml (app/design/your_package/your_theme/layout/) and adding the XML code as above.

Customize the Point of Sale map

The template which allows the Point of Sale map to display is easy to modify with basic PHP and HTML skills.

  • The Point of Sale template is found, by default, in:
    app/design/frontend/default/default/template/ pointofsale/pointofsale.phtml
  • All the CSS styles and associated images required to display the Point of Sale map are:
    skin/frontend/default/default/pointofsale/.
  • To translate the wording on the Point of Sale map either use the on-line Magento translation tool or, copy and translate the translation files available in:
    app/locale/en_US/Wyomind_ pointofsale.csv

Show all the places where you sell on a Google map with Point of Sale!

Show all your stores on a Google map

  • Display an unlimited number of stores
  • Show directions to all your stores from any location
  • Enjoy a fully responsive interface

Completely customize the display of your stores

  • Personalize the display of your stores with CSS code
  • Add your own translation

Configure Point Of Sale very quickly

  • Easily import all your stores into Magento® thanks to a CSV file
  • Add your API key in the configuration of the extension
Freqently Asked Questions
Pre-sales informations

This extension works with Magento Community Edition and also Magento Enterprise Edition. To know if Point Of Sale is compatible with your Magento version, please check the Compatibility tab. 

There are some limitations with the Google Shopping API that allows to calculate the directions for the 24 closest locations only. Hovewer, all the points of sale will be displayed anyway.

License and domains

We offer our customers who want to migrate their Magento 1 license to a Magento 2 license, the transfer at a reduced price. 

You have the possibility to migrate your license directly from your Wyomind account in:
My accountLicenses & Downloads

Click on migrate to magento 2  in front of the extension and the domain you want to transfer. 

Confirm you want to migrate your license to a Magento 2 license by clicking on Confirm and checkout .

An invoice will be automatically added to your account from: 
My accountInvoices


The price of the transfer is equivalent to a 30% reduction compared to the price of the regular Magento 2 license.

You can proceed to the payment by clicking on PP .

Once the payment is done, you can go back to: 
My accountLicenses & Downloads

There you will be able to download and install your license for Magento 2. 

Note that your license for Magento 1 will remain active indefinitely in your Wyomind account in order for you to migrate with peace.

A license is valid for an unlimited period of time on one single Magento installation.

If you use more than one Magento installation, you will have to buy a separate license for each one.

If you run several domains on the same Magento installation, you will need only one license for all of them.

Although your license doesn’t have a limited period of validity, your support period does. By purchasing an extension, you’ll be granted a 6-month support period for free. Passed this period, you will have to renew your Support plan (see FAQ: How to extend my support period?).

You can pre-register your live domain to your license in advance.

Thanks to this option, you'll be able to get the extension ready to use on your domain before it goes live.

To pre-register your production domain: 

  1. Go to:
    mY accountLicenses & DOwnloads
  2. Click on  next to the extension you want your domain to pre-register on.
  3. Click on the link at the bottom of the page saying:
    Do you want to pre-register your domain in order to be ready to go live?
  4. Finally, enter your domain name and click on pre-register now .
Attention, this doesn't mean your license is activated. You'll still have to activate it on your new domain when the extension is installed. 

One license is valid for an unlimited period of time on one Magento installation only.  

It is possible, however, to extend or transfer your license in 2 cases: 

  • If you'd like to add your testing environments to your license.
    In this case, it is possible to extend your license to an unlimited number of domains for free.
    For example mywebsite-staging.com or mywebsite-dev.com
  • If you want to transfer your license to another live domain.
    In that case, the support period for your license must still be active.


To be able to use Point Of Sale on both your production and testing environments, follow the instructions below:

  1. Download Point Of Sale.
    (see FAQ: Extensions download)
    .
  2. Install Point Of Sale on your production environment.
    (see FAQ: Extensions installation)
  3. Activate the license.
    (see FAQ: Extensions activation).
  4. From your Magento admin panel, enter your current Activation Key in:
    syStem CONFIGuration WYOMING YOUR EXTENSION 
  5. Save your configuration.


Now that you can use Point Of Sale on your production environment, repeat the same steps as above on your testing environments.

The only difference this time: a notification will appear in your Magento admin

You will be given a choice between:

  1. buy a new license now
  2. add this domain to my license


Click on Add this domain to my license.

A transfer request will then be sent to our team within an hour.

Once the request is taken care of, you will receive a confirmation email.

If your transfer request is accepted, you can use Point Of Sale on both environments at the same time.

The order in which you activate your license on your domains does not matter.
You can start with your staging/dev/local environment or with your live domain, the process will be the same.
Modules versioning and download

In order to download Point Of Sale, log into your Wyomind account:

    1. Go to:
      my accountLicenses & downloads 
    2. Click on the  icon next to Point Of Sale.

      A new window opens.

    3. Choose the version of Point Of Sale.
      You will be able to choose the most recent version of Point Of Sale (for both Magento 1 and Magento 2).
    4. Click on  .

Your download can start.

When purchasing an extension from wyomind.com, you benefit from a lifetime upgrade. You can at any time download the latest version of the extension directly from your account. 

To upgrade Point Of Sale, follow the steps below:

  1. Go to:
    my accountLicenses & Downloads
  2. Click on  next to Point Of Sale.
  3. Choose the latest version of Point Of Sale (for Magento 1 and Magento 2).
  4. Click on download .
  5. Install the new version of Point Of Sale to update your Magento admin. 

Modules Installation/Uninstallation

To uninstall Point Of Sale, go on its zip folder and open it.

You will find a shell file (such as: yourextension-uninstall.sh) that you must execute on both your server and Magento root directory.

Once the uninstallation is over, refresh your cache and enable the compiler back again (if you use it).

Before installing Point Of Sale, you’ll have to:

  • Backup your Magento installation in:
    system  tools   backups
  • Disable the compiler in your Magento admin panel if it’s not already disabled:
    system  tools   COMPILATIONS
  • Refresh your cache in:
    systemselect cache typeactionsrefreshsubmit


Now you can install Point Of Sale:

  1. Download Point Of Sale (zip file) from:
    my account my downloads
    Refer to FAQ here: Extensions download
  2. Once Point Of Sale is downloaded, open the folder and unzip it.
  3. Copy the content of the unzip folder and paste all files and directories in your Magento root directory (the folder content can vary according to the extension but it generally includes app, lib and skin folders).

  4. Once your installation is complete, don't forget to enable the compiler back (if it was already enabled before the installation) and run compilation process.
  5. Refresh your cache, logout from your admin panel and log back in right after.

Next step is to activate your license, to do so, click here: Extension activation

Modules activation

Once Point Of Sale is installed, you have to activate the license: 

  1. Go to your Magento admin panel. A message pops up at the top of the page.

    If the message doesn't appear then you must check that:

    Wyomind's License Manager has not been removed from your installation.
    Wyomind's License Manager is enabled in: app/etc/modules/Wyomind_Licensemanager.xml
    The HTML output for Wyomind_Licensemanager and/or Adminhtml_Notification are not disabled in your system under: system   configuration  advanced advanced

  2. Copy your activation key.

    You can find your activation key in 2 different places:
    - In the confirmation email that you received after purchasing Point Of Sale
    - In your Wyomind account:MY ACcount My downloads, select Point Of Sale and click on  . A new page opens where you'll find your activation key (see below).
  3. In your Magento admin go to:
    SysteMConfigurationWyomindYour extension

    Paste the activation key in the Activation Key field and choose between the automatic (yes) or the manual (no) activation method:
    - By choosing Yes, the connection to Wyomind license server will be automatic. 
    - By choosing No, you will have to log on to Wyomind license server yourself.


  4. Save the configuration.
  5. Clear your caches. 
  6. A message appears at the top of your admin panel: Activate it now!  Click on that link.

  7. Copy and paste the license code in the License code field from your admin or simply click on Activate now! 
  8. Finally, refresh your cache, log out and log back in straight after, to complete the installation.

To activate the license of an extension that includes other modules, you’ll have to repeat the steps described above for each extension, using the corresponding activation keys (each module has its own activation key).

Modules use

In order to use Point Of Sale, you need to have a Google API key filled in the extension's settings. 

Google APIs are now paying services. Find the pricing for Maps, Routes and Places here.

To create an API key:

  1. Log into https://console.developers.google.com
    There, you'll be asked to agree the Terms of Service.
    You can then click on Agree and Continue 

  2. You will first need to create a new project with a name, an organization and a location.
  3. To that project you will have to link some API's by clicking on Enable APIs and services .
  4. From the library you will be able to add the services you want. 
  5. In order to use Point Of Sale, you will need to enable the below APIs by clicking on Enable 

    - Maps JavaScript API

    - Geocoding API

    - Distance Matrix API

    - Directions API

  6. When enabled, you'll be able to see the traffic, errors and latency for each API. 
  7. You should see all the enabled APIs from the APIs section. 
  8. FromAPIs & ServicesCredentials, you will be able to create credentials. 
    Click on Create credentials  and then choose API key.
  9. You'll also have the possibility to restrict your API key by websites, applications, IP addresses...
  10. Once restricted or not, the API key will be listed among the credentials. 
  11. The final step for this to work is to link your account to a billing account from the Billing section. 
Find more info on how to get an API key

For example, you want to translate some expressions for the French store view.

Go to your Magento root directory. Copy the Wyomind_pointofsale.csv file under app/locale/en_US to app/locale/fr_FR (or to the language you want).

In that file, you can add some entries and translations. For example:

  • "First name","Prénom"
  • "Last name","Nom"
  • ....

Here is below an example of a translation csv file.

You could also use the "Translate Inline" tool available in the magento system in:
SystemConfigurationAdvancedDeveloperTranslate Inline

With the Point Of Sale extension, you have the choice between two statuses while creating your stores:

  • warehouse
  • point of sale

In order to configure your Magento shop, you need to understand what's the difference between both statuses.

A warehouse won't be visible at all by the customers from the front-office.

A point of sale will be visible on the Google map in the front-office. In the case where you're using Advanced Inventory , customers will be able to check if products are in stock in these points of sale directly from the front-office, and if you're using Pickup@Store, they will have the possibility to come and pickup their orders in these points of sale.

If you're using another template package than "default" (eg: "rwd" for Magento 1.9), simply copy the files and folders you'll find in:
app/design/frontend/default/default/

into: 
app/design/frontend/your_package/default/

The template which allows the Point of Sale map to display is easy to modify with basic PHP and HTML skills.

The Point of Sale template is found, by default, in:
app/design/frontend/default/default/template/pointofsale/pointofsale.phtml

All the CSS styles and associated images required to display the Point of Sale map are in:
skin/frontend/default/default/
pointofsale/

To translate the wording on the Point of Sale map either use the on-line Magento translation tool or, copy and translate the translation files available in:
app/locale/en_US/Wyomind_
pointofsale.csv

You need to go to:
SystemConfigurationWyomindPoint of Sale

There you will be able to define your own time format with the help of the table displayed below.

At line 39 of the below file:
app/design/frontend/default/default/template/pointofsale/pointofsale.pthml

Change the values for height and weight into:

<?php echo Mage::helper('pointofsale')->getImage($place->getImage(), 150, 150, true, "float:right"); ?><br>


You can easily replace km with miles by editing the following file:
\skin\frontend\base\default\pointofsale\js\pointofsale.js

In line 178, replace:
unitSystem: google.maps.UnitSystem.METRIC

with:
unitSystem: google.maps.UnitSystem.IMPERIAL

Troubleshooting

If your site crashes and gives this error message after uploading all files to the correct folders:

Fatal error: Class 'Wyomind_Notificationmanager_Model_Resource_Setup' not found in includes/src/Mage_Core_Model_Resource_Setup.php on line 234

It probably comes from installing an extension while the compiler is still enabled.

Important note:

  • If the compilation is enabled on your website, disable it first before installing any extension from: 
    SystemToolsCompilation
    After installation re-run the compilation process and re-enable the compiler.
  • Before installing any extension, it's advisable to backup your Magento installation.

Here is how to disable the Magento compiler:

  1. Edit the following file: includes/config.php and add a # before the 2 following lines:
    define('COMPILER_INCLUDE_PATH', dirname(__FILE__).DIRECTORY_SEPARATOR.'src');define('COMPILER_COLLECT_PATH', dirname(__FILE__).DIRECTORY_SEPARATOR.'stat');​

    to get:

    #define('COMPILER_INCLUDE_PATH', dirname(__FILE__).DIRECTORY_SEPARATOR.'src');#define('COMPILER_COLLECT_PATH', dirname(__FILE__).DIRECTORY_SEPARATOR.'stat');
  2. Then go back to your website admin and re-run the compilation process.

If you're getting a white page using the extension, you should enable the error reporting in order to display the error. You can do that from index.php.

Most of the time log-out/log-in may solve this issue.

This issue may be due to a problem during the installation process.

You can fix it by following these steps:

  • Access your database via your control panel (Phpmyadmin for example).
  • Delete the entry pointofsale_setup from the core_resource table.
    Be careful, that entry depends on your extension. For example, if you have the extension called Simple Google Shopping, you should delete simplegoogleshopping_setup.
  • Logout from your Magento admin.
  • Log into your Magento admin.

As of June 2016 some changes have been made to the Google Maps APIs Standard Plan. Among these changes, Google no longer support requests that don't include an API key as they allow Google to contact developers when required and help them identify misbehaving implementations.

If you're getting an error "NoApiKeys" in your console, it means the script element that loads the API has no API key. You need to make sure you include a valid API key as a key parameter. You can generate a new API key on the Google Developers Console (see how to get an API key).

Once you have an API key, you can fill in the Google API key field with it, in:
SystemConfigurationWyomindPOS/Warehouse

This feature is available from Pickup@Store.2.3.0 and Point Of Sale 5.5.0.

Magento 1 / Openmage Compatibility

Magento 1 / Openmage®

  • 1.1.3
  • 1.1.4
  • 1.1.5
  • 1.1.6
  • 1.1.7
  • 1.1.8
  • 1.2.0
  • 1.2.1
  • 1.3.0
  • 1.3.1
  • 1.3.2
  • 1.3.3
  • 1.4.0
  • 1.4.1
  • 1.4.2
  • 1.5.0
  • 1.5.1
  • 1.6.0
  • 1.6.1
  • 1.6.2
  • 1.7.0
  • 1.8.0
  • 1.8.1
  • 1.9.0
  • 1.9.1
  • 1.9.2
  • 1.9.3
  • 1.9.4
  • 1.10.0
  • 1.10.1
  • 1.11.0
  • 1.11.1
  • 1.11.2
  • 1.12.0
  • 1.13.0
  • 1.13.1
  • 1.14.0
  • 1.14.1
  • 1.14.2
  • 1.14.3
  • 1.14.4

Magento 1 / Openmage® Enterprise (deprecated)

  • 1.1.3
  • 1.1.4
  • 1.1.5
  • 1.1.6
  • 1.1.7
  • 1.1.8
  • 1.2.0
  • 1.2.1
  • 1.3.0
  • 1.3.1
  • 1.3.2
  • 1.3.3
  • 1.4.0
  • 1.4.1
  • 1.4.2
  • 1.5.0
  • 1.5.1
  • 1.6.0
  • 1.6.1
  • 1.6.2
  • 1.7.0
  • 1.8.0
  • 1.8.1
  • 1.9.0
  • 1.9.1
  • 1.9.2
  • 1.9.3
  • 1.9.4
  • 1.10.0
  • 1.10.1
  • 1.11.0
  • 1.11.1
  • 1.11.2
  • 1.12.0
  • 1.13.0
  • 1.13.1
  • 1.14.0
  • 1.14.1
  • 1.14.2
  • 1.14.3
  • 1.14.4
User's reviews
Log into your account to leave your review and get up to 3 months of free Support & Upgrade.

1st June 2021

Cool and easy to use

This Magento extension is really functional easy to use and good looking. You can add and customize easily your point of sales and geolocalize they on a map. You can also add custom attribute to the point of sales in order to enrich the descriptions.

10th January 2019

Good extension - but UI to be more user friendly

Easy to install and setup, fast and efficient support. The process was straightforward: install the extension, configure it, capture all our POSs info and then launch it. We use point of sale to manage and show our physical location of shops and with the help of it we could be able to receive a continuous stream of customers from our website to our stores. Considering feature point of view, it would have been better if nearest store could have been fetched based on the current location automatically in the POS dropdown instead of Google Map in checkout. This extension is great to use and support service is EXCELLENT. They answered immediately all our doubts,

30th August 2018

user friendly extension for our shops

We use point of sale to manage and show our physical location of shops and with the help of it we could be able to receive a continuous stream of customers from our website to our stores

25th May 2018

Indispensable et parfaite pour localiser nos boutiques

Installation facile et rapide. Révision accessible des feuilles de styles pour adapter à notre charte. Le support est rapide et efficace. Nous avons demandé la prise en charge des accents utf8 et avons reçu la mise à jour le jour même. bravo et merci !

19th October 2017

Straightforward extension - does the job well

A nice simple extension to add the stockists of our jewellery to our brand's website. Customers can go to the stockist finder page and then extension will find their location from their device and then show them the nearest outlet to buy our products. Easy to configure and it is possible to enter plenty of details about each individual stockist such as opening hours, shop logo, email address etc.

21st August 2017

The POS more easy we've tried

The process was straightforward: install the extension, configure it, capture all our POSs info and then launch it. The only changes we need to make were to adapt the PHTML template files and embed them in a popup, it couldn't be easier. :)

17th August 2017

Good extension - Several possible improvements

Nice design, responsive, easy to install and setup and like always, fast and efficient support. You can customize fields with CSS I would have liked to find functions like: - coordinates engine search (like in Google Maps for Wordpress) - easier set up of business hours of points of sale (even if CSV import is available). Manual entry is not possible. You must enter time with a [select] field and check a box to enable the display of the time for the selected day. - 1 or 2 more fields for additional information about the point of sale. To bad! the [description] field doesn't accept CSS For all this, I would have accepted to pay more.

20th April 2015

Good easy-to-use extension

Nice extension that does exactly what it says it does. Straightforward to understand and use. Support from developer is fast and helpful.

tomc76

12th December 2012

AAA+ company

AAA+ company. I was not able to put it in my webshop myself. Very helpfull company!!! They also helped me with the Simple Google Shopping, what you can not miss if you having a Magento shop.

ck123

9th December 2011

This was the perfect solution for our site

This was the perfect solution for our site: an extension to show the google map of each store, and with a plus: the support service is EXCELLENT. They answered immediately all our doubts, and solved some issues of installation and performance due to our particular configuration, another plugin that used the same html ID for the google map area, and did it directly in our site, via FTP and database access. Great extension and great people to work with!! We are very pleased with their work.

susawx
Changelog

Initial release for the master version

Initial release for the legacy version

Enhancements

  • Days off added
  • Mass actions (delete and stores visibility)
  • Update of the images import
  • Enhancement of the POS importation

Bug Fix

  • Code refactoring
  • Fix on grids

Enhancement

  • Ability to define if the point of sale is visible for collect in store AND/OR as shipping origin (in association with PIckup@Store)
Patch v5.6.2.3

  • Minor fix

Patch v5.6.2.2

  • Fix for the display of  "Available in check" in the grid

Patch v5.6.2.1

  • Minor js fix

Fix

  • Store display on Google map fixed when Advanced Inventory is activated 
Patch v5.6.1.1

  • Minor fix

Enhancement

  • Opening hours allows to insert a lunch time
Patch v5.6.0.1

  • Minor fix

New translation

  • Danish translation
Patch v5.5.1.1

  • Minor fix

Enhancements:

  • Google API key in the configuration
Patch v5.5.0.1

  • Minor fix

Enhancements:

  • Improved management of the points of sale display

Enhancements:

  • Responsive frontend design for Magento 1

Enhancements:

  • New management of licenses

Patch:

  • Compatibility fix for Magento Security Patch SUPEE 6788

Enhancements:

  • Improved database management

Patch:

  • Compatibility fix for Magento Security Patch SUPEE-6285

Enhancements:

  • Translation updates

Enhancements:

  • CSV import/export

Bug Fix:

  • Fix on the Gmap

New features:

  • Complete reworking

New features:

  • Sort order to the different local stores

Bug Fix:

  • Fix on localstoresplace.php

New features:

  • Customer groups management

New features:

  • Name change to Nearby Stores
  • License Manager v2.0.0

Enhancements:

  • Modifications to allow compilation

Enhancements:

  • Optional date field

Bug Fix:

  • Fix on the admin menu display
  • Fix when no country associated to the store

Enhancements:

  • Optimized fields management

Bug Fix:

  • Installation fix
  • First stable release
  • Beta version 2
  • Beta version 1
Demo store
Front-end
Back-end
Login
PointOfSale
Password
PointOfSale123

Stay tuned and get a coupon code of 10% off any purchase while creating your account!

Subscribe now for updates, promotions and products launch twice a month at most.

Please indicate a valid email