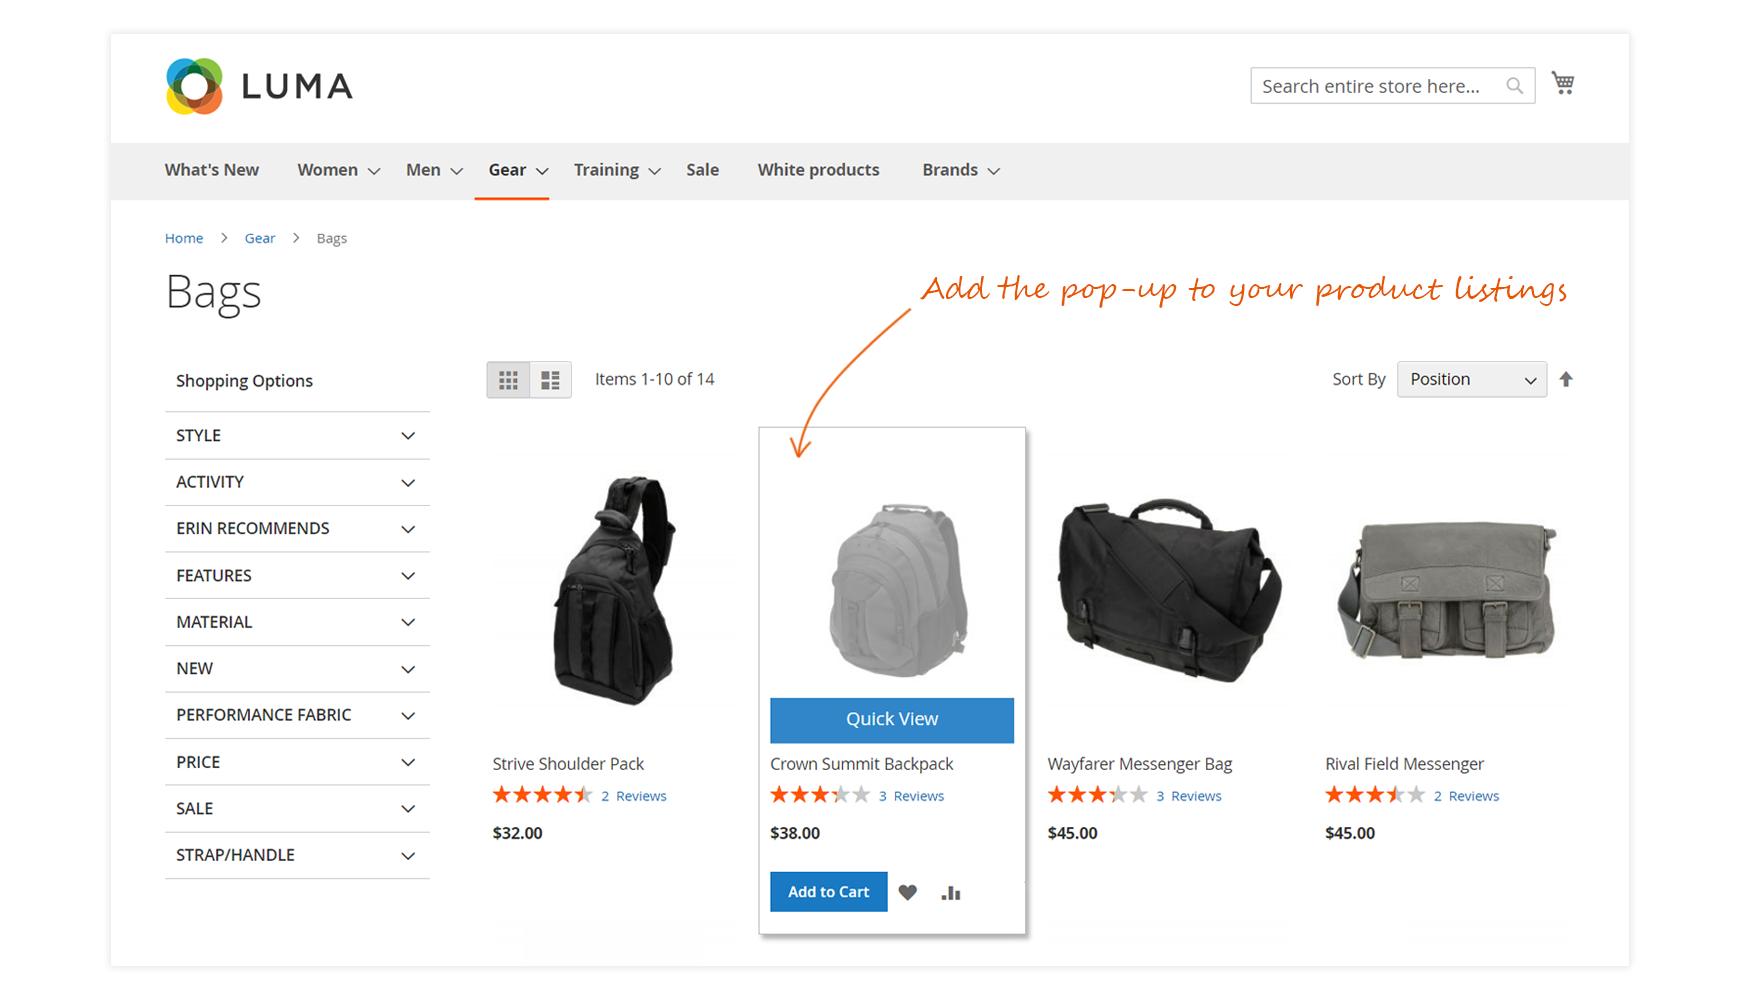
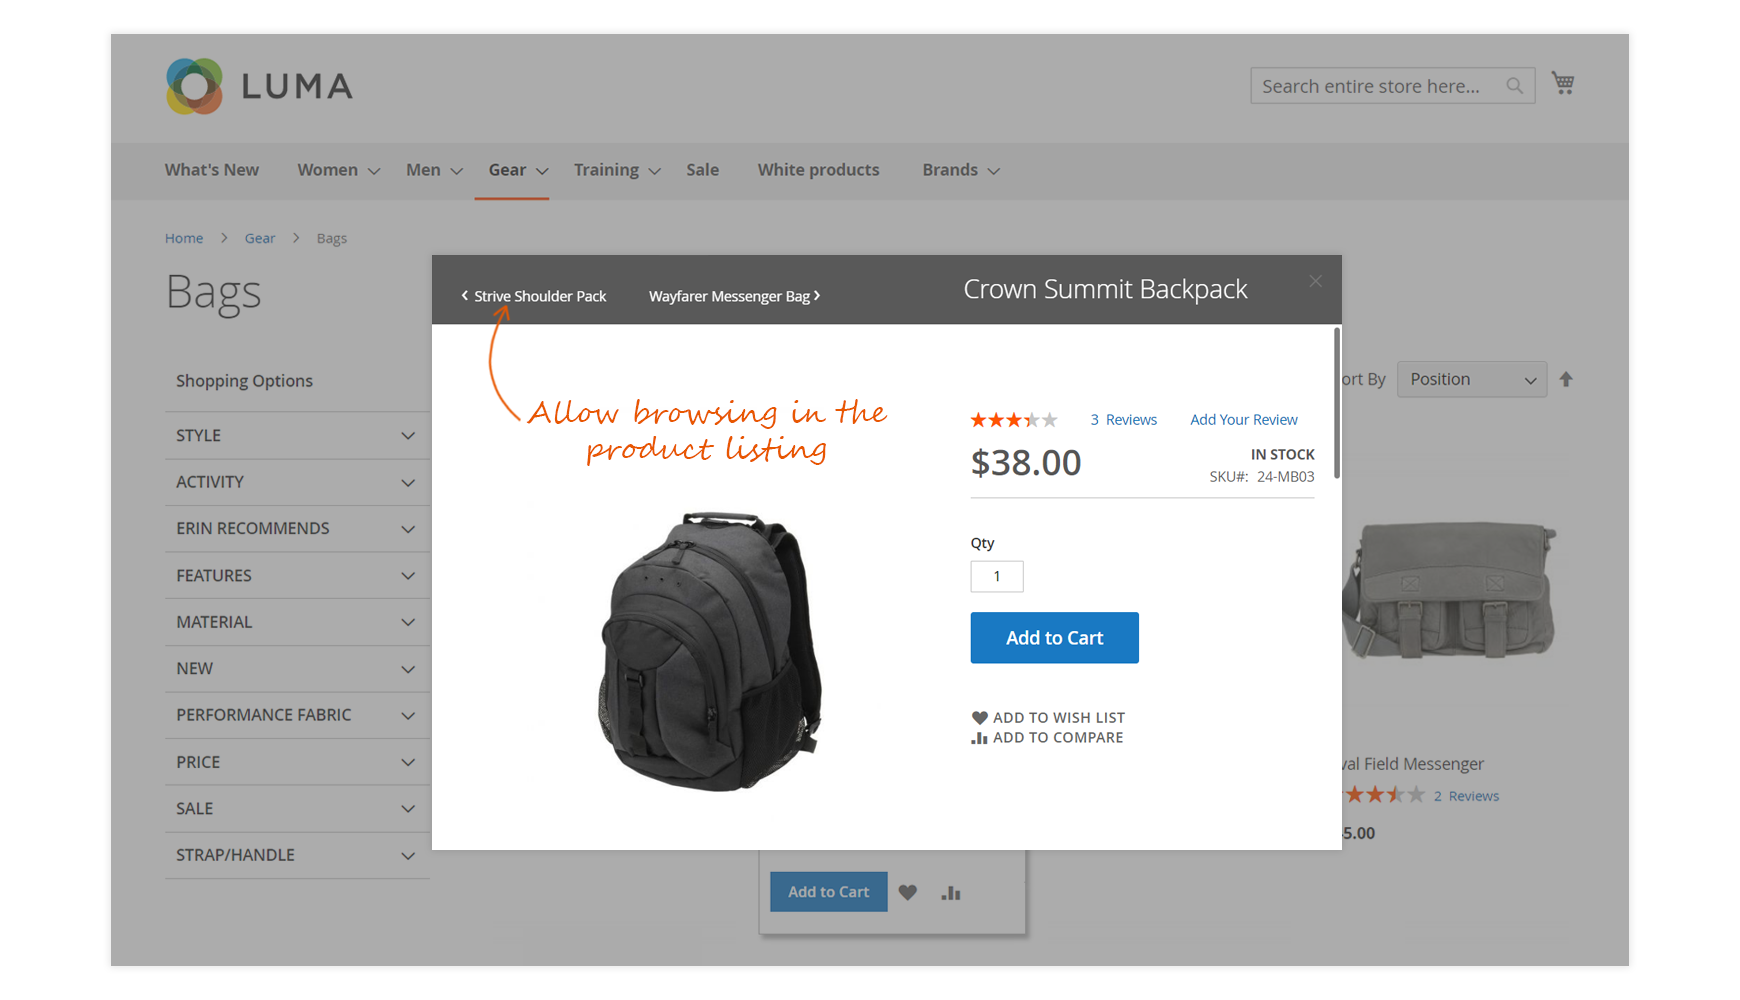
The Quick View extension allows you to add a pop-up window on your products listing pages (home page, CMS, and categories pages, checkout...) in order to make your customers save time.
You can define the display of the Quick View button as you want.
The pop-up is fully responsive and can be totally customized in order for you to meet your own store design.
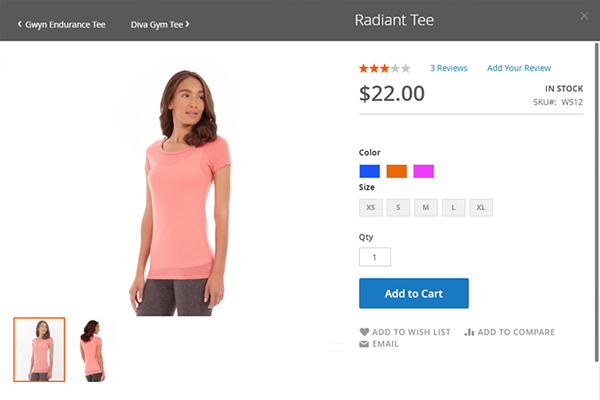
Here is how the Quick View extension can show on a smartphone view.
How to use the Quick View extension for Magento 2?
To start using the Quick View extension, you can go in: StoresSettingsConfiguration Wyomind Quick View
Enable the Quick View option
Start with enabling the extension from the Settings section.
You can enable/disable the Quick View extension easily by switching that option.
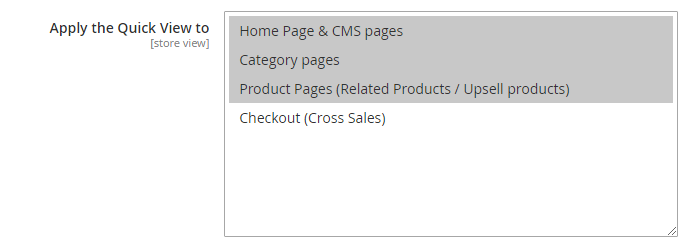
Choose the pages where to apply the Quick View
You have the possibility to apply the Quick View option on different pages:
A license is valid for an unlimited period of time on one single installation
If you're using more than one installation, you will have to buy a separate license for each instance.
if you're running several domains on a same installation, you will need only one license for all of them.
Although your license doesn’t have a limited period of validity, your Support & Upgrade period does. By purchasing a module, you’ll be granted a 12-month support period for free. Passed this period, you will have to pay for a new one (see FAQ: Extend your Support period)
One license is valid for an unlimited period of time on oneinstallation only. However, it is possible to extend or transfer your license in 2 cases:
If you would like to add your testing environments to your license. In that case, it is possible to extend your license to an unlimited number of domains for free. For mywebsite-staging.com or mywebsite-dev.com
If you want to transfer your license to another live domain. In that case, the Support & Upgrade period for your license must still be active.
To be able to use Quick View on both your production and testing environments, follow the instructions below:
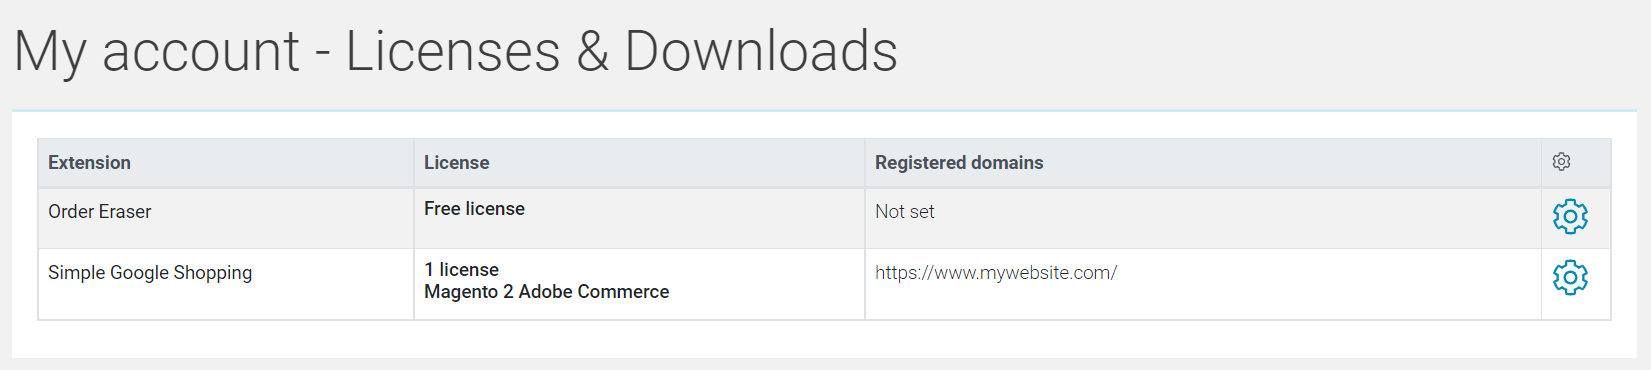
In order to download Quick View, log into your Wyomind account:
Go to: my accountLicenses & downloads
Click on the settings icon next to Quick View.
A new window opens.
Click on the download icon.
Only the latest extension version released within your Support & Upgrade period is available. In order to get the very latest extension version make sure your Support & Upgrade plan is up to date.
When purchasing a module from wyomind.com, you benefit from 12 months of upgrade. Within this period you can at any time download the latest version of the module directly from your account.
Once Quick View is downloaded, open the folder and unzip it.
Copy the content of the unzipped folder and paste all files and directories in your Magento 2 root directory.
In your Command Line Interface, execute:
bin/magento setup:upgrade
If you are using a production mode, execute also:
bin/magento setup:static-content:deploy
bin/magento setup:di:compile
When installing the extension on Magento >= 2.1.7, you need to delete the following file: Wyomind/QuickView/Plugin/Catalog/Block/Product/Image/Block/Builder.php
Then go in your Command Line Interface and execute:
bin/magento setup:upgrade
If you are using a production mode, also execute:
bin/magento setup:static-content:deploy
bin/magento setup:di:compile
When installing the extension on Magento >= 2.1.7, you need to delete the following file: Wyomind/QuickView/Plugin/Catalog/Block/Product/Image/Block/Builder.php
Once Quick View is installed, you have to activate the license. For previous versions, you can activate the license from your back-office:
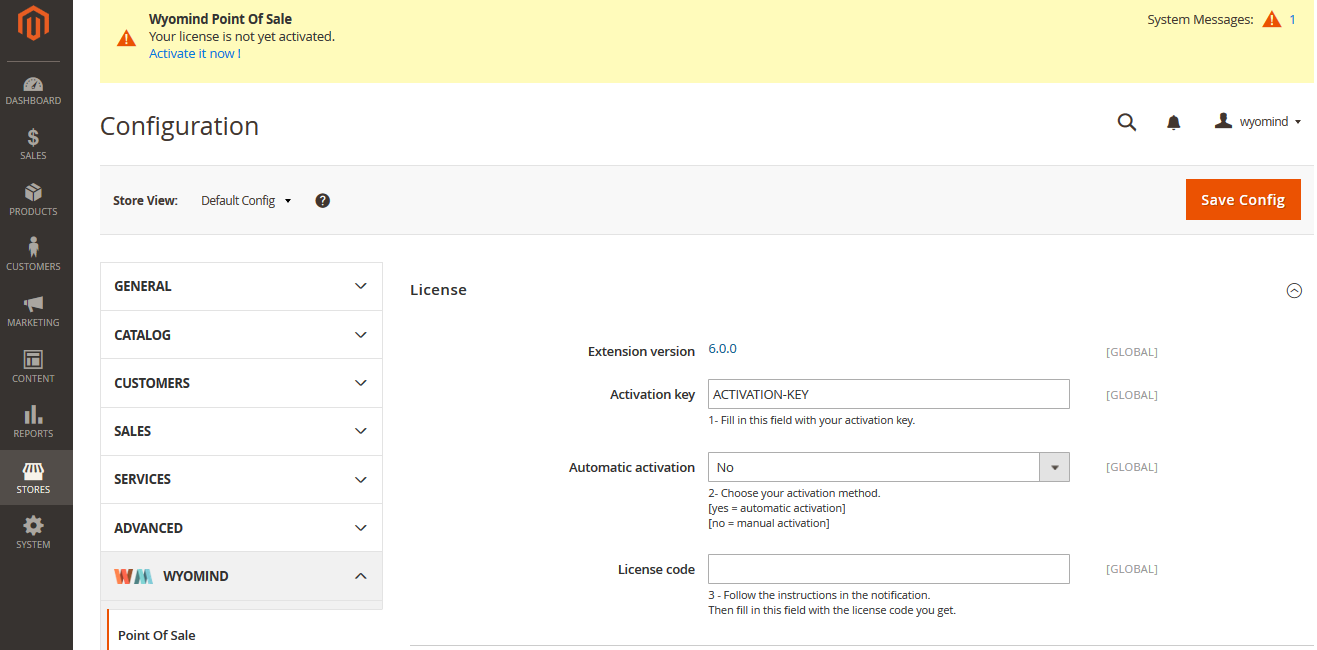
Go to your Magento admin panel. A message pops up at the top of the page.
If the message doesn't appear then you must check that:
1. The Adminhtml_Notifications and Wyomind_Core modules are well enabled. 2. The HTML output of the Adminhtml_Notifications and Wyomind_Core modules are not disabled in: storesconfigurationadvanced advanced 3. The encryption key well exists in app/etc/env.php:
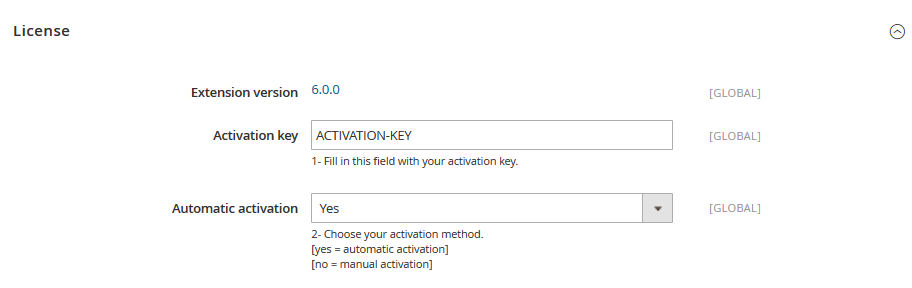
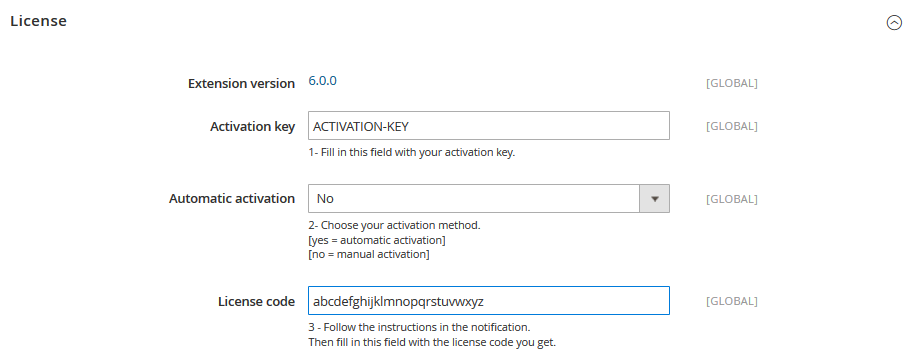
Copy your activation key in: StoresConfigurationWyomind Your extension
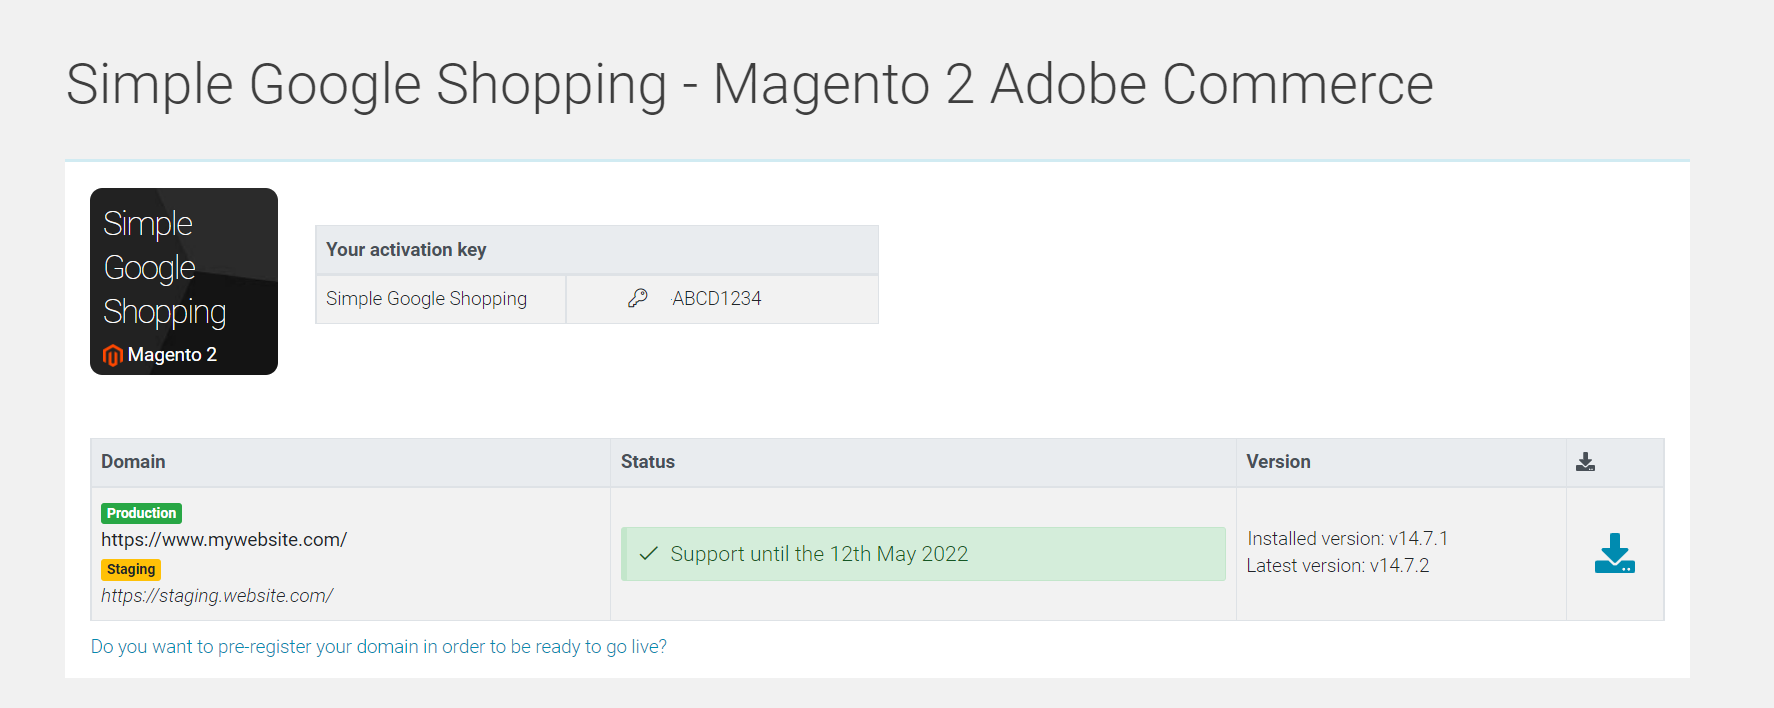
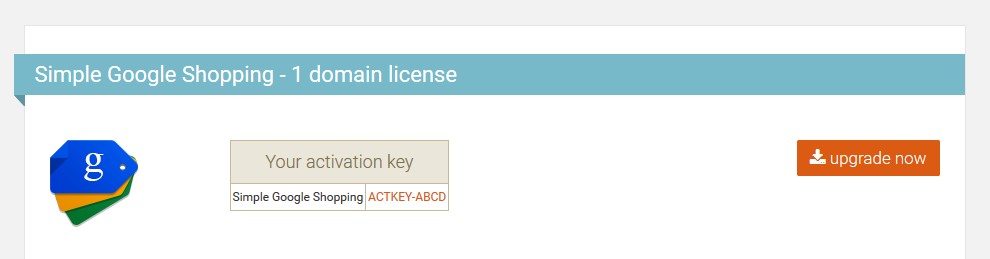
You can find your activation key in 2 different places: - In the confirmation email that you received after purchasing Quick View. - In your Wyomind account:My account Licenses & downloads Select Quick View and click on .
A new page opens where you'll find your activation key (see below).
In your Magento admin go to: StoresConfigurationWyomind Your extension
Paste the activation key in the Activation Key field and choose between the automatic (yes) or the manual (no) activation method: - By choosing Yes, the connection to Wyomind license server will be automatic. - By choosing No, you will have to log on to Wyomind license server yourself.
Click on Save config .
A message appears at the top of your admin panel. Click on that link: Activate it now!
Copy and paste the license code in theLicense code field from your admin or simply click on Activate now!
Finally, refresh your cache, log out and log in back straight after, to complete the installation.
When the extension includes other modules, repeat the steps described above for each one, using the corresponding activation keys (each module has its own activation key).
Add another domain to your license
To activate the license on another domain (test, staging...):
Once the extension is installed on the new domain, copy your activation key in: StoresConfigurationWyomind Your extension
After having saved the configuration, a notification appears. Click on Add this domain to my license.
A transfer request will then be sent to our team within an hour. Once the request is taken care of, you will receive a confirmation email. If your transfer request is accepted, you can use Quick View on both environments at the same time.
Note that the order in which you activate your license on your domains does not matter. You can start with your staging/dev/local environment or with your live domain, the process will be the same.
Also, if you have loads of staging domains, or if you are an agency managing load of domains for your customers, please contact us so that we can automatically whitelist these domains.
Let your customers collect their orders from any of your stores when checking out. Locations can be displayed on a Google Map and managed by store-views and/or customer groups. Click & Collect supports and enhances the Magento 2 MSI module.
Make any search on your website much more relevant, quicker and user-friendly than the default Magento search tools with this complete suite of Elasticsearch extensions.
Display on the Magento product pages and in the customer cart the estimated delivery date for the available products and for the backorders with a completely customizable message.
Quick Order for Magento 2 is a real time-saving and easy to use extension which is particularly useful for B2B purpose. This will considerably reduce searching time by allowing your customers to quickly place an order in bulk via a text area or a CSV import file.


 The pop-up is fully responsive and can be totally customized in order for you to meet your own store design.
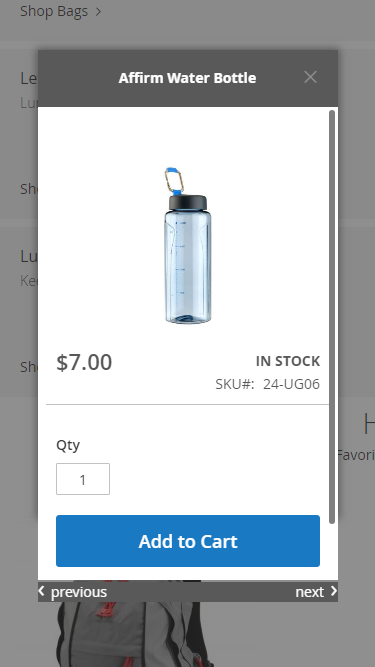

 Magnifier picto
 Eye picto
 Button with text


