

What are Rich Snippets ?
Rich Snippets is the term used to describe structured data markup that site operators can add to their existing HTML, which in turn allow search engines such as Google to better understand what information is contained on each web page.
The benefits of these Rich Snippets are:
- Better ranking in the search engines result pages
- Better visibility of your product information in the result pages of the search engines (price, availability, ratings...)
- Automatic update of your product data in Google Merchant Center
The Rich Snippets may be built with different markup:
- Microdata
- Microformats
- RDFa
- JSON-LD (recommended by Google)
The Google Rich Snippets extension allows applying in a few minutes the required structured data to the product pages of your website and taking benefits of the search engine optimizations.
How to use Google Rich Snippets for Magento 2?
Creating a new Rich Snippet template is really easy and quick with the Google Rich Snippets extension.
Go to:
sTORESSETTINGSconfigurationWyomind Rich SNippets manager
Configure the general settings
Enable log reporting

The file is named RichSnippetsManager.log.
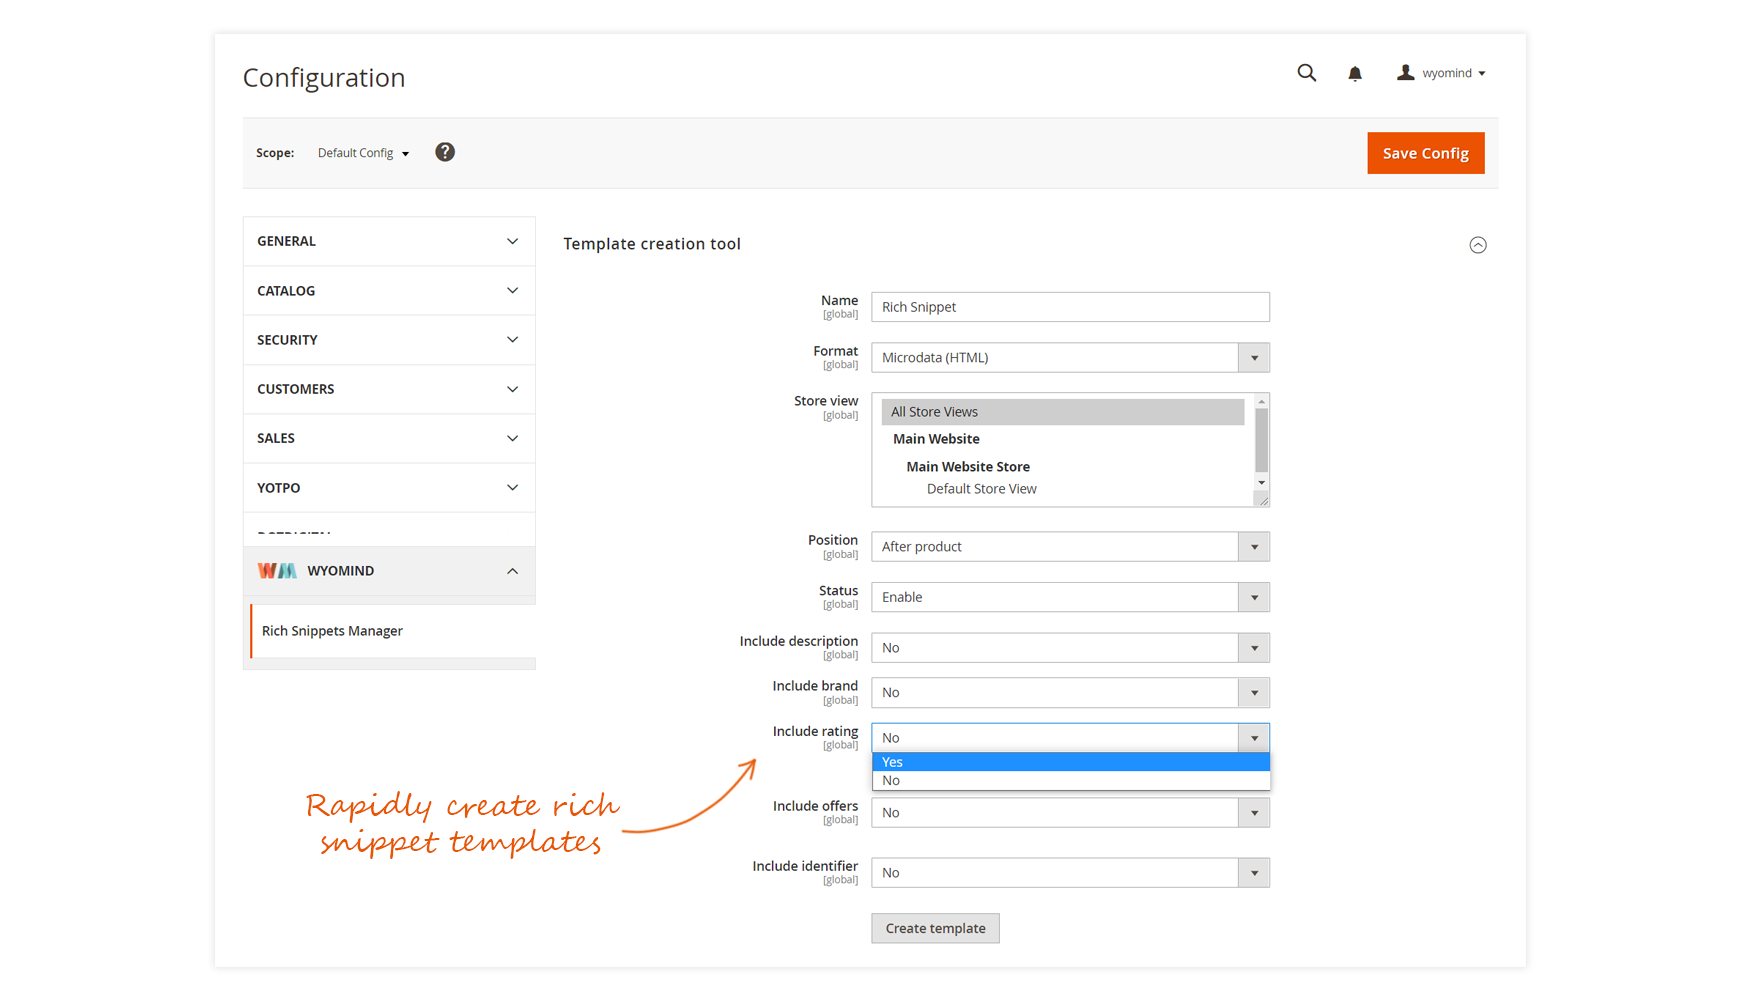
Create a Rich Snippet template with the wizard
You can create a new Rich Snippet using the template creation tool.
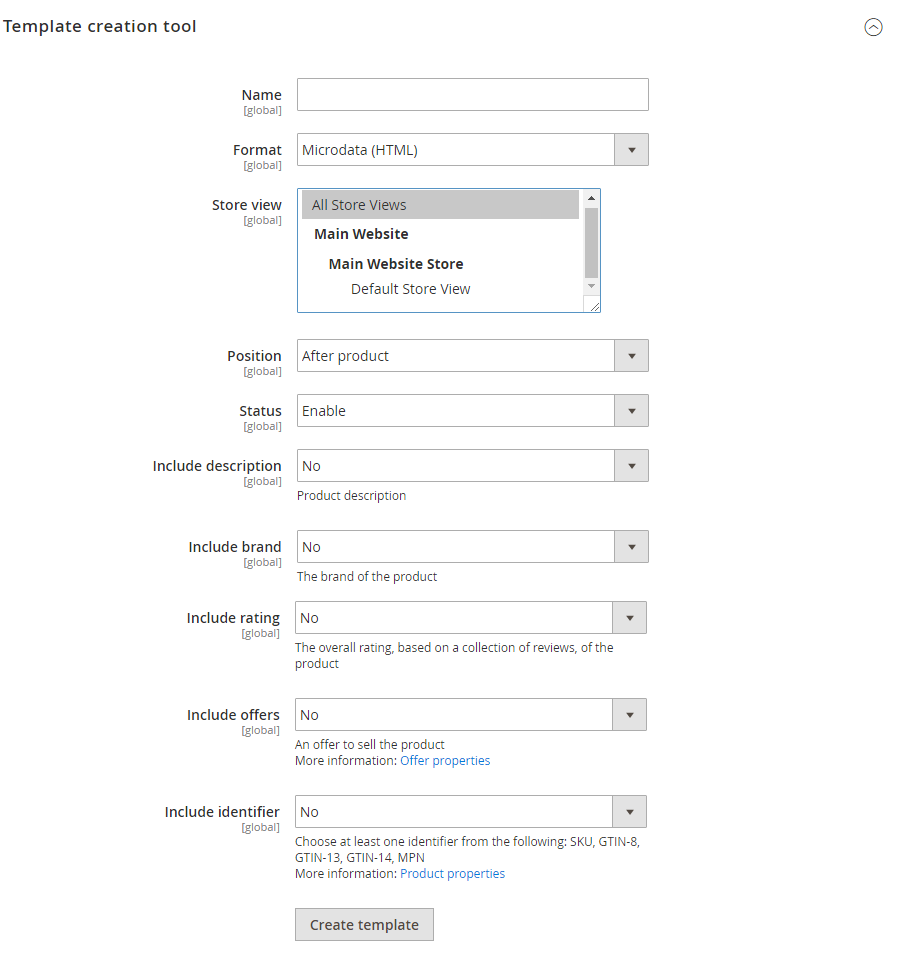
Name
This name is only visible in the back-office and doesn't have any incidence on the front-end.
Format
- Microdata (HTML)
The microdata is based on the schema.org syntax and adds invisible HTML tags in your pages that describe their content. - Json-LD (recommended by Google)
Json-LD is a syntax recommended by Google. This syntax is based on JSON and makes the content easy to read for human eyes.
Store view
Position
- Before the product
That option is not recommended, except if you are using Google Rich Snippet for other purposes than the Rich Snippets management. - After the product (recommended)
All resources that are not necessary to the visitors of your website or for which the payload can be deferred must be placed below the fold (Google Insight recommendations). That's why we suggest placing any Rich Snippets after the product data.
Status
A template that is not enabled will not have any incidence on the front-end.
Include description
Include brand
Include ratings
Include offers
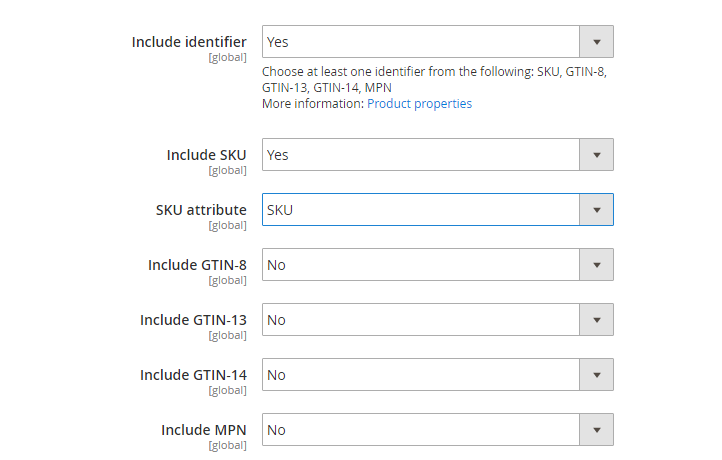
Include identifier
- SKU
- GTIN 8
- GTIN 13
- GTIN 14
- MPN
Once the template is configured, you can click on Create template. The template will be automatically saved in your Rich Snippets templates library. You will then be able to update this template in:
ProductsRich Snippets ManagerMANAGE TEMPLATES
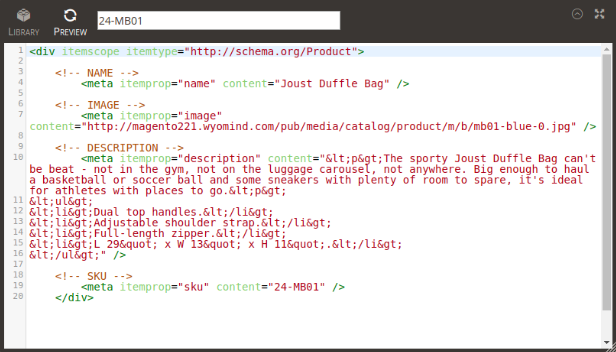
Test the template
Thanks to Google Rich Snippet, you can test the result of the Rich Snippets that are present in your product pages.
To do so you just have to insert the SKU of the product you want to check in the testing tool and then click on GO.

Two links appear:
- The first link is the one of the product page as you customers see it.
- The second link is a direct link to the Google testing tool, Google Structured Data Testing Tool: This tool allows you to visualize the Rich Snippets as Google sees them, and if necessary, identify potential errors and fix them.
Refine the Rich Snippets with the editor
The Google Rich Snippets extension creates for you a PHTML template from your settings while creating a Rich Snippet template from:
sTORESSETTINGSconfigurationWyomind Rich SNippets manager
The template is then converted automatically into PHP, HTML, and/or JSON code without any further action from your end.
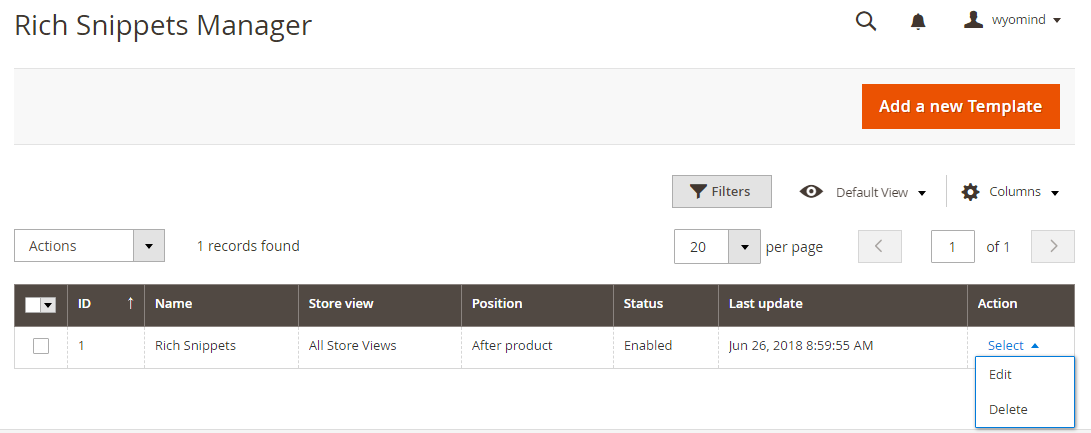
However, you can edit and update the templates from the editor available in Google Rich Snippets. To do so, go to:
ProductsRich Snippets ManagerMANAGE TEMPLATES
The grid lists all the Rich Snippets available in your library.
The black box
In order to make the editing of the Rich Snippets easier, the editor includes a toolbox (so-called the "Black Box").
This toolbox allows visualizing several things.
Placeholders
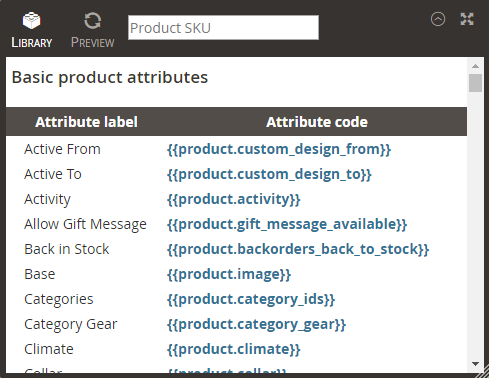
Methods
Preview
Predefined objects and placeholders usage
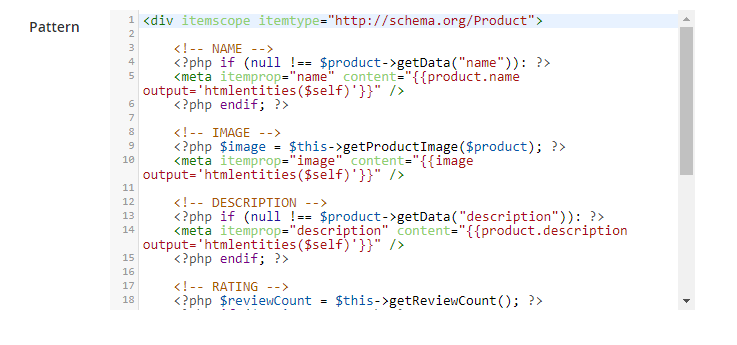
When editing a Rich Snippet template, a code editor appears and displays the code used by the Rich Snippets.
The source code of the template uses PHP code samples and placeholders (also called shortcuts) that make the source code editing easier to read and edit.
Product data
$product is an instance of the Catalog/Product model.
/**
* Catalog product model instance
*
* @var Mage_Catalog_Model_Product
*/
var $product;The product attributes are available through the usual methods:
- $product->getData("attribute_code");
- $product->getAttributeText("attribute_code");
- $product->getAttributeCode();
For example:
<?php
// Display a product SKU
echo $product->getSku();
// Display a product NAME
echo $product->getData("name");
// Display a product DESCRIPTION
echo $product->getDescription();
// Display a product MANUFACTURER
echo $product->getAttributeText("manufacturer");
Product attributes are also available through the placeholders as follows:
{{product.attribute_code}}
For example:
<!-- Display the product SKU -->
{{product.sku}}
<!-- Display the product NAME -->
{{product.name}}
<!-- Display the product DESCRIPTION -->
{{product.description}}
<!-- Display the product MANUFACTURER -->
{{product.manufacturer}}
Reviews data
/**
* Product Review model instance
*
* @var Mage_Review_Model_Review
*/
var $reviews;
If you want to iterate through each element of the collection, then you must use a foreach loop, as follows:
foreach($reviews as $review){
...
}
Each review is available through the $review variable and the properties are available through the usual methods:
- $review->getData("attribute_code");
- $review->getAttributeCode();
For example:
<?php foreach($reviews as $review): ?>
 <div itemprop="review" itemscope itemtype="http://schema.org/Review">
 <meta itemprop="name" content="<?php echo $review->getTitle(); ?>"/>
 <meta itemprop="author" content="<?php echo $review->getNickName(); ?>"/>
 <meta itemprop="datePublished" content="<?php echo $review->getCreatedAt(); ?>"/>
 <div itemprop="reviewRating" itemscope itemtype="http://schema.org/Rating">
  <meta itemprop="ratingValue" content="<?php echo $review->getScore(); ?>"/>
 </div>
  <meta itemprop="description" content="<?php echo $review->getDetail(); ?>" />
 </div>
<?php endforeach; ?>
The data related to the reviews are also available through the placeholders as follows:
{{review.attribute_code}}
For example:
<?php foreach ($reviews as $review): ?>
 <div itemprop="review" itemscope itemtype="http://schema.org/Review">
  <meta itemprop="name" content="{{review.title output='htmlentities($self)'}}" />
  <meta itemprop="author" content="{{review.nickname output='htmlentities($self)'}}" />
  <meta itemprop="datePublished" content="{{review.created_at output='htmlentities($self)'}}">
  <div itemprop="reviewRating" itemscope itemtype="http://schema.org/Rating">
   <meta itemprop="ratingValue" content="{{review.score output='htmlentities($self)'}}" />
  </div>
 <meta itemprop="description" content="{{review.detail output='htmlentities($self)'}}" />
 </div>
<?php endforeach; ?>
PHP API usage
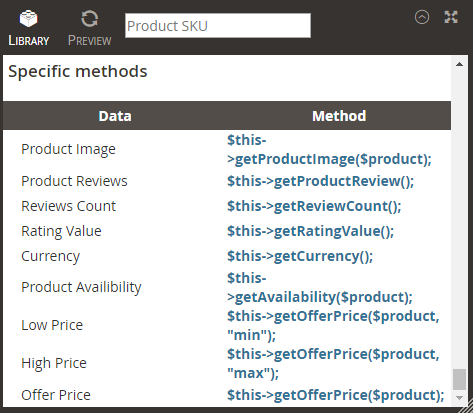
Google Rich Snippet offers a few methods that allow to easily access the data related to the products.
Image
Get the image of a product:
/**
* Get product image
*
* @return Mage_Catalog_Helper_Image|string
*/
$this->getProductImage($product);
Rating and reviews
Get the number of reviews left by the customers for the product:
/**
* Retrieves total reviews
*
* @return string
*/
$this->getReviewCount();
Get the average rating of the customers for the product:
/**
* Get rating value
*
* @return float
*/
$this->getRatingValue();
Currency
Get the store view currency:
/**
* Get currency
*
* @return string
*/
$this->getCurrency();
Availability
Get the product availability:
/**
* Get product availibility
*
* @return string
*/
$this->getAvailability($product);
Price
Get the product price, the minimal price and the maximum price:
/**
* Get offer price according to product type
*
* @param string[min|max|NULL] $which
* @return float
*/
$this->getOfferPrice($product, $which = null);
PHP variables
For example:
<!-- RATING -->
{{ratingValue output='htmlentities($self)'}}
 <?php $reviewCount = $this->getReviewCount(); if({{ratingValue output='htmlentities($self)'}} return "{{ratingValue output='htmlentities($self)'}}";)?>
 <?php if ($reviewCount > 0): ?>
 <?php $ratingValue = $this->getRatingValue(); ?>
 <div itemprop="aggregateRating" itemscope itemtype="http://schema.org/AggregateRating">
  <meta itemprop="ratingValue" content="{{ratingValue output='htmlentities($self)'}}">
  <meta itemprop="reviewCount" content="{{reviewCount output='htmlentities($self)'}}"/>
 </div>
 <?php endif; ?>
PHP functions in attribute calls
You can use any PHP function to apply in the attribute calls even if the function requires one or more additional arguments, for instance:
{{ratingValue output='htmlentities($self)'}}


 For months we've been looking for a rich snippet extension that will easily allow us to have full control. Been searching up and down the web for something that is easy enough to use and extremely powerful with no luck. Until we got in touch with Wyomind and told us that they are working on an extension which will just do that! We decided to wait! And all this waiting worth every day/hour/second! Finally out! Using this extension we were able to fix lots of issues in our Google merchant center and we are not tied up on what more we can do with it - the sky is the limit! Not to mention the support from Aurelie which is top notch every time we have a question or problem. Extremely fast response and helpful advice! I can't fault this company. Their support is just like next door and will answer any query in no time! For any Magento 2 extensions we need they are the first to look first! Thank you so much Wyomind for making our life so much easier!