

Terminology
- Sources
Represent physical sites where the available products are stocked and shipped from. It can be warehouses, stores, wholesalers...
See your sources from:
StoresInventorySources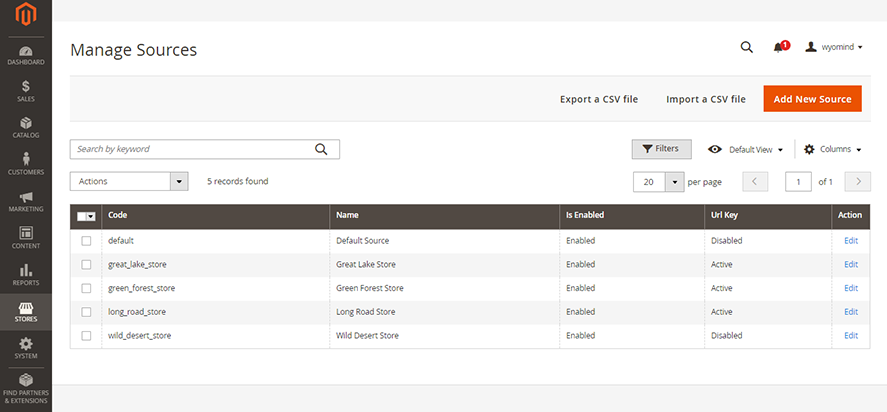
- Source Item
It is a source for a given product.
Pre-allocate sources to your products from the Sources tab of any product page in:
Catalog Products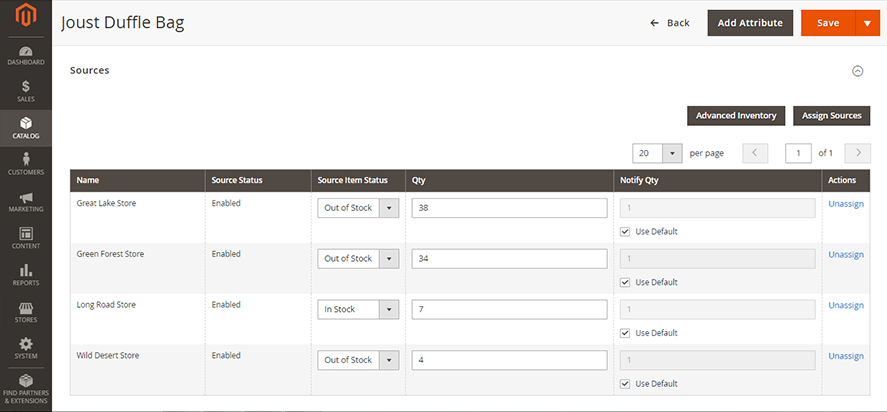
- Stocks
One stock can be linked to several websites and sources.
See your stocks from:
StoresInventorySTocks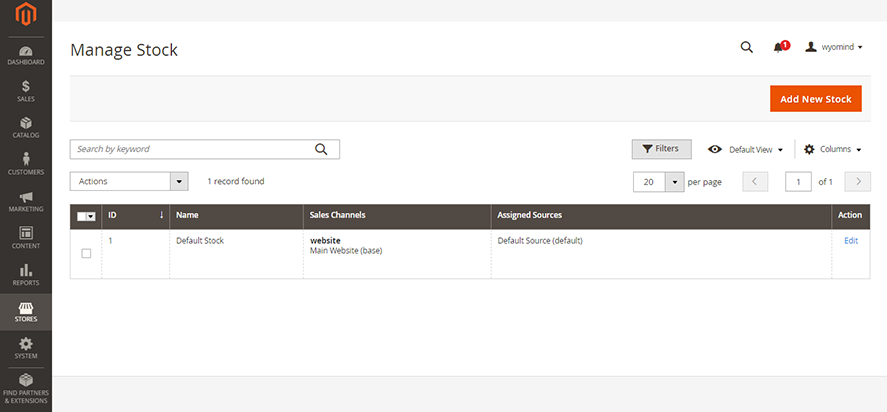
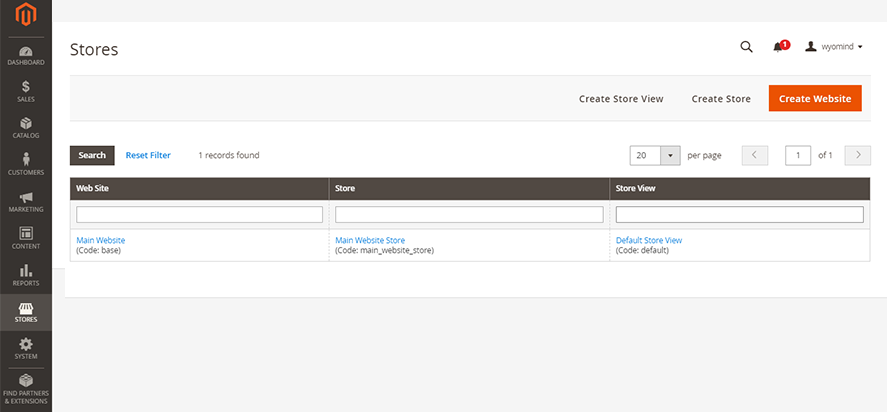
- Sales Channels
Refers to a website. It can only be linked to one stock.
See your websites from:
StoresSettingsALL Stores
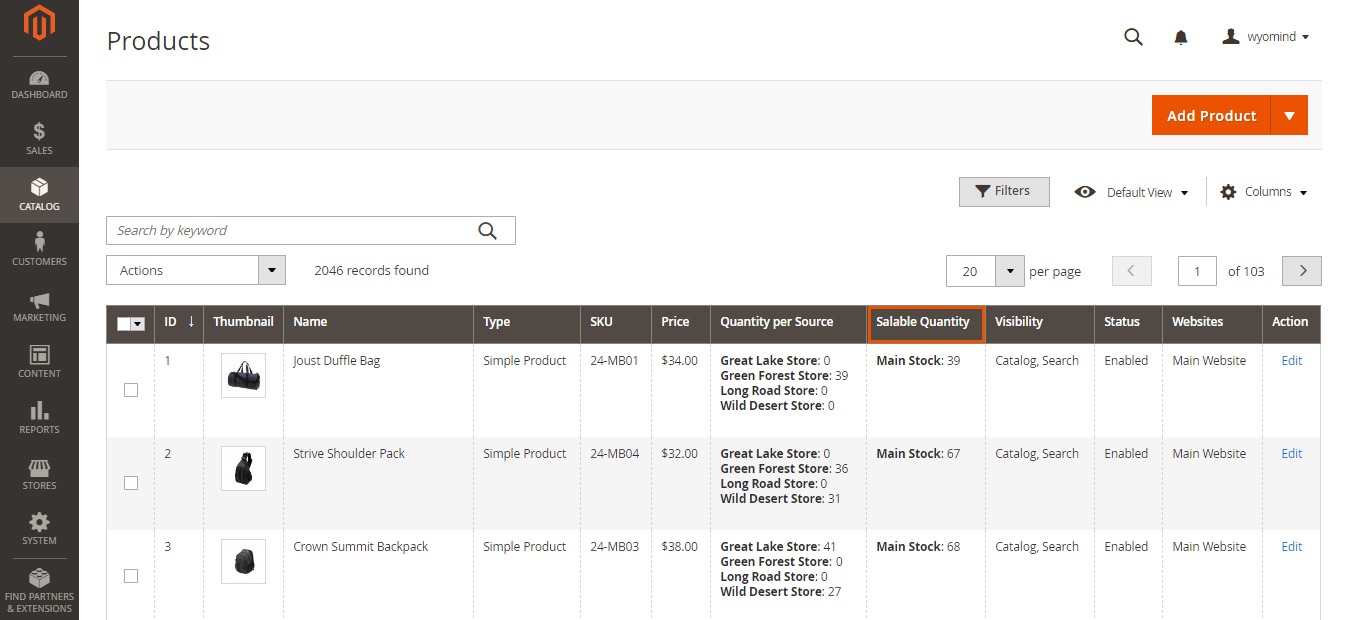
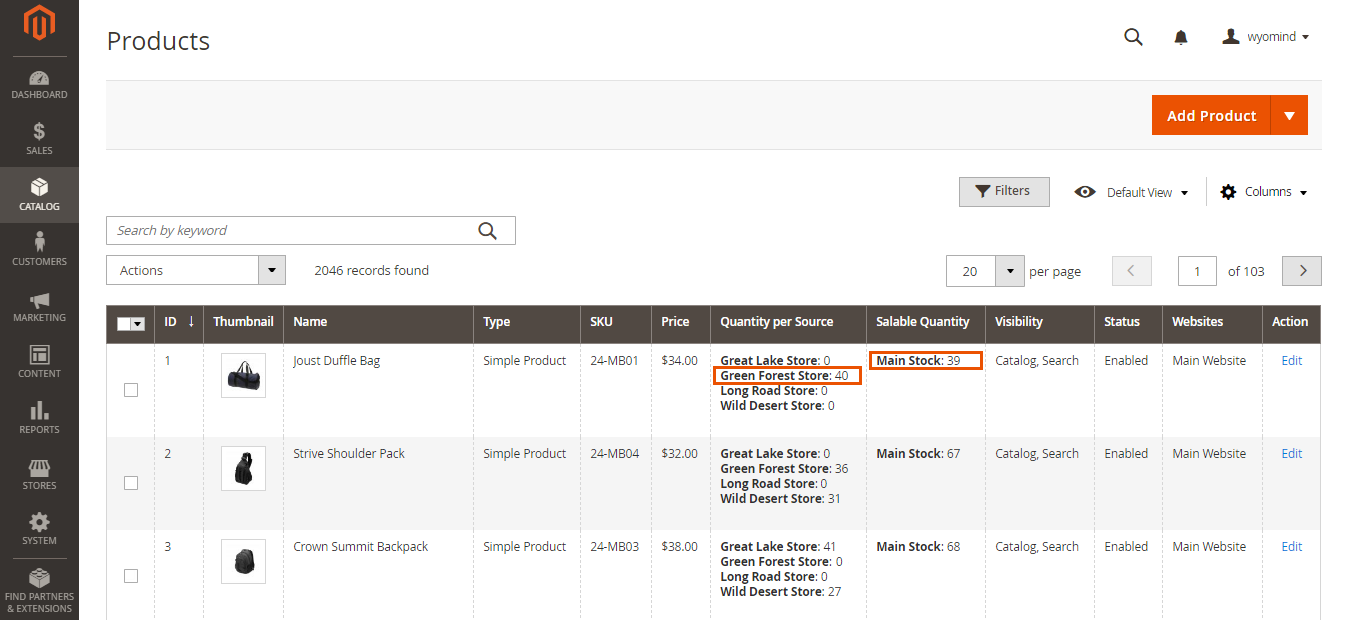
- Salable Quantity
It is the total virtual inventory that can be sold from a website.
Check the salable quantity from:
CatalogProducts
- Reservations
It is the number of products reserved and deducted from the salable quantity when customers add products to cart and pass their order.
Check the quantities reserved from:
CatalogProducts
 When an order is shipped, the quantity of reservations is reset and deducted from the quantities of the inventories of the appropriate sources.
 - Allocation
It is the default behavior of Magento. It refers to the source(s) to which the order is shipped. - Pre-allocation
It refers to the MSI Order Management assignation process. Orders can be pre-allocated to sources before the shipment. It can be done manually or automatically. - Algorithm
It is a process or set of rules to be followed in calculations or other problem-solving operations. In Magento, the Source Selection Algorithm recommends how to fulfill partial and full shipments. Magento provides the following algorithms: Source and Distance priority
Adopt the best way to manage your inventory with the MSI Suite
The MSI Suite includes several extensions. Each one responds to a problem and to a desire to improve Magento 2 default inventory management.
Thanks to these extensions that are completely plug and play, the MSI Suite easily adapts to your business model, whether you manage several warehouses, multi-stocks, dropshipping…
Perfect your inventory management and your selling process with the MSI Suite and enjoy:
- optimal order management: optimize and automate the orders pre-allocation to the appropriate sources. Save time and avoid human errors in your Magento 2 back office with MSI Order Management.
- smoother and fine-tuned inventory management: gain considerable time while managing your inventory directly from the stocks grid and get a clear and accurate view of your products' availability thanks to the tree view with MSI Stock Management and MSI Backorders.
- team management under control: limit the access to your orders, products, and stock management for each source by assigning specific permissions to each user registered in your Magento 2 admin with MSI Permissions.
- more transparent information on product availability: provide your customers with more information on your products' availability, carriers, or delivery times via completely customizable stock status messages with MSI Stock Status and MSI Custom Attributes.

How to use MSI Order Management for Magento 2
The MSI Order Management extension will help you to considerably optimize the Magento default workflow and be a lot more productive.
Every time an order is placed through your website, it can be automatically pre-allocated to one or more sources via the algorithm you have selected. This will keep your inventory up to date as your stocks are decreased in real-time.
The extension gives you the possibility to create new algorithms offering endless possibilities for managing your orders.
You can also follow in real-time the orders pre-allocations from the orders grid and gain considerable time creating the shipments for each product.
STEP 1: Configure MSI Order Management
First of all, you need to configure the MSI Order Management extension from:
StoresSettingsConfiguration Wyomind MSI Order Management
Order Pre-allocation
Configure here, how you want the orders to be pre-allocated.
Pre-allocation Process
Choose how you want the orders to be pre-allocated. You have 3 options:
- Default: The pre-allocation before the shipment is not available.
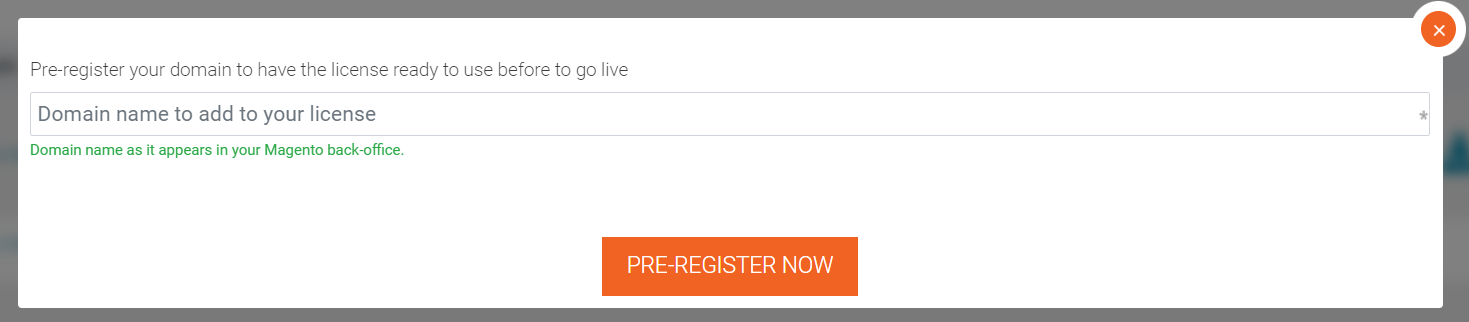
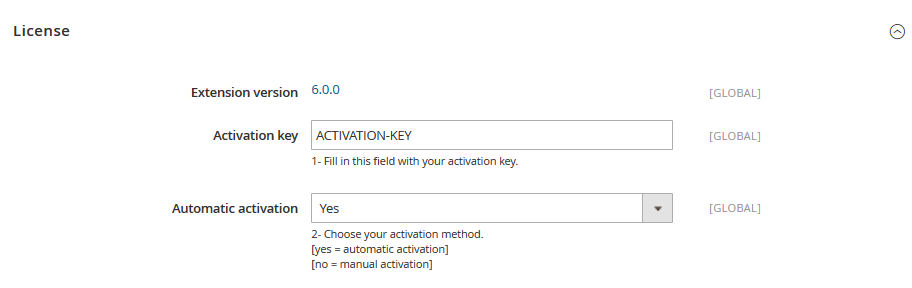
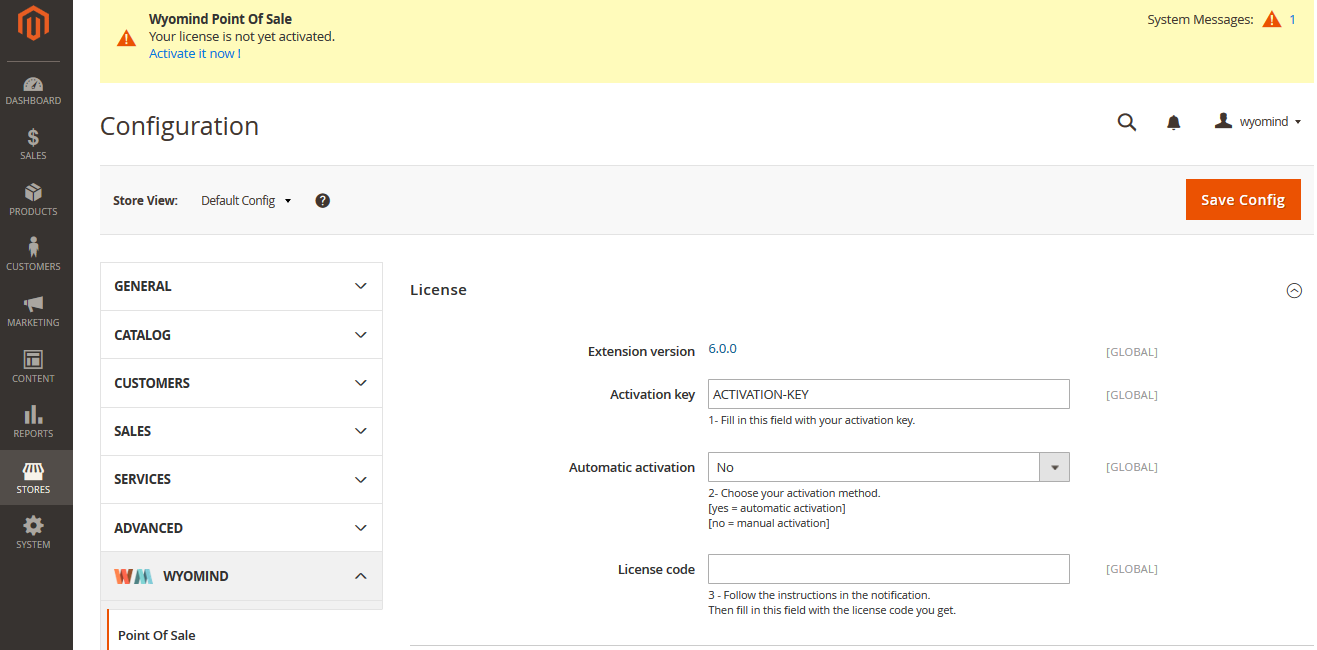
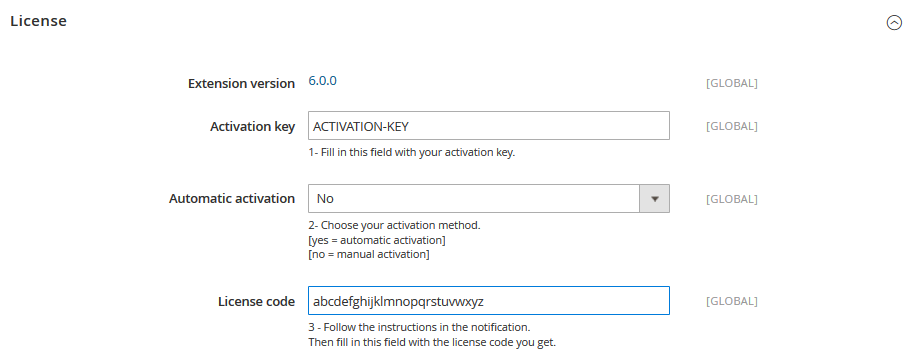
Note that while the license is not registered, the default option will be used. Check how to activate your license. - Manual: The pre-allocation must be done manually once the order has been placed.
- Automatic: The pre-allocation will be done automatically after the order has been placed and according to the algorithm you have selected in Source Selection Algorithm. The pre-allocation can also be modified manually.

Automatic Pre-allocation Source Selection Algorithm
When choosing the Automatic pre-allocation process, you must select a Source Selection Algorithm between:
- Distance Priority: the order will be pre-allocated to the closest source
- Source Priority: the order will be pre-allocated to the first source
- Your custom algorithms: the order will be pre-allocated to sources according to the rules of your algorithm.
See how to create your custom algorithms.

Enable pre-allocation log
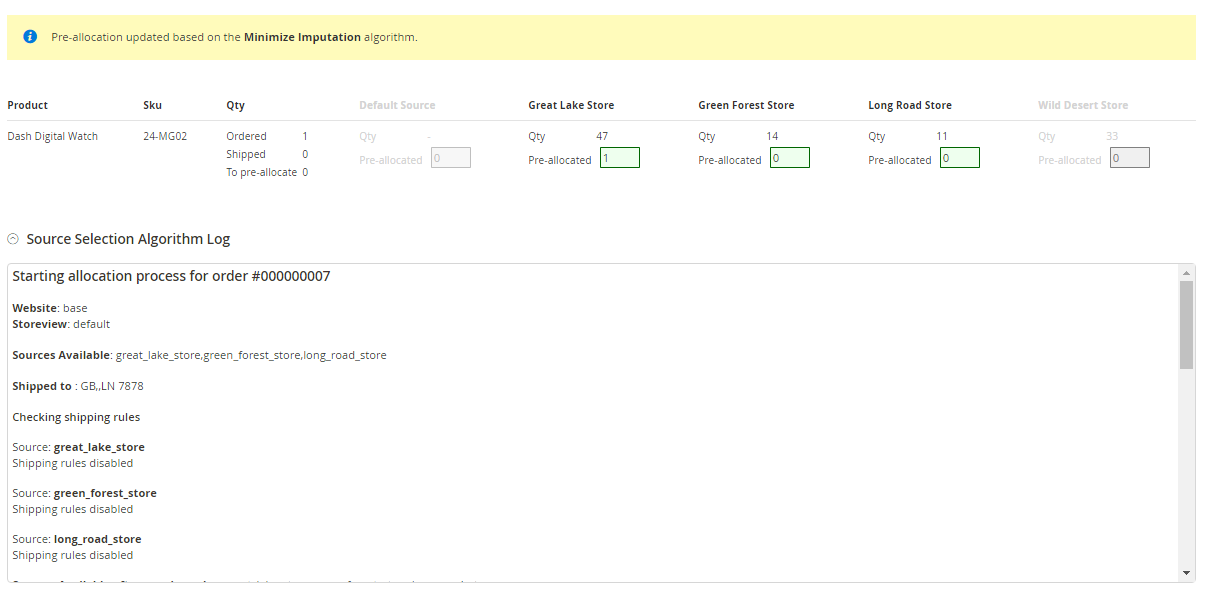 The log will be available after having run an algorithm from the pre-allocation grid.
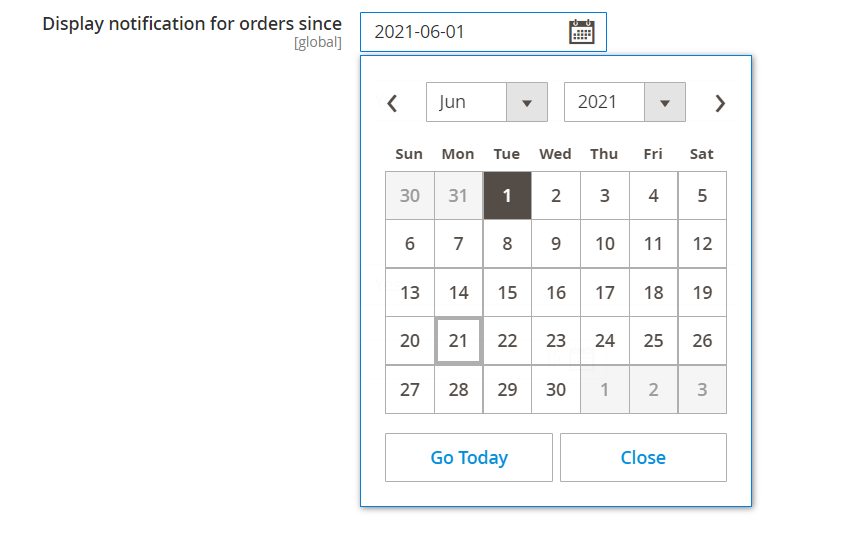
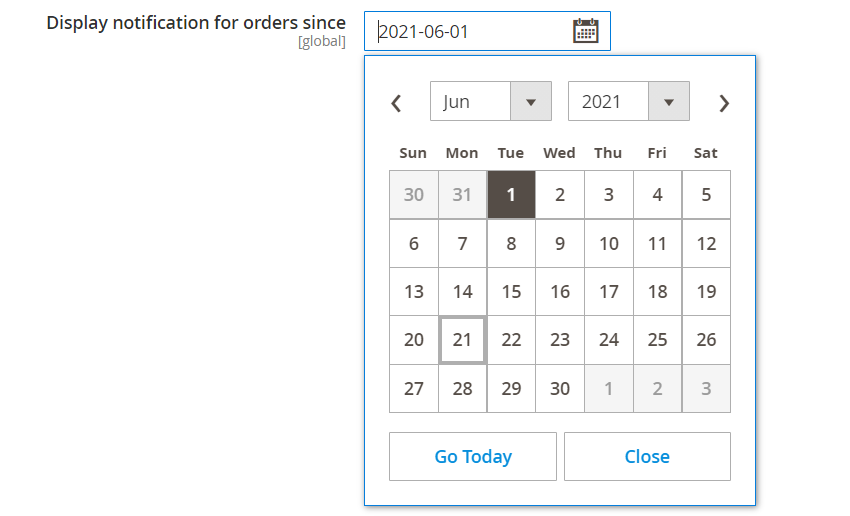
 Display notification for orders since
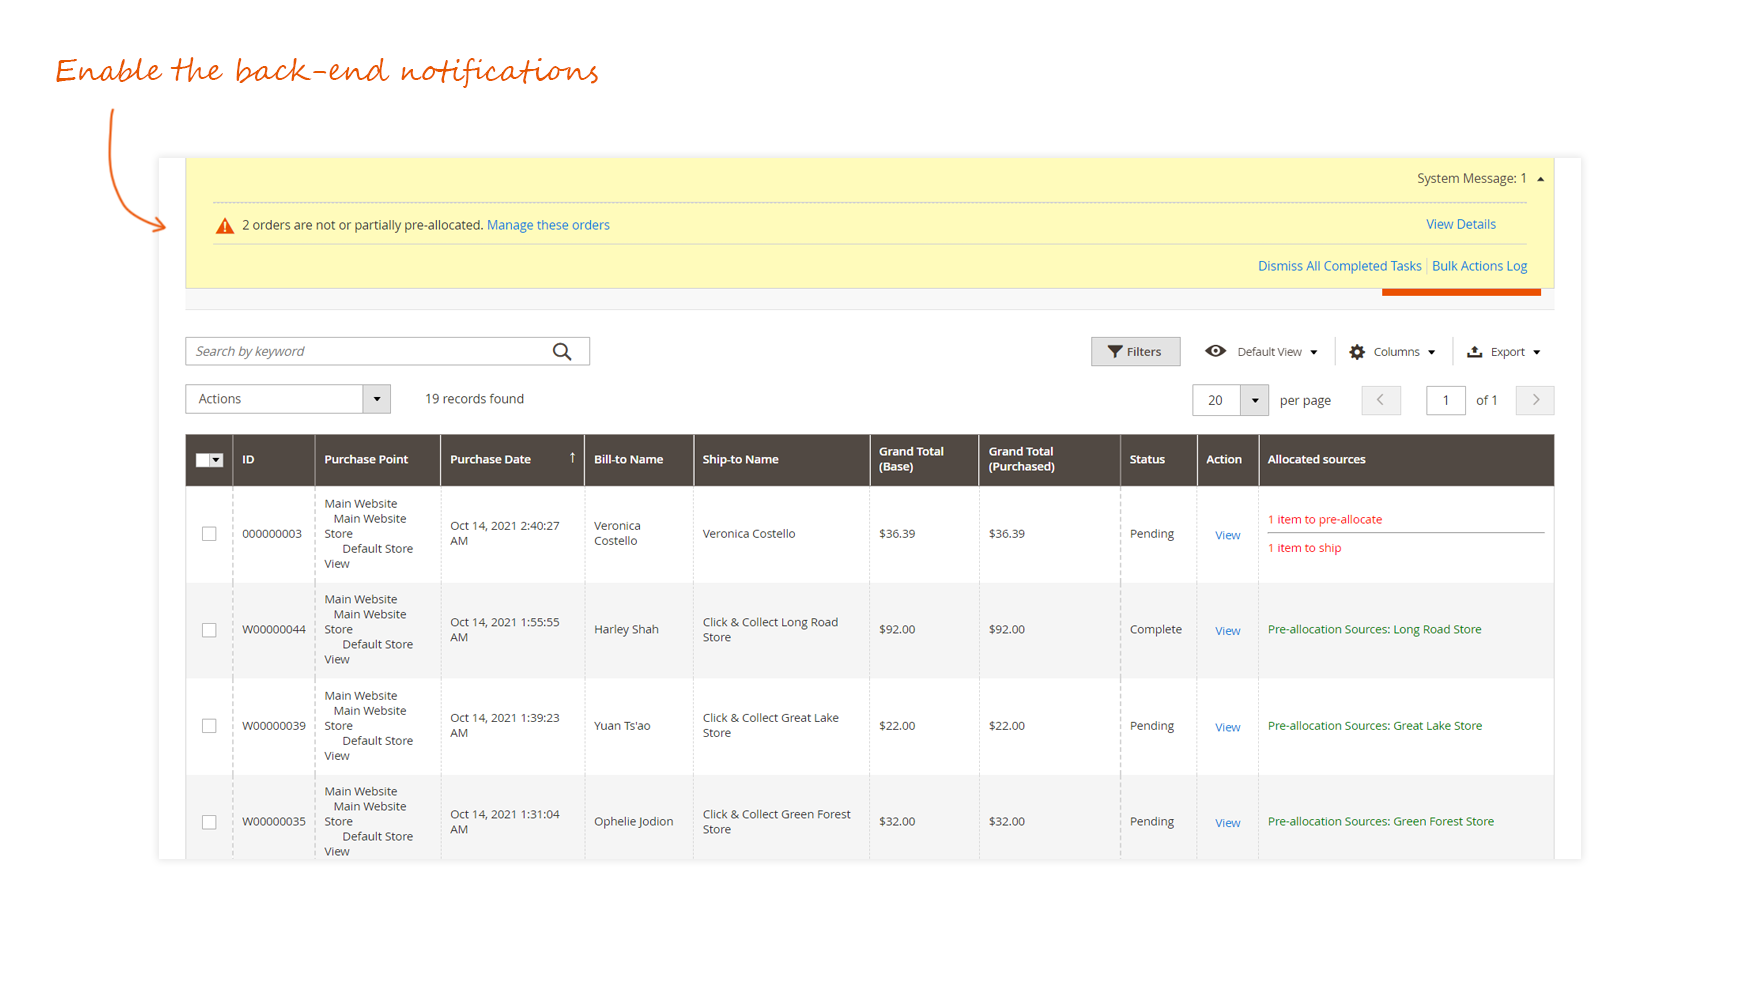
Pending pre-allocations notification in the back-end
 The following notification will be displayed in your back-office:
![]()
Allow pre-allocation to sources not linked to the website
 In the case where the product of the order is assigned to "Wild Desert Store" but the source is not assigned to the website, then you can still pre-allocate quantities to "Wild Desert Store".
 Limit pre-allocation according to the delivery address
The shipping rules allow you to automatically pre-allocate orders placed on your website to one or more sources according to your customer's shipping address: code of the country and/or zip code and/or regional code. These rules allow you to define the geographical area that each one of your sources can cover.
For each source, you can enable the Pre-allocation by shipping rules. from the Order Management tab of the source edition page from:
StoresInventorY Sources
If enabled, the shipping rules will apply each time an algorithm is run.

You will be able to fill in the Shipping rules using the same syntax as the Owebia Shipping extension (with their agreement).
Below are some examples that you can use in the Shipping rules field:
*: Worldwide
For a whole country:
US(*): United-States
UK(*): United-Kingdom
FR(*): France
For a specific region of a country:
US(CA): California / United-States
FR(75*): All French zip codes starting with 75 (Department of Paris)
DE(7*): All German zip codes starting with 7 (Region of Bade-Wurtemberg)
For many countries:
US,UK,CH,ES,IT: United-States, United-Kingdom, Switzerland, Spain, and Italy
You can subtract some regions:
* - (CAN, US(CA,FL)): Worldwide except Canada, California and Florida
For flexible assignation rules, it is also possible to use regular expressions:
FR(/^75[0-9]+$/): Department of Paris (All French zip codes starting with 75 followed by numbers from 0 to 9)
Order Shipment
You have the possibility to enable the pending shipments notification in your back-office. This option will display a notification when orders are not fully shipped.

Pending shipments notification in the back-end
Receive notifications in your back-office when orders are not shipped.
The following notification will be displayed in your back-office:

Display notification for orders since
STEP 2: Create your custom algorithms
You can create new algorithms in:
SalesCustom Algorithms
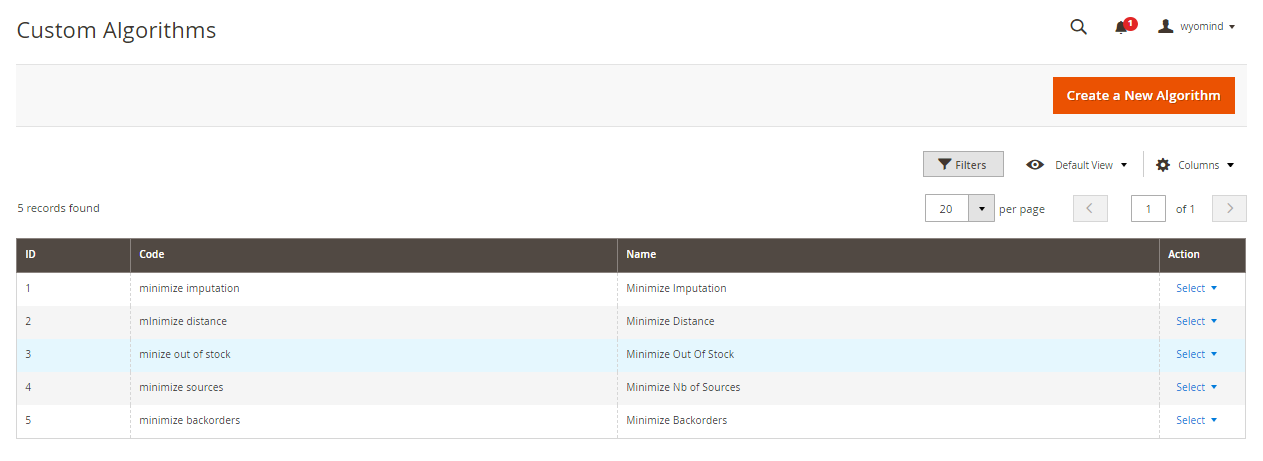 Click on Create a New Algorithm.
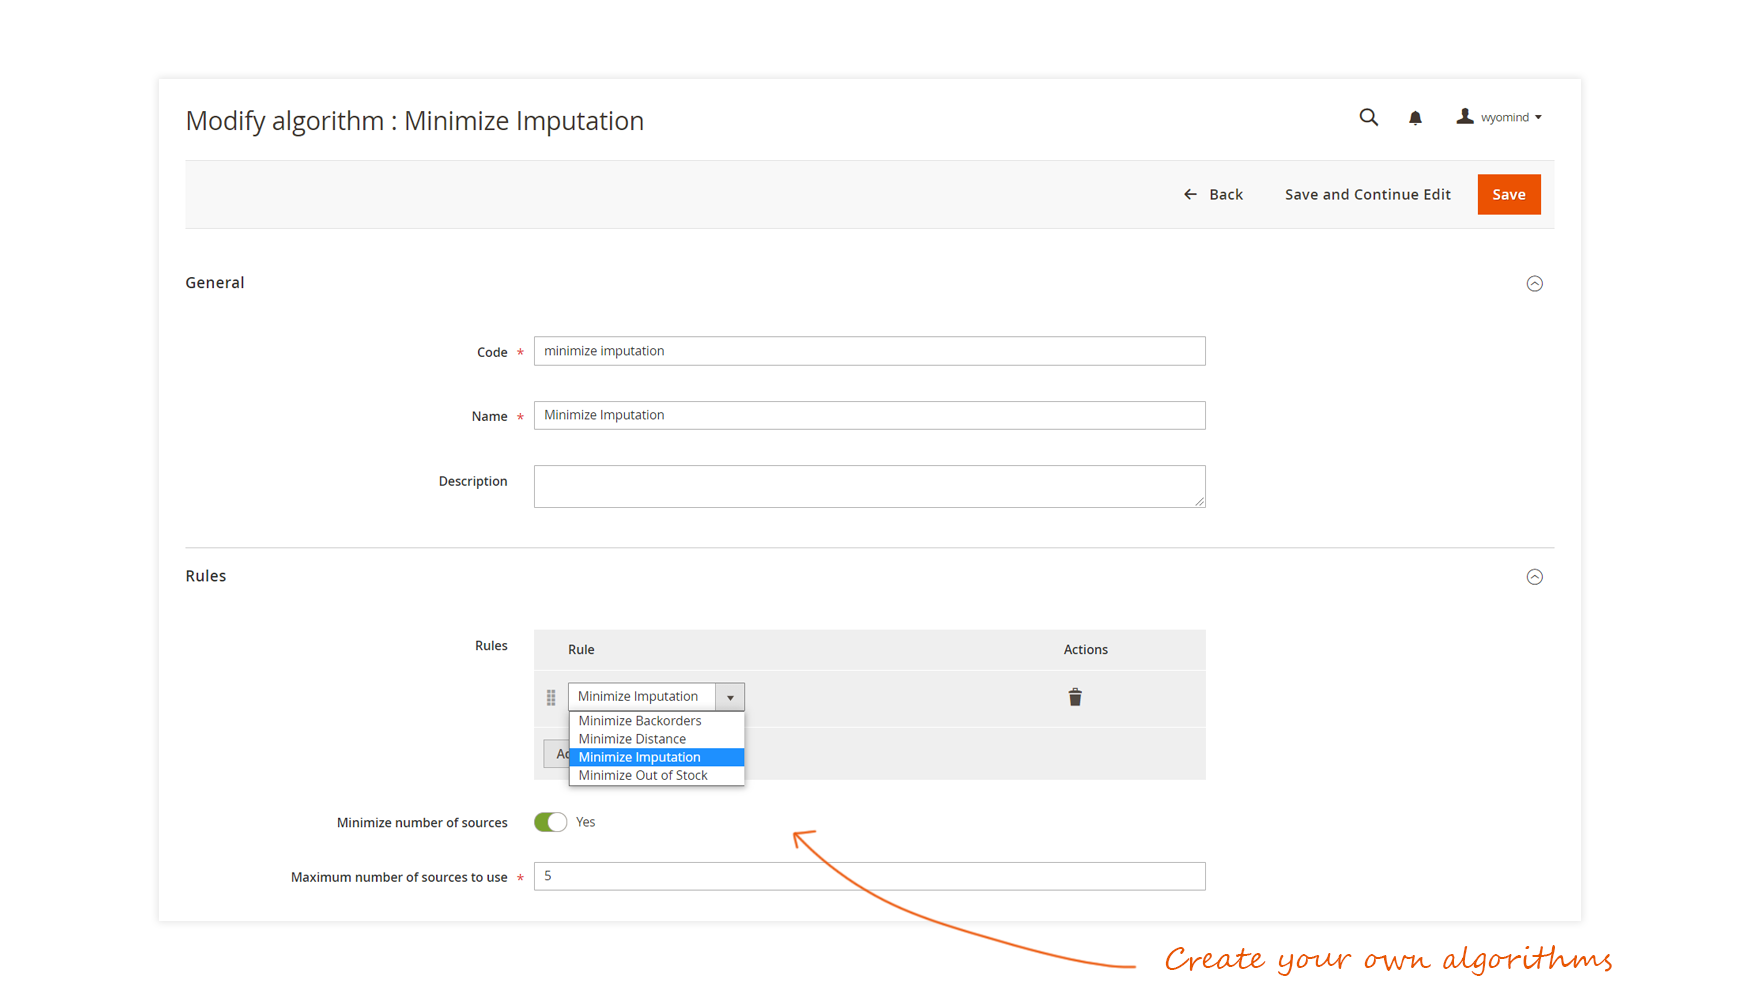
General
In the General tab, fill in the following fields.

Code
Code of the algorithm. It is internal.
Mini-backorders
Name
Name of the algorithm.
Minimize backorders
Description
Description of the algorithm.
This algorithm will minimize backorders.
Rules
You have the possibility to add rules to your algorithms.
When there are several rules, they are prioritized in the same order as they are configured in the algorithm.
So sources will be ordered according to the first rule, then if sources have the same order, they will be ordered according to the second rule...
From the final sources found, the pre-allocation will be minimized according to the maximum number of sources to use.
Overview of the interface
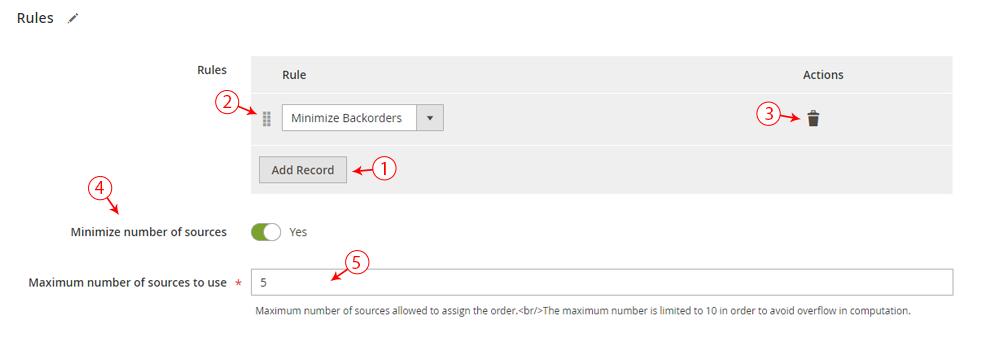 In the Rules tab, you can:
- Add as many pre-allocation rules as you need for your algorithm by clicking on Add record.
- Use the drag and drop option to order your rules.
- Click on the bin icon to delete a rule from the Actions column.
- Choose to minimize the number of sources when pre-allocating orders.
If enabled, the order is pre-allocated to the minimum number of sources.
If disabled, each product of the order can be pre-allocated to a different source. - If you have decided to minimize the number of sources, you can define the maximum number of sources to use and that will be allowed to pre-allocated the order.
Any custom algorithm tries to minimize the number of sources used. If the algorithm does not find a solution with a number of sources less than or equal to the field, the pre-allocation is not possible
5
Algorithm rules
You have the possibility to base your algorithm according to the following rules:
- Minimize Backorders
This rule will favor pre-allocations to sources where there is stock for the products. - Minimize Distance
This rule will favor pre-allocations to the closest sources. - Minimize Imputation
This rule will favor pre-allocations to sources that have a lot of stocks. - Minimize Out Of Stock
This rule will favor pre-allocations that will not cause a stock shortage.
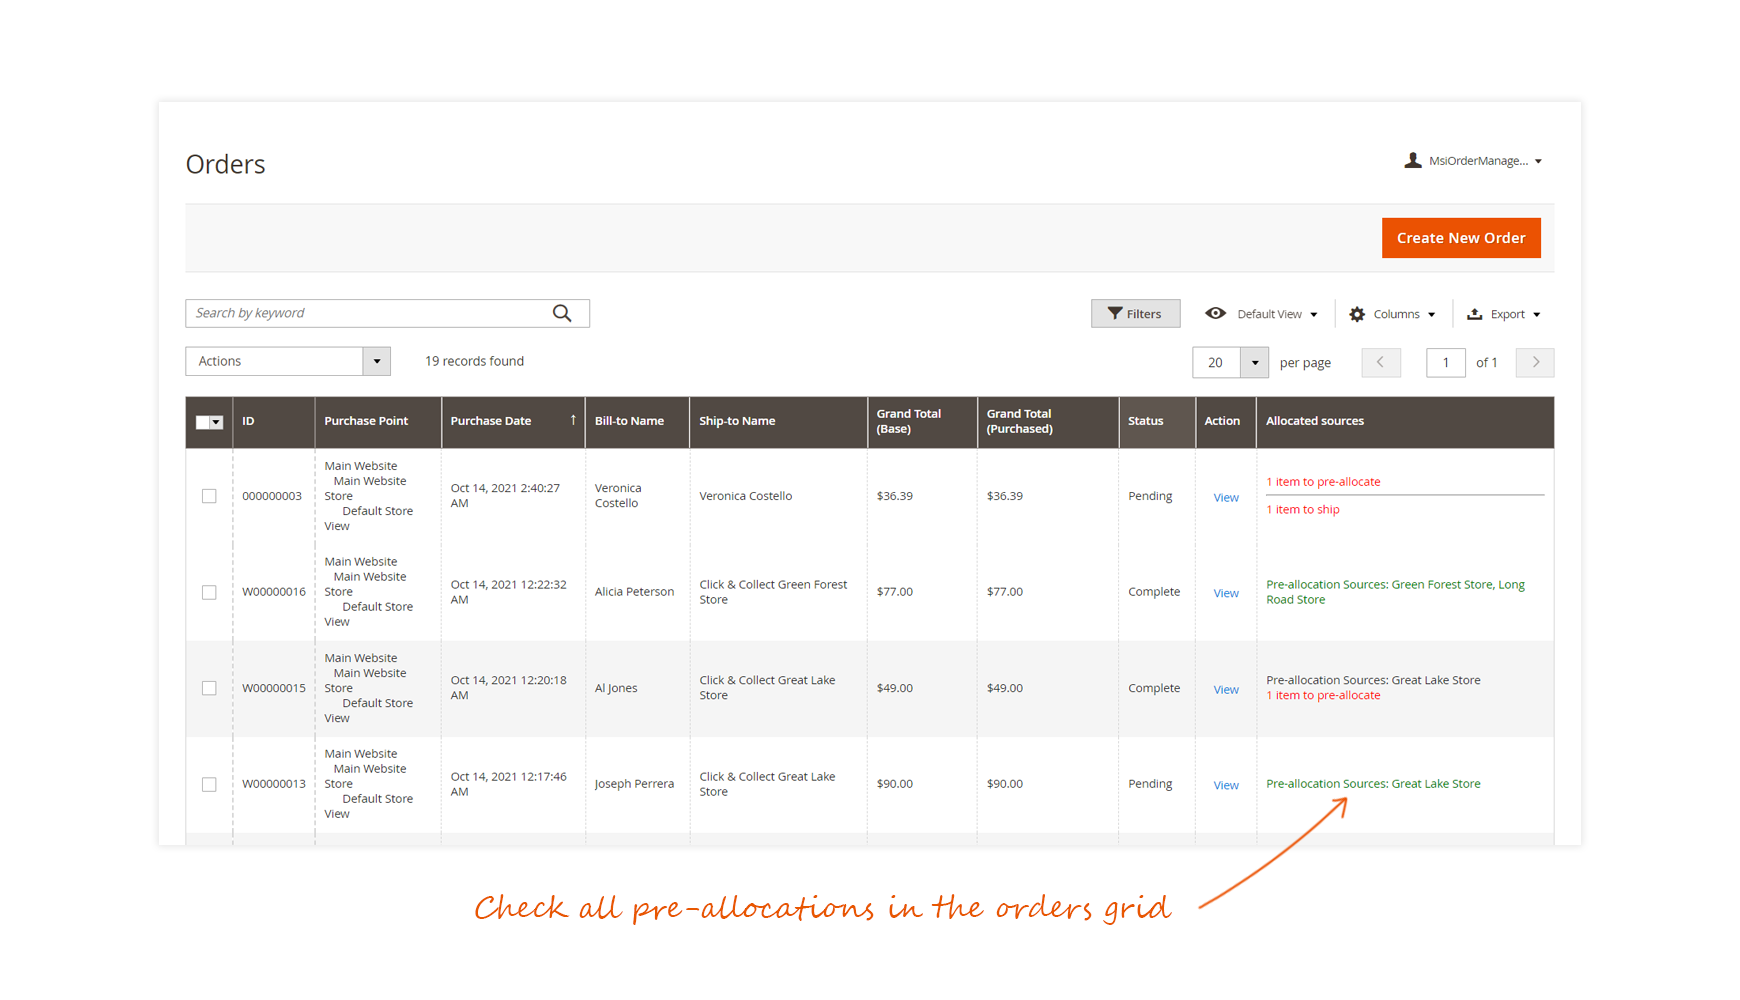
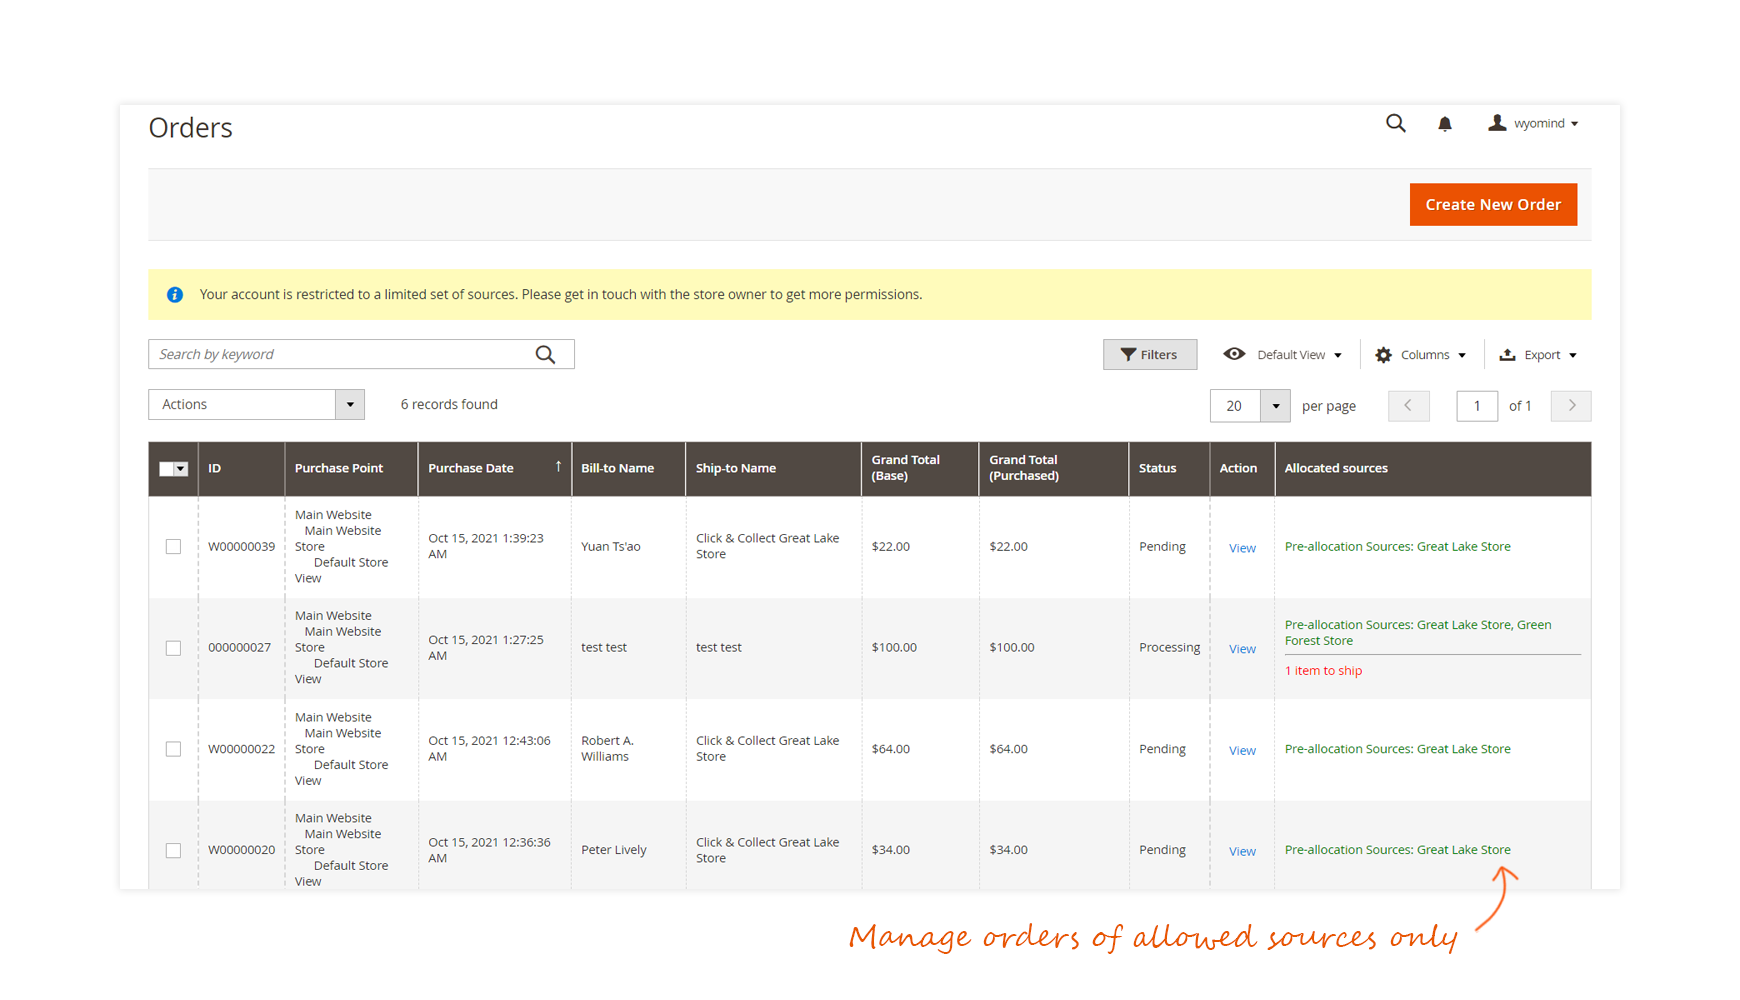
STEP 3: Manage your pre-allocations
You can check and edit your orders' pre-allocations from:
SalESOrders
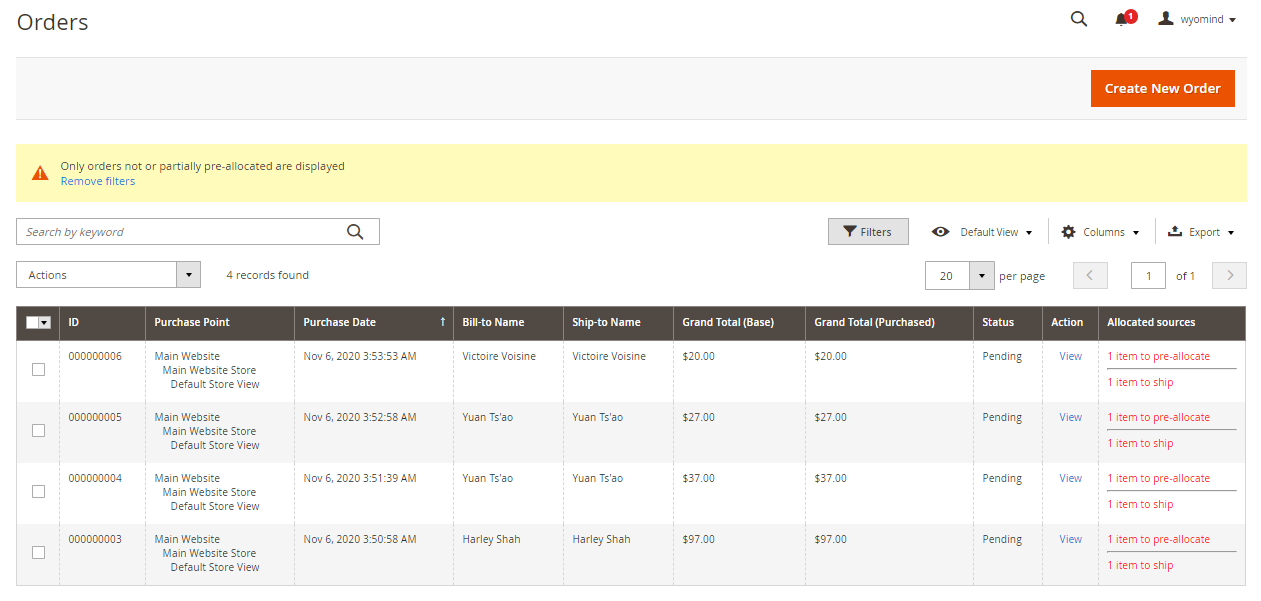
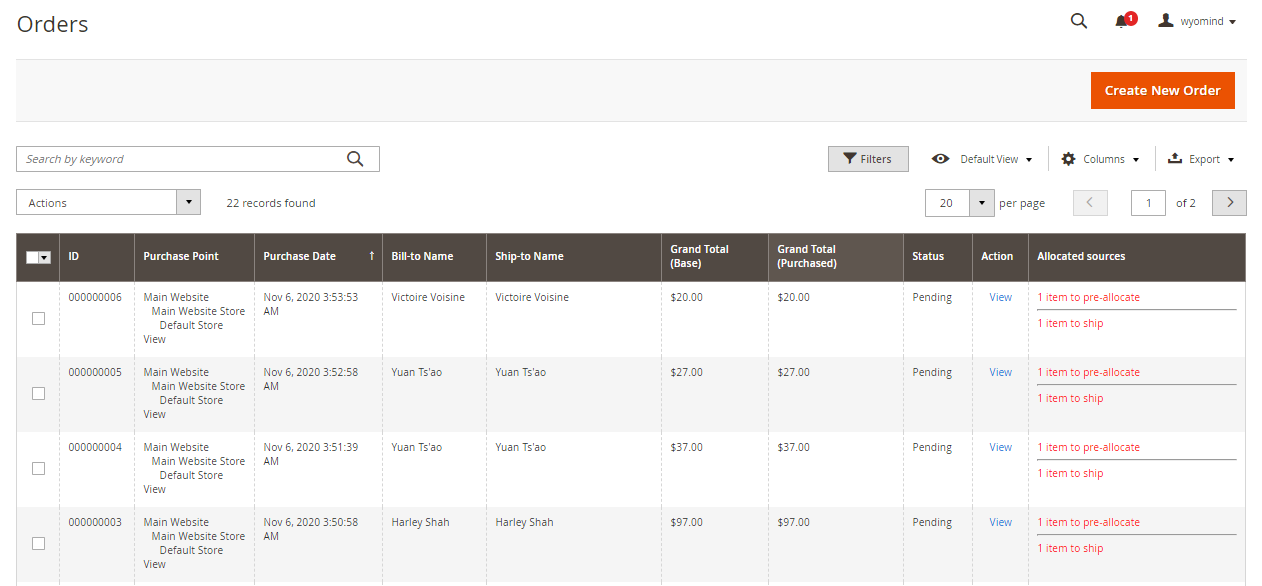 In the orders grid, you'll be able to see different statuses from the Allocated sources column.
These statuses concern the pre-allocation or the shipment of the orders.
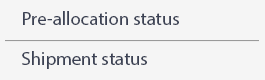
Pre-allocation statuses
The pre-allocation status appears first, above the shipment status.
You can have:
- X item to pre-allocate
X product must be pre-allocated manually to a source. - X item(s) is partially pre-allocated
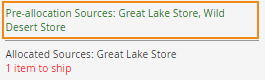
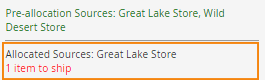
There are still products from the order to pre-allocate. - Pre-allocation Sources: Name of the store
The order is pre-allocated to the source.
These are the sources used for the automatic or manual pre-allocations. - No pre-allocation required
For orders placed before the module installation and for orders that don't need to be pre-allocated (for example, products with no stock management).
Shipment statuses
The status concerning the shipments appears below the pre-allocation status.
You can have:
- X item(s) to ship
X product(s) must be shipped manually. - X item(s) is partially shipped
There are still products from the order to ship. - Allocated Sources: Name of the source
The order is allocated to the source.
These are the sources used for the shipments. - No item to ship
When products cannot be shipped (virtual, downloadable, ....).
Automatic pre-allocation
MSI Order Management for Magento 2 allows you to automatically pre-allocate sources during the order validation.
For that, you must define the Pre-allocation process on Automatic from:
StoresSettingsConfiguration Wyomind MSI Order Management
The orders will be pre-allocated to sources according to the pre-allocation algorithm you have chosen:
- Distance Priority: the order will be pre-allocated to the closest source
- Source Priority: the order will be pre-allocated to the first source
- Your custom algorithms: the order will be pre-allocated to sources according to the rules of your algorithm.
See how to create your custom algorithms.
If you have enabled the Pending pre-allocations notification in the back-end, the following notification will be displayed when the automatic process cannot find a solution for the pre-allocation.
![]() Click on Manage these orders to open the orders grid displaying only the orders with pending pre-allocations.
Click on Manage these orders to open the orders grid displaying only the orders with pending pre-allocations.
Manual pre-allocation
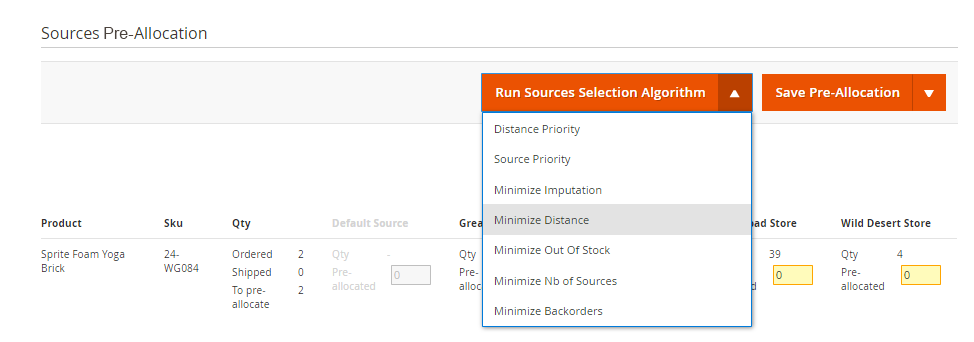
The extension allows you to edit the orders pre-allocations and to run the algorithms manually from the orders grid and pages.
You will be able to run default and custom algorithms via the Run Sources Selection Algorithm dropdown, and you will also be able to edit each field manually.
Sources can be:
- editable: you can assign quantities to the source.
If the source is editable and displayed in grey, it means that the product is linked to the source but this one is not linked to the stock.
See how to enable pre-allocation to sources not linked to the website. - disabled: the product is not linked to the source (although the source belongs to the stock).
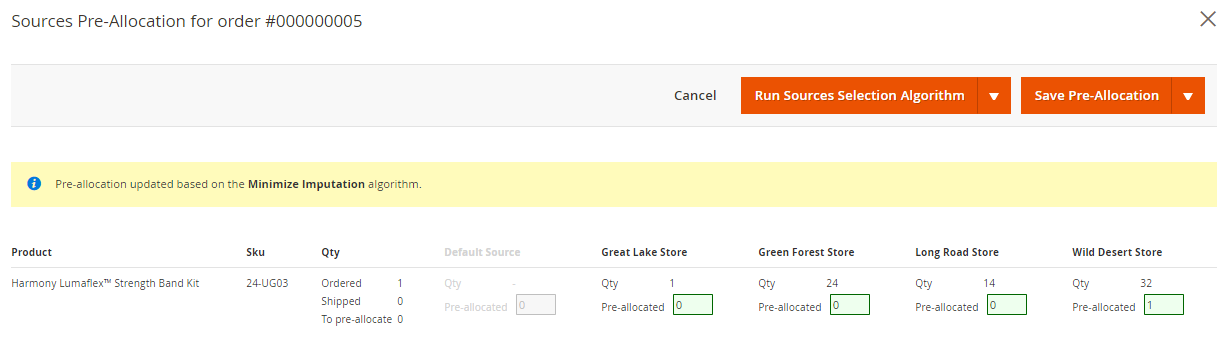
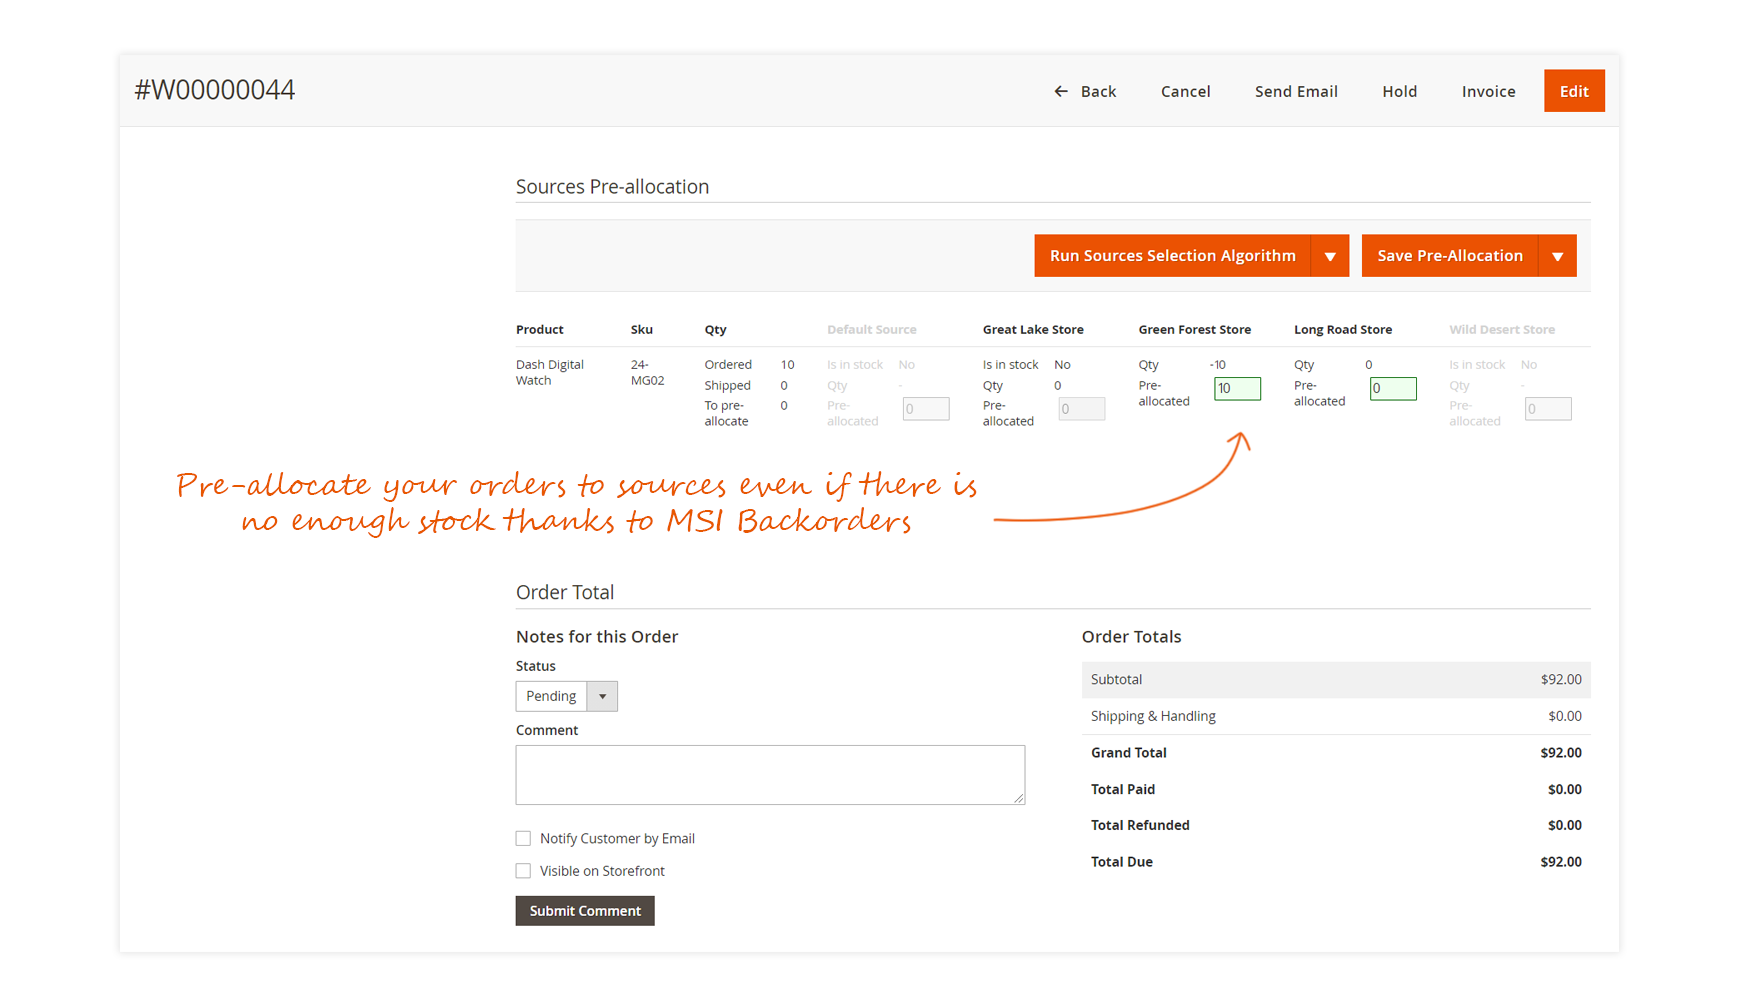
From the order page
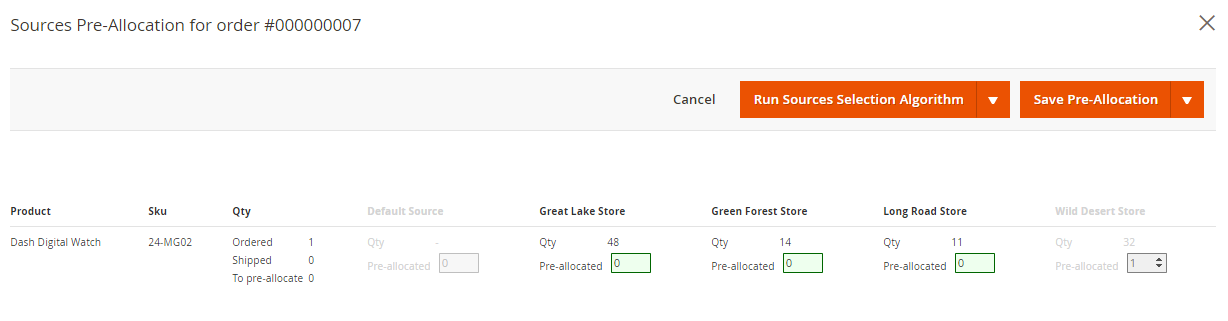
You can pre-allocate orders to sources manually from the Sources pre-allocation section of the orders page directly.
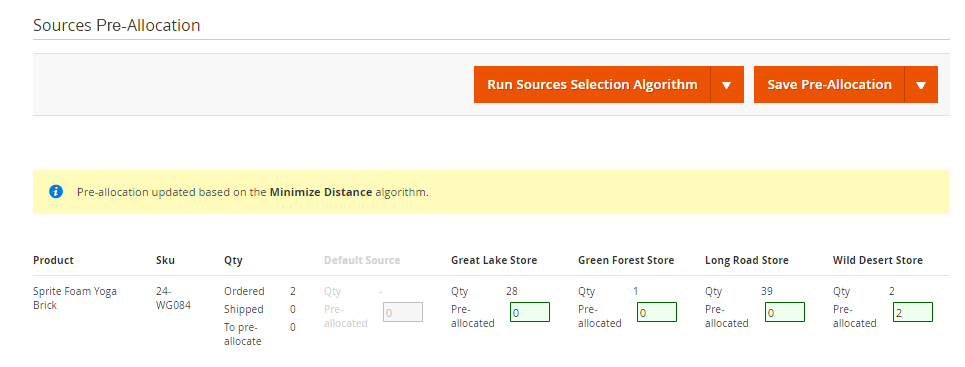
Select the algorithm from the Run source selection algorithm dropdown.
 A notification should be displayed to confirm the pre-allocation.
From the popup
You can pre-allocate orders to sources manually from the orders grid popup directly in:
SalesOrders
Click on X item(s) to pre-allocate from the Allocated sources column.
A popup should open and display the sources' pre-allocation for the order.
Select the algorithm from the Run source selection algorithm dropdown.
 A notification should be displayed to confirm the pre-allocation.
Via the command line
You can use the Command Line Interface to run the below commands:
- Run a pre-allocation in bulk for orders that were not pre-allocated (fully or partially):
bin/magento wyomind:msiordermanagement:preallocation:run [options] [arguments] - Reset and run the pre-allocation for orders that are not fully shipped:
bin/magento wyomind:msiordermanagement:preallocation:update [options] [arguments]
Options:
- -l, --limit[=LIMIT]
To limit the number of orders to process:bin/magento wyomind:msiordermanagement:preallocation:run --limit 6 "priority"
- -la, --list-algorithms
To list the available algorithms:
bin/magento wyomind:msiordermanagement:preallocation:run -la
Arguments:
- -a, --algorithm
It is the code of the algorithm to use for the pre-allocation enclosed in double-quotes. Default is "priority".
bin/magento wyomind:msiordermanagement:preallocation:run -a "distance"
Retrieve pre-allocation
Via the API
You may use a Web app or software to manage your stocks. So that you can make the link between that tool and your Magento 2 instance, the MSI Order Management extension allows you to use the API to manage your stocks:
- /V1/msiordermanagement/getsalesorderpreallocation/: to retrieve the pre-allocation of items for an order.
Use the order ID as an argument:
https://www.wyomind.com/rest/V1/msiordermanagement/getsalesorderpreallocation/84The result looks like: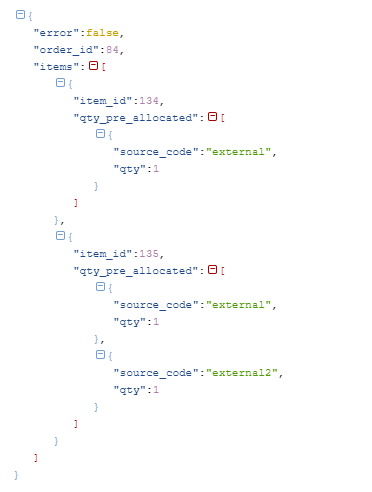
STEP 4: Create your shipments
The extension allows you to create shipments in a few clicks only in:
SalesOrders
If you have enabled the Pending shipments notification in the back-end, the following notification will be displayed in your back-office.
![]() Click on Manage these orders to open the orders grid displaying only; the orders with pending shipments.
Click on Manage these orders to open the orders grid displaying only; the orders with pending shipments.

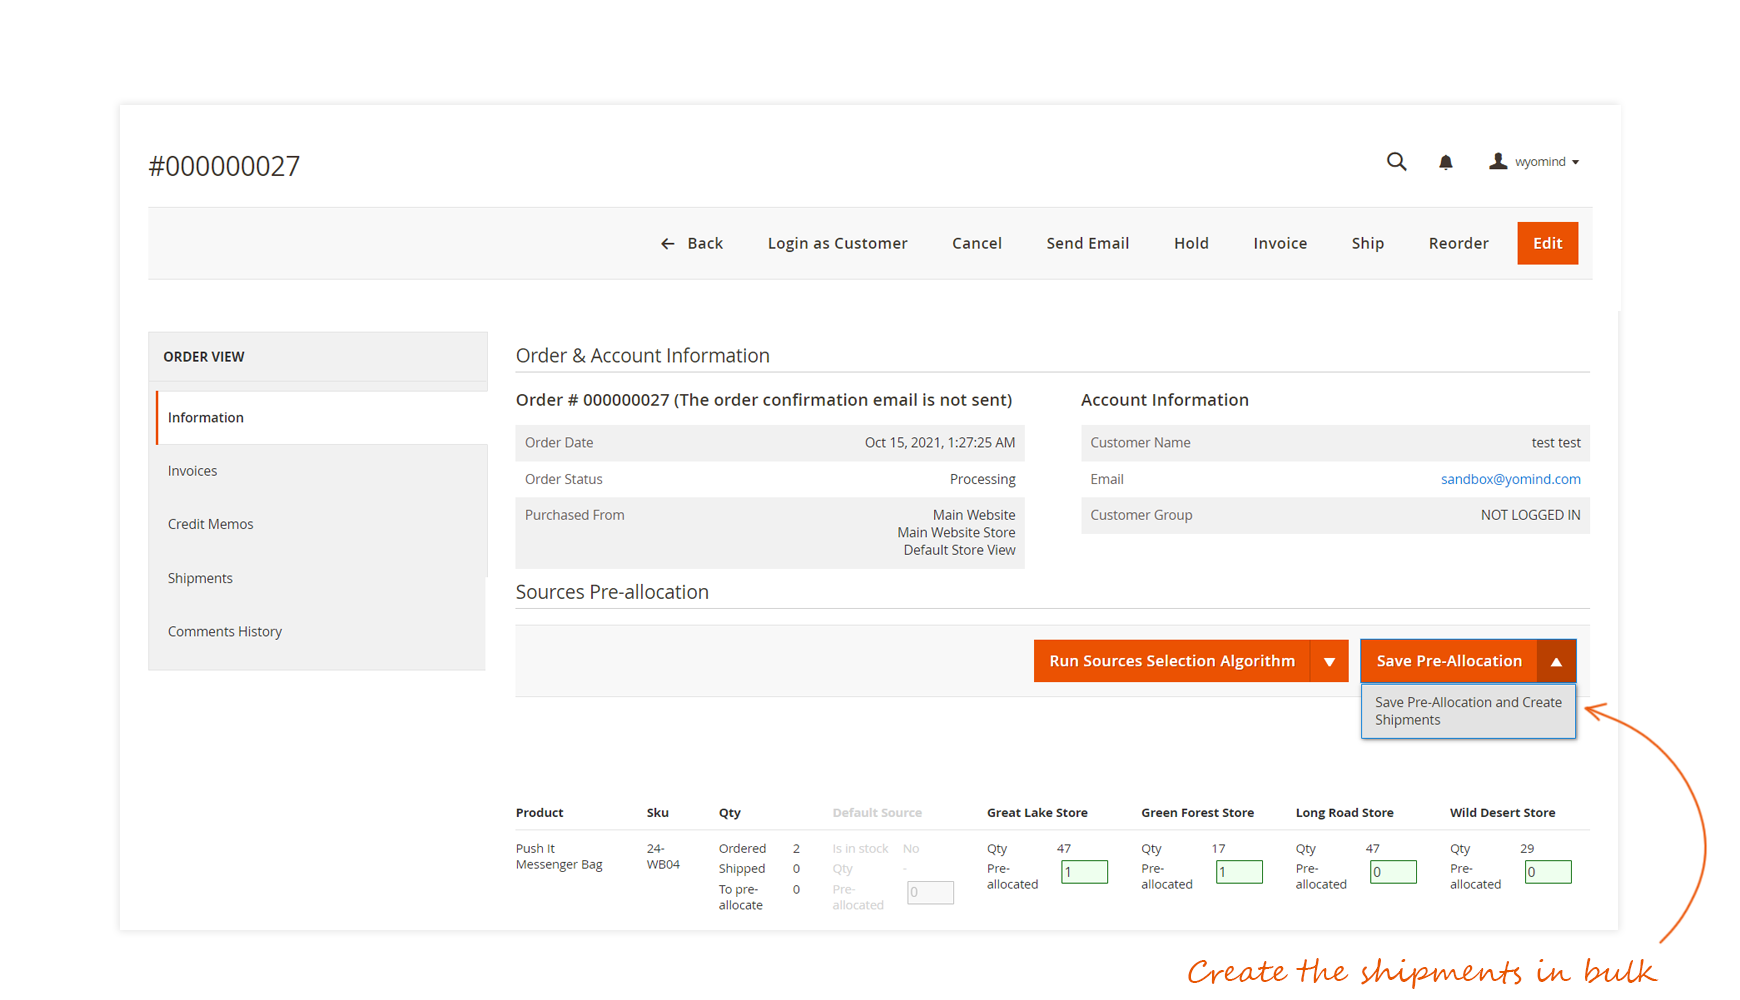
From the order page
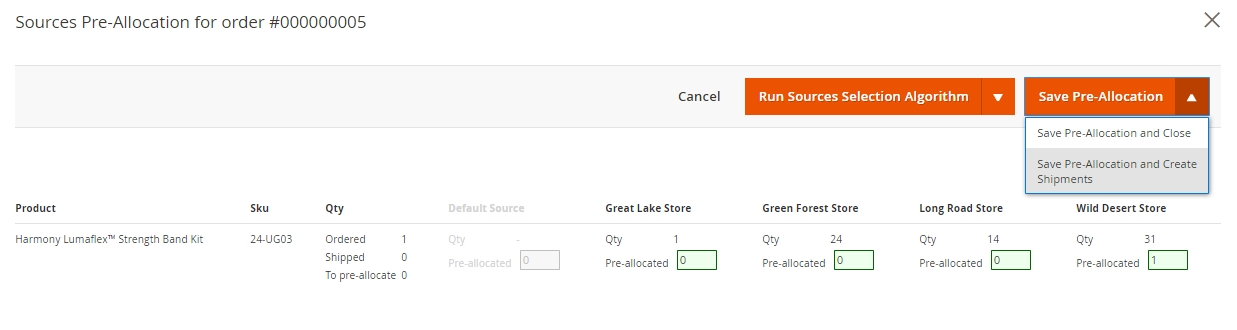
You can create the shipments from the Sources pre-allocation section of the orders page directly.
From the Save pre-allocation dropdown, choose Save Pre-Allocation and Create Shipments.
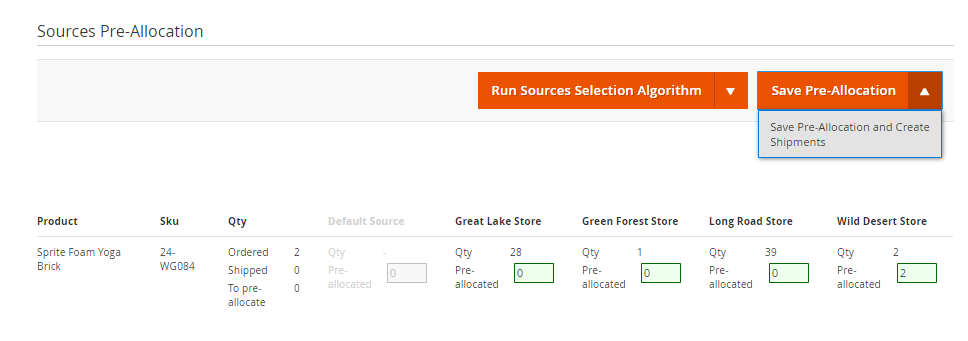 A popup should open and sum up the shipment for the order.
At this time, you have the possibility to add a tracking number from the Shipping information section.
Click on Create Shipments or Create and Open the Shipments.
![]()
Once the shipment is created, a notification will be displayed:
 If you have selected Create and Open the Shipments, this will open each shipment in a new window.
You'll find the Shipping and Tracking Information in the Shipment page.
![]()
From the popup
You can create the shipments from the orders grid popup directly in:
SalesOrders
Click on X item(s) to ship from the Allocated sources column.
A popup should open and display the stock pre-allocation for the order.
From the Save pre-allocation dropdown, choose Save Pre-Allocation and Create Shipments.
 Another popup should open and sum up the shipment for the order.
You can add a tracking number from the Shipping information section.
Click on Create Shipments or Create and Open the Shipments.
![]()
Once the shipment is created, a notification will be displayed: If you have selected Create and Open the Shipments, this will open each shipment in a new window.
You'll find the Shipping and Tracking Information in the Shipment page.
![]()
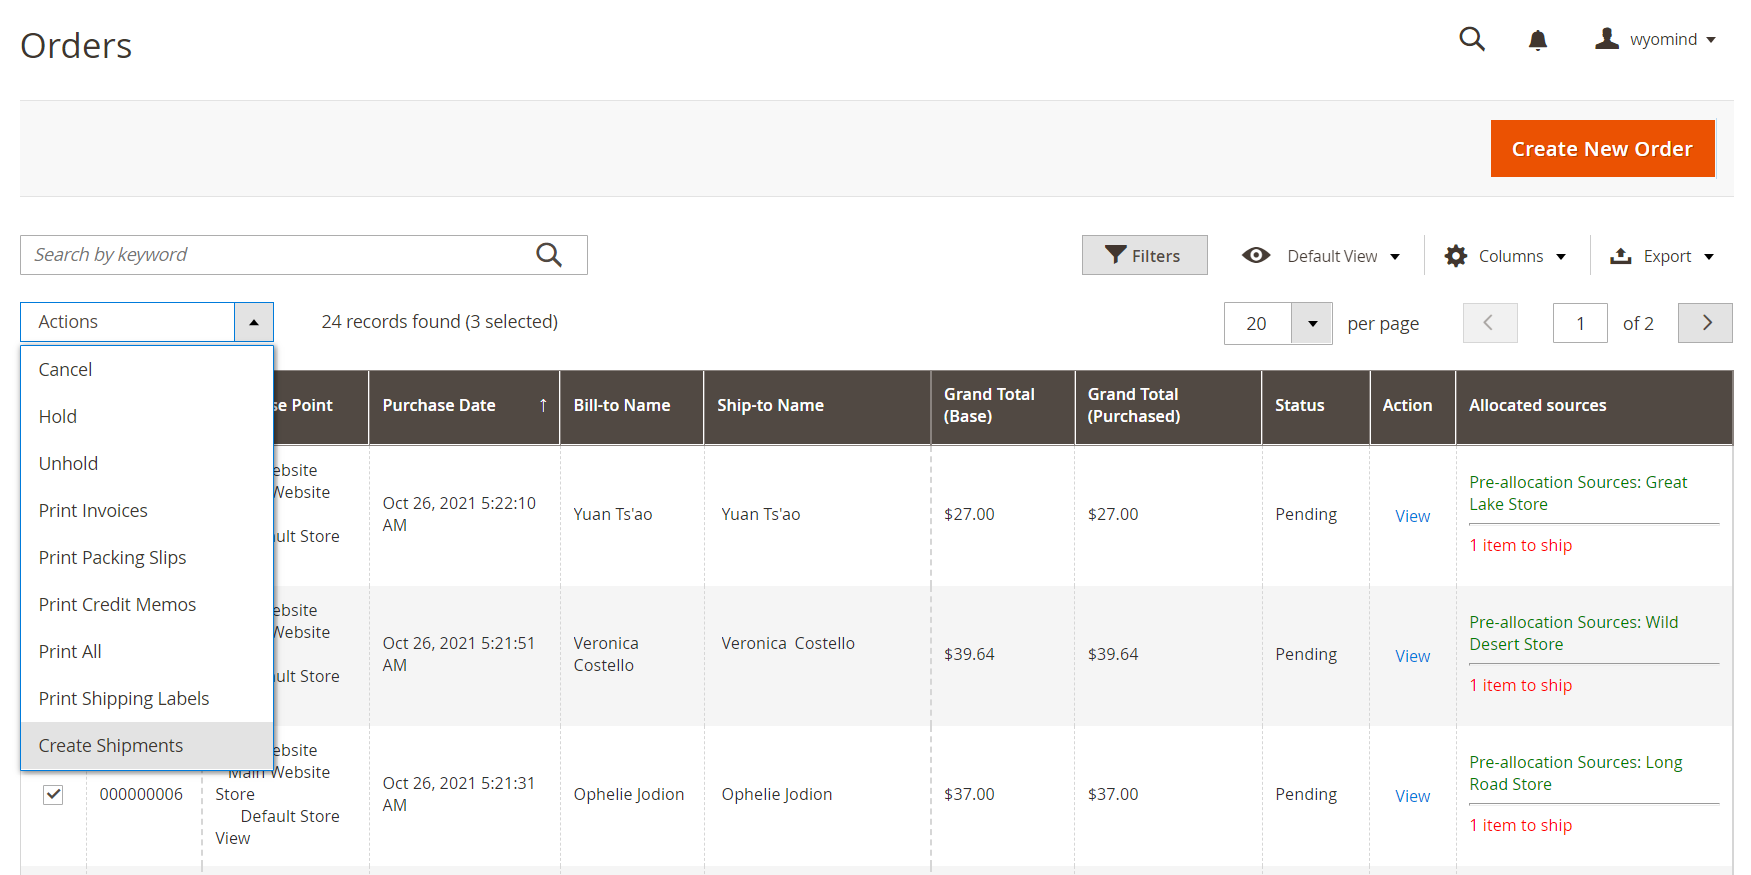
From the orders grid
You can create the shipments from the orders grid directly in:
SalesOrders
Select the orders for which you want to send the shipments and from the Actions dropdown, choose Create Shipments.
Once the shipment is created, a notification will be displayed:

STEP 5: Check the reservations
MSI Order Management provides a history of each reservation movement available in a grid from:
SalesOrder ManagementReservations

This view allows you to understand what is happening at the level of your stocks when orders are placed, and in particular of the inconsistencies between the stocks and the salable quantity.
The extension adds 3 events:
- item_pre_allocated: this event compensates for the decrease in stocks during the pre-allocation
- item_pre_allocation_compensation: this event compensates for the shipment_created event
- order_cancel_compensation: this event compensates for the re-stocking of canceled products


