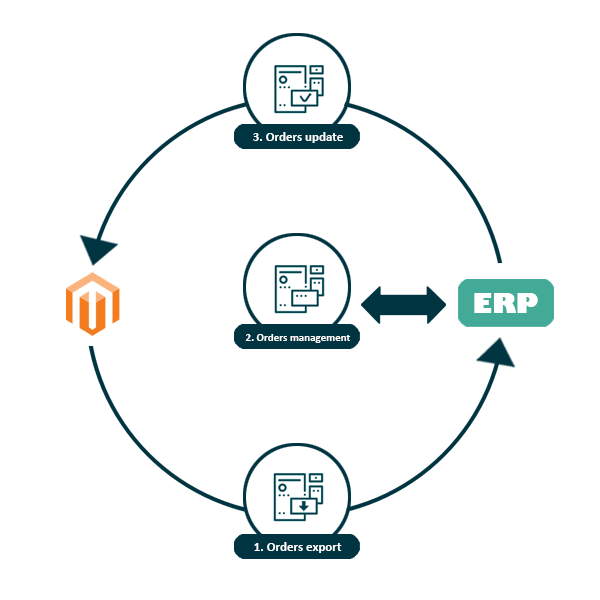
How does the Mass Order Update extension work with Magento 2?
Features
The Mass Order Update extension for Magento 2 will allow you to update massively your orders via CSV or XML files imported manually or automatically from any order management software/platform.
Mass Order Update makes it possible for you to manage:
- order information: change the status and add a comment
- delivery: create a shipment and add a tracking number
- order processing: create the invoice, the credit memo, and cancel the order
Configuration steps
The extension is very easy to use:
- Create an import profile
- Set the import file
- Define where the order identifier is in the file
- Define if the identifier is the order id or the increment id
- Create your rules
- Execute your profile or configure an automatic execution
In the case where you don't want to apply the rule to all the orders, you have the possibility to add some conditions to it. You could also create logical combinations of conditions to manage more complicated cases. In fact, the conditions allow you to define whether or not you apply the actions of the rule to the orders.
STEP 1: Configure the general settings
General Settings
You can configure the general settings from:
StoresSettingsConfigurationWyomindMass Order Update
Log
Profile
You can also configure:
Cron job
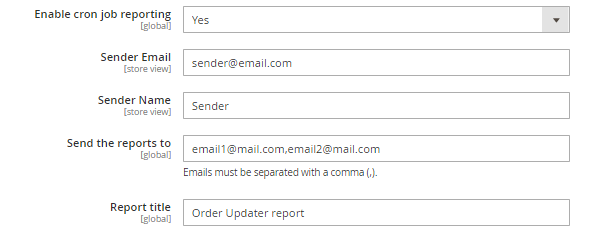
To activate the cron job reporting, set Enable cron job reporting on YES. If set to yes, the Mass Order Update module will send a report email on each execution.
You'll have to configure:
- Sender Email
The email of the sender. - Sender Name
The name of the sender. - Send the reports to
The recipients of the email.
Note that emails must be separated with a comma.
[email protected],[email protected] - Report title
A title for the report and the email.
You can also define:
- a Cron Interval
By default, cron tasks can be scheduled for each period of 30 minutes.
If you need a more precise hour, you can change that interval.
20
STEP 2: Create your profile
To create your profile, click on create a new profile from:
SalesMass Order UpdateProfiles
The Tool Box
The toolbox is very useful as this will help you to configure your update file more quickly.
Below are the different options for the toolbox.
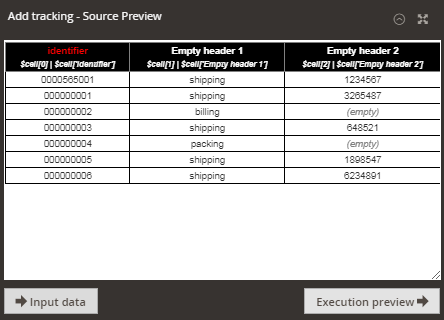
Input Data
Output Data
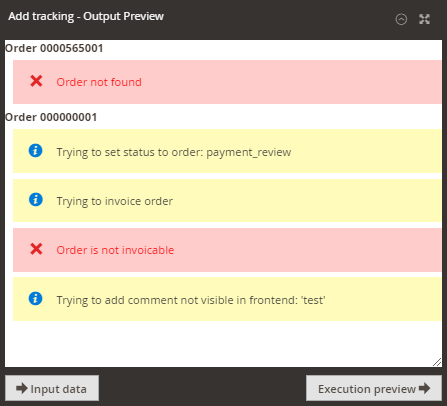
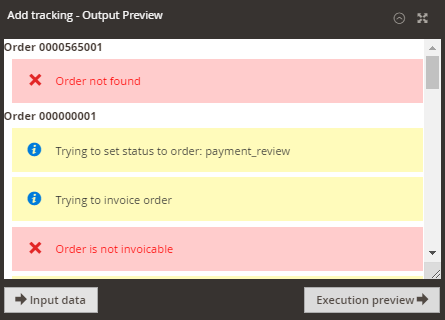
You can have different notifications among which:
Settings
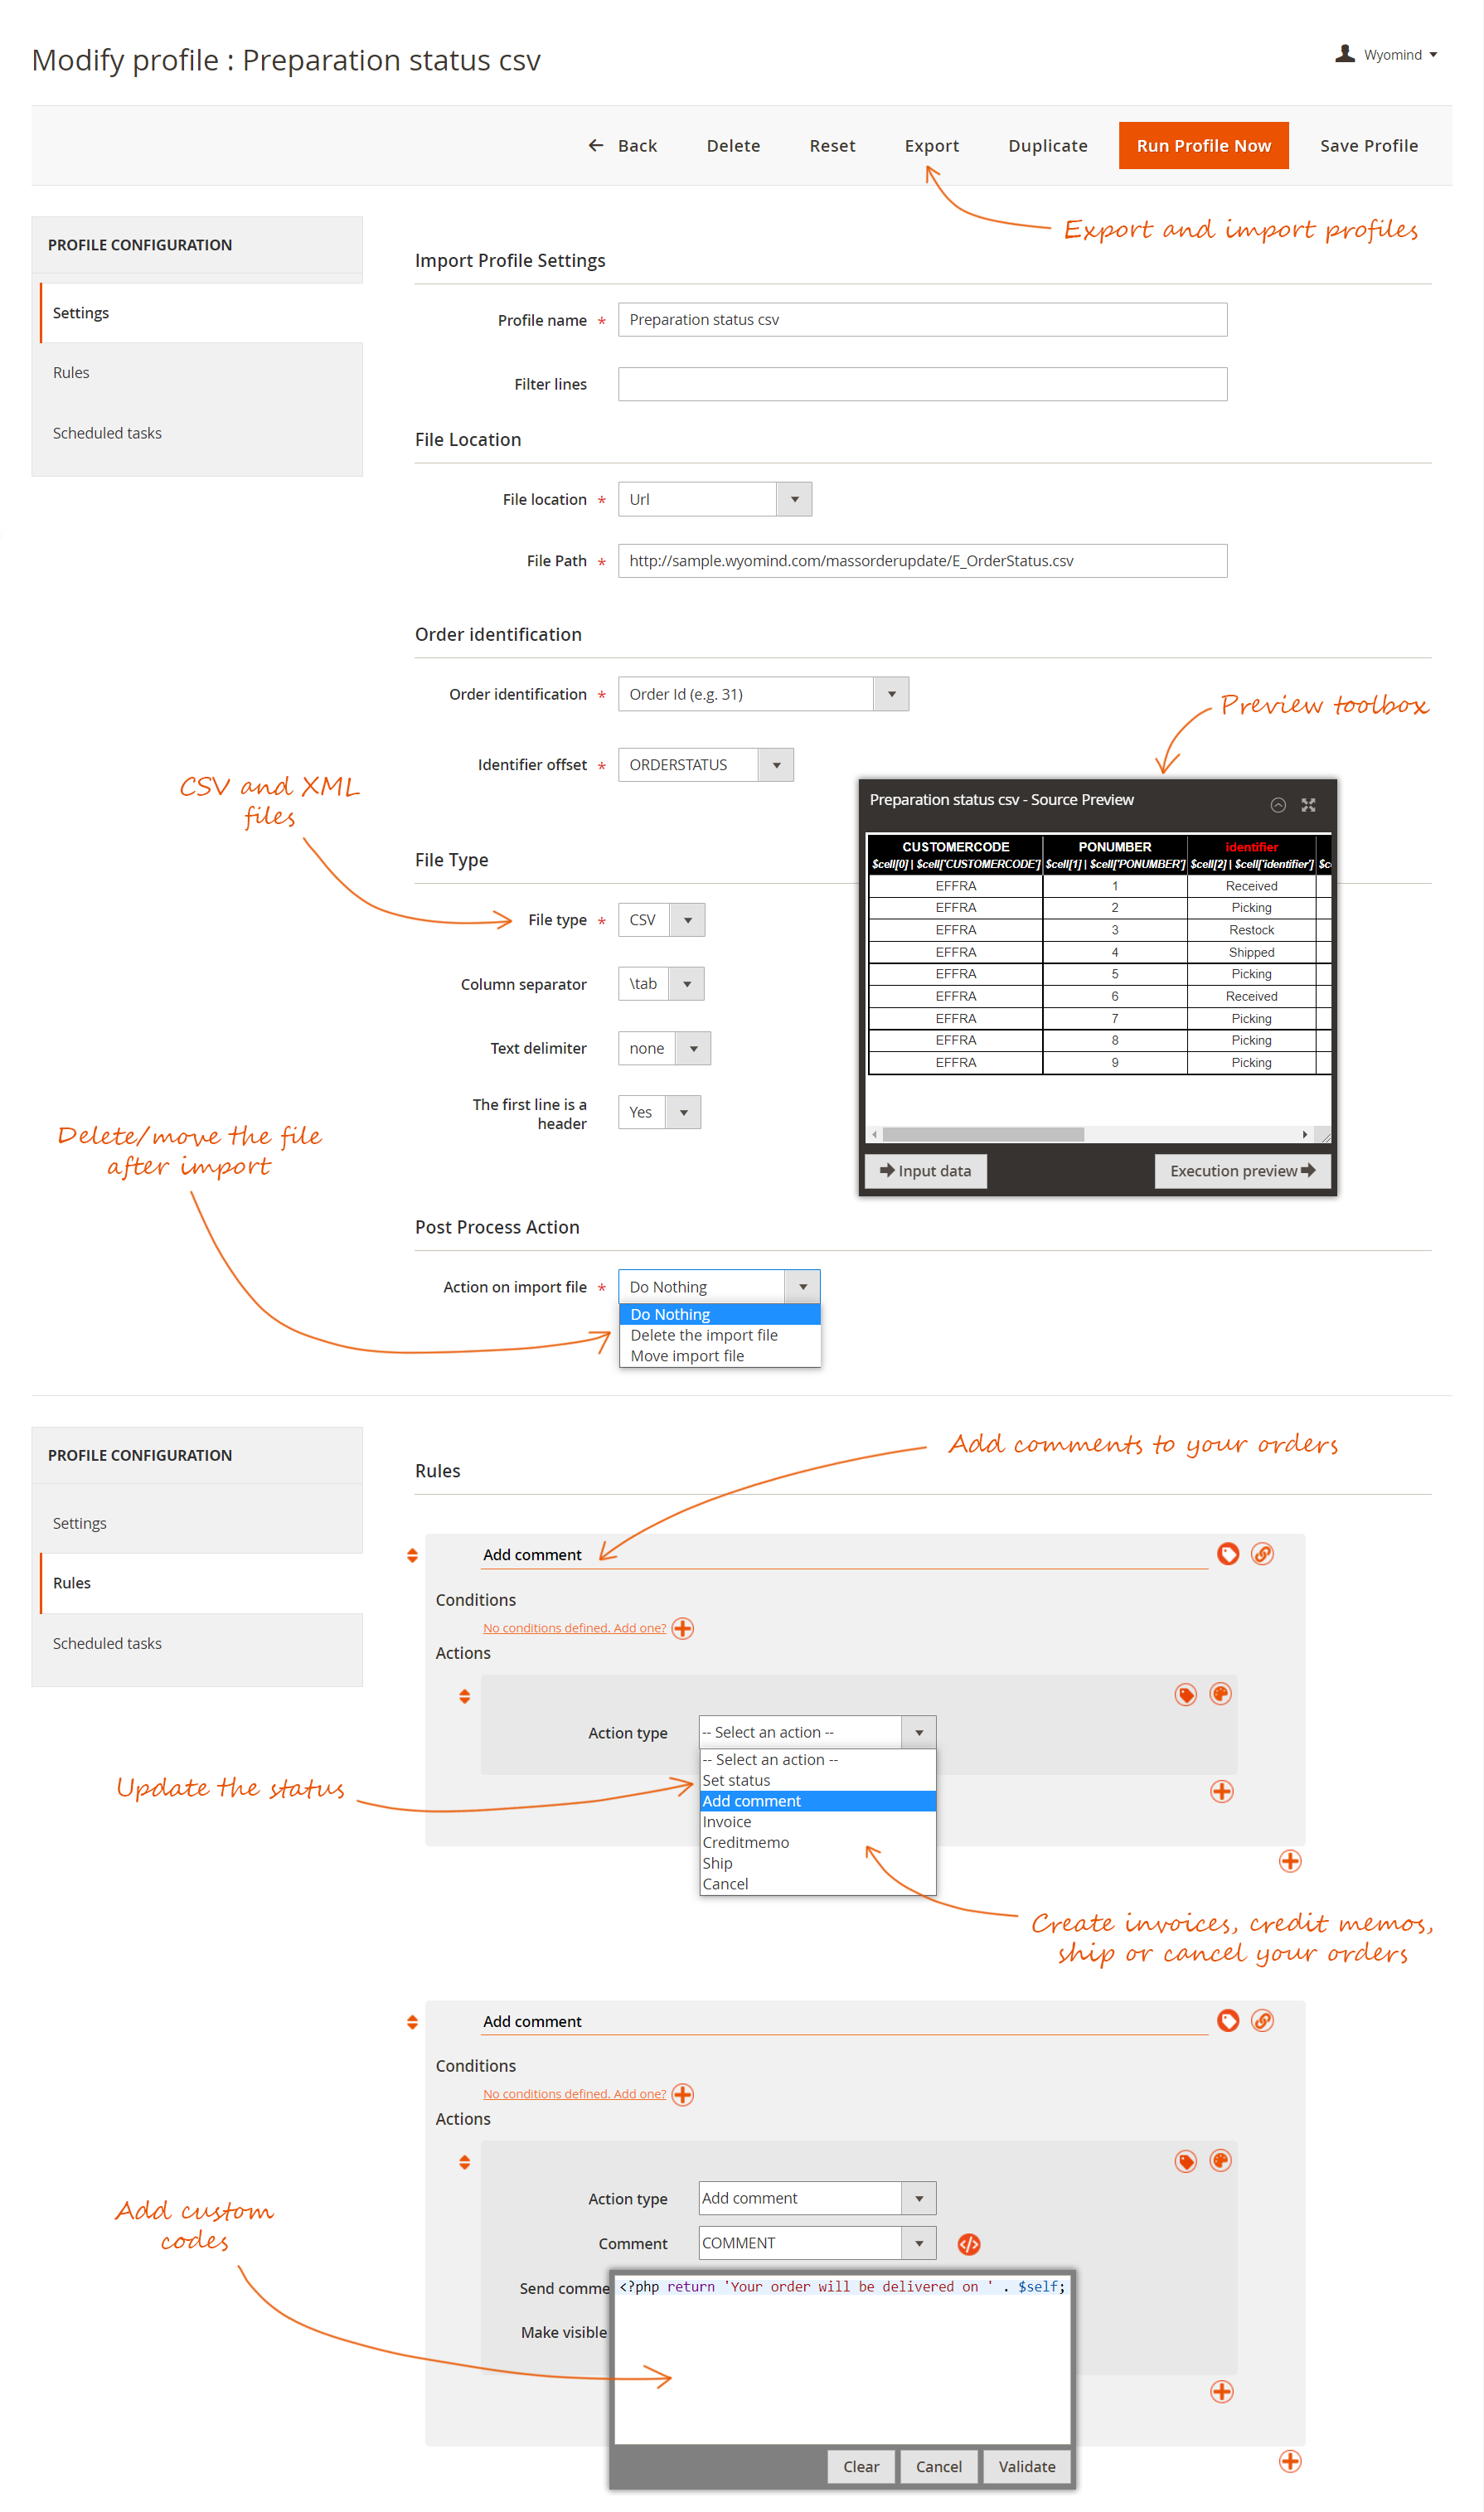
Import Profile Settings
Define the settings for your profile.
- Profile Name
The profile's name must be unique. - Filter lines
Leave empty to import all lines:
means all lines will be imported
Type the numbers of the lines you want to import, making sure to separate each line or range with a comma (,):
2,4,6,8,10means lines 2,4,6,8,10 will be imported
Use a dash (-) to denote a range of lines:
8-10means lines 8,9,10 will be imported
Use a plus (+) to import all lines from a line number:
4+means all lines from line 4 will be imported
Use regular expressions surrounded by # to indicate a particular group of identifiers to import:#0000002[0-9]+#
means all lines with an identifier matching the regular expression will be importedNote you can combine all those options. For example 2,6-10,15+ means line 2,6,7,8,9,10,15,16,17,... will be imported.
File Location
This section allows you to specify where the source data file is stored. You have several options:
- Magento File System
The file is stored in the Magento root directory or a subdirectory of the Magento root directory.
The File path is relative to Magento root folder. - FTP server
The file is stored on a remote server available from FTP orSFTP . Do not prefix the domain name or the IP with FTP://.
You'll be able to check if the FTP connexion is valid.
The File path is relative to FTP user root folder. - URL
The file is stored on a remote server available from HTTP or HTTPS.
Fill in the File path with the URL of the file. - Webservice
The file is available on a remote server accessible as web service.
Fill in the File path with the URL of the web service.
The extension uses the CURL PHP library to connect the web service. You can provide the web service a login/password couple and any parameters formatted asurl parameters, as follows:
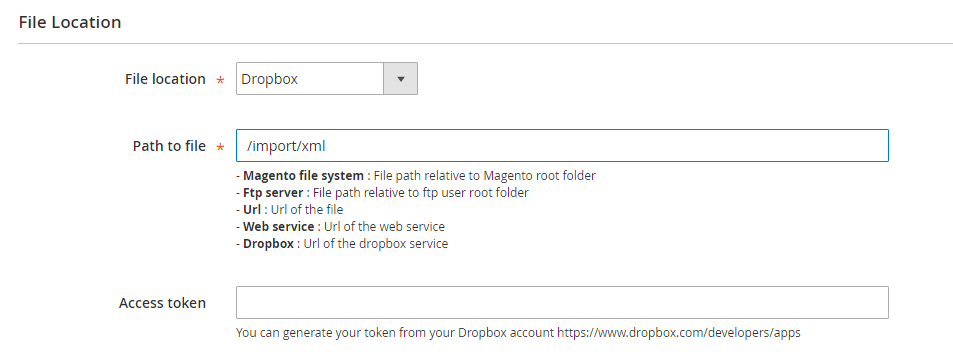
parameter1=value1¶meter2=value2¶meter3=value3 - Dropbox
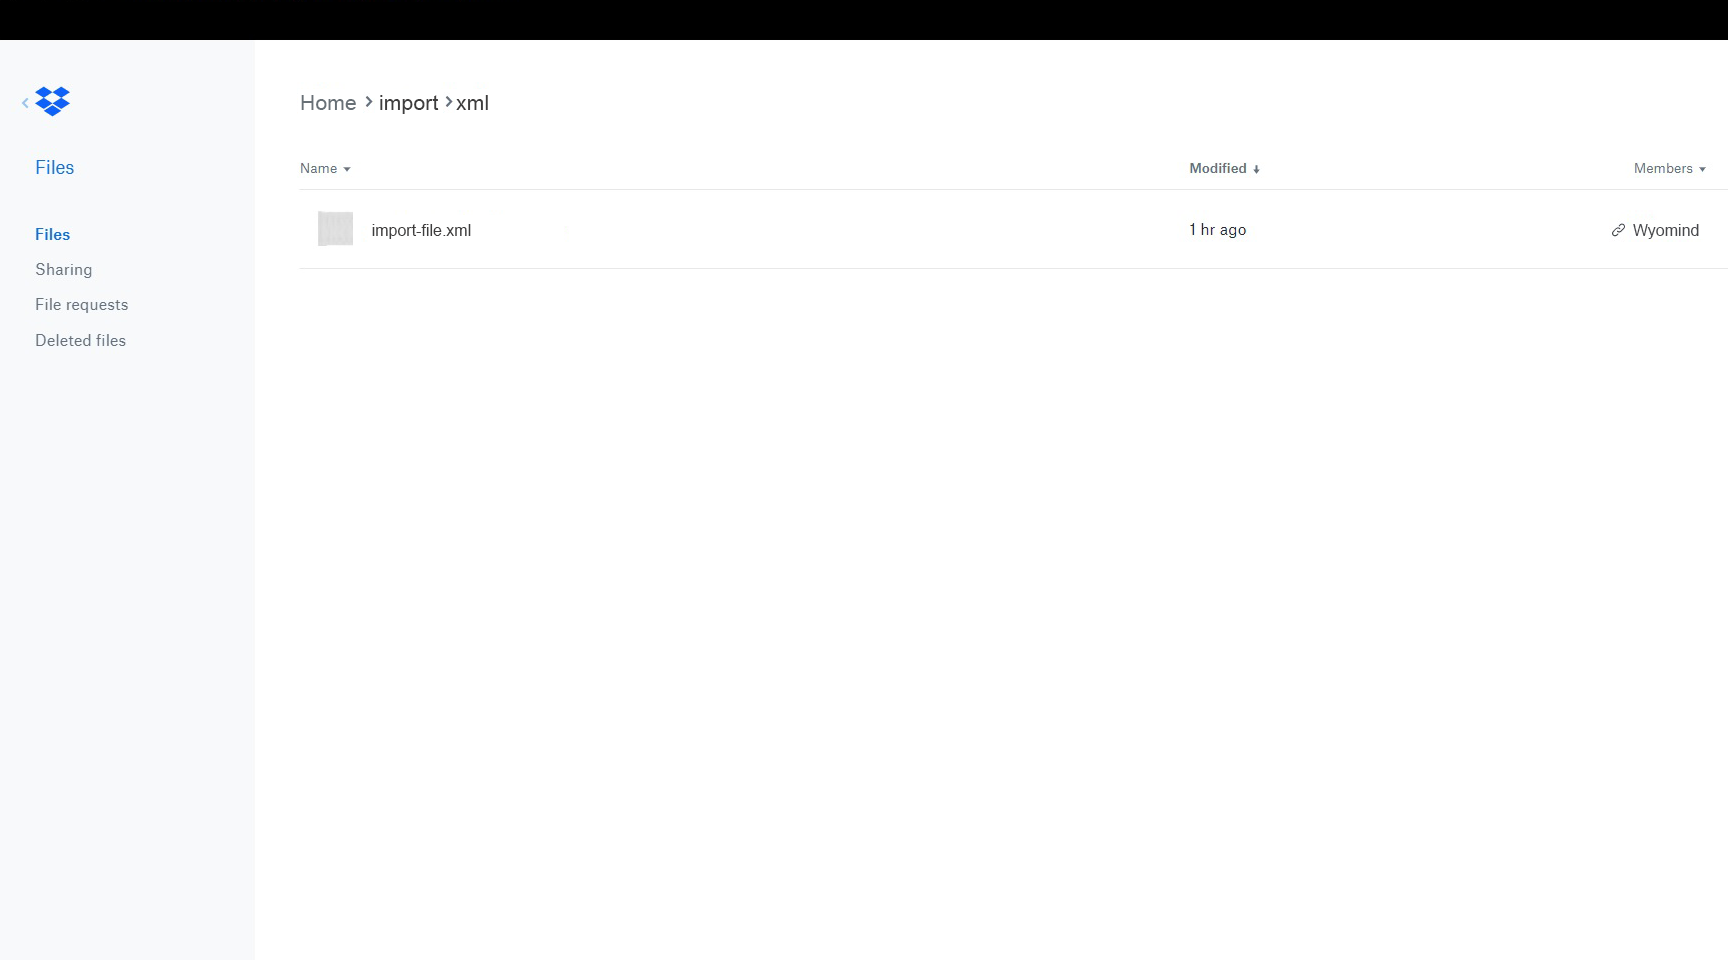
Fill in the File Path with the URL of the dropbox service.
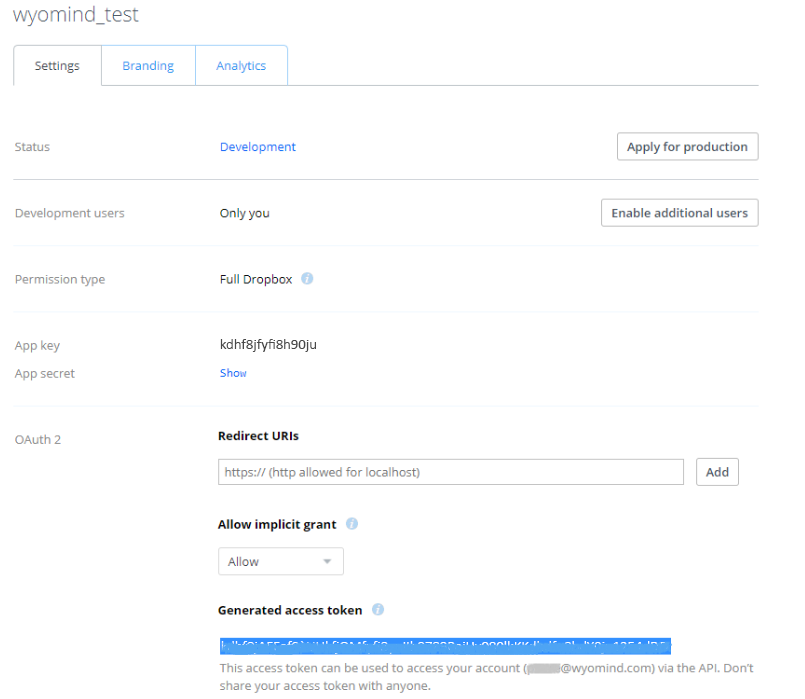
Generate your token from your Dropbox account https://www.dropbox.com/developers/apps
- File path
The path to the file including the file name and the extension as it appears in the file system of the server.
You can also use regular expressions in the file paths.
Order Identification
Choose how your orders will be identified in the imported file:
- Order identification
You have the possibility to choose the order id or the order increment.
For example:
3420or
1000003421 - Identifier offset
You need to select the field which contains the order identifier.
File Type
This allows you to specify the file type used for the update between XML and CSV.
For CSV files, define:
- Column separator
Define the column separator. - Text delimiter
Select the text delimiter. - The first line is a header
Specify when the first line is a header.
For XML files, define:
- Xpath to orders
In case of an update from an XML file, fill in the XPath that targets the orders. The Xpath is case sensitive. - XML structure
You have two options; the Automatic detection or the Predefined structure.
The automatic detection fits for simple files made of only one nesting level such as the above file sample. - Predefined structure
If you've selected the Predefined structure, you have the possibility to define your own file structure. When the structure of your file is quite complex, the info may be dispatched in deep nodes and sometimes in tag attributes such as:
url="something"
Below is an example of complex file where you need a predefined structure:
<orders> <order> <CustomerOrderId>000000028</CustomerOrderId> <order-shipment> <OrderTrackingNumber>334678MCLK</OrderTrackingNumber> <OrderCarrier>ups</OrderCarrier> <OrderTrackingURL>https://www.fedex.com/apps/fedextrack/?action=track&trackingnumber=334678MCLK&cntry_code=us&locale=en_US</OrderTrackingURL> </order-shipment> </order> </orders>The XPath that targets the orders in the above file is /orders/order
The JSON syntax you need to use is:
{
"incrementid":"CustomerOrderId",
"tracking_number":"order-shipment/OrderTrackingNumber",
"carrier":"order-shipment/OrderCarrier"
}
Post Process Action
You have the possibility to define an action after the file is processed.
- Action
Do Nothing
Delete the import file
Move import file - Move to folder
Define the file path where you want to move the import file, relative to your Magento root folder.
Rules
In that section, you can define your own rules and give them a Rule name.
A rule is a combination from 0 to n conditions and from 1 to n actions. Rules are tested for each order corresponding to an element of the file. If the conditions are met for the current element, the actions of the rule will be executed for the order.
If there is no condition for a rule, the actions are always executed for the order.
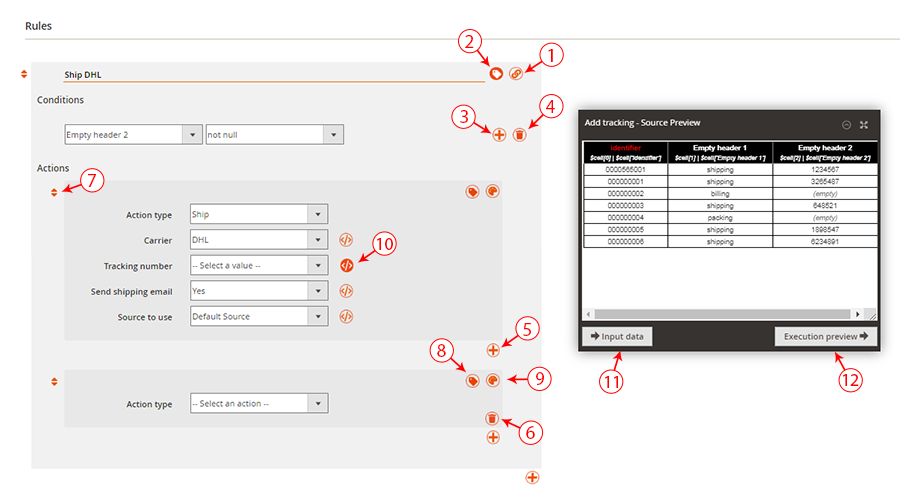
Overview of the interface
Find below a quick overview of the Rules section.
- Enable or disable a rule by clicking on the LINK symbol.
- Apply a label to the rule.
- Add a condition to your rule by clicking on +.
- Delete a condition from the rule.
- Add a new action.
- Delete an action from the rule.
- Change the order of each row using the drag and drop.
- Apply a label to the action.
- Apply the color of your choice to the action.
- Apply a custom script </> to the action options.
These scripts can be previewed in the output.
See how to use the PHP API. - Preview your file by clicking INPUT DATA.
- Check the actions that will be performed on your orders by clicking Execution preview.
Conditions
You can define conditions based on:
- the file: the conditions are based on the data available in the source file
- the order: the conditions are based on the orders data
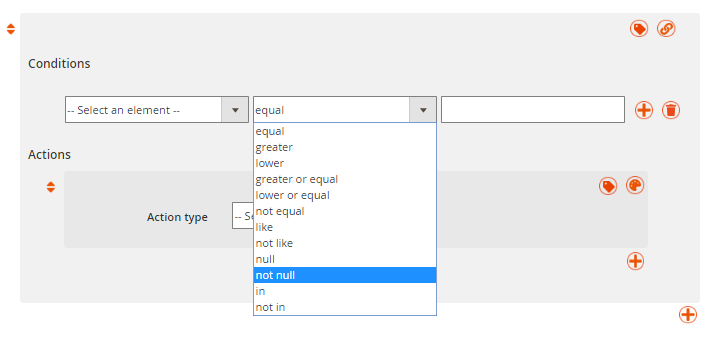
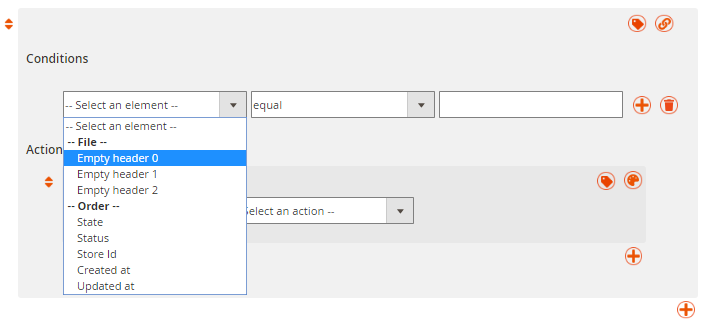 You have the possibility to define conditions according to several options such as:
- EQUAL / NOT EQUAL
- GREATER / LOWER
- GREATER OR EQUAL / LOWER OR EQUAL
- LIKE / NOT LIKE
- IS NULL / IS NOT NULL
- IN / NOT IN
Actions
You can select the below actions:
- Set status
You will have to select the status you want to apply to the orders.
- Add comment
You can define the comment you want to add to the orders as well as if you want to send the comment email and make the comment visible on the front-office, in the customer account.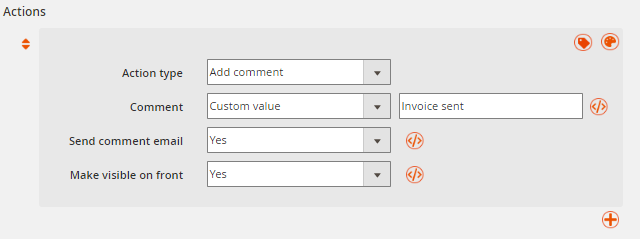
- Invoice
You can define if you want to send the invoice and the email.
- Creditmemo
You can define if you want to send the credit memo and the email.
- Ship
Define the carrier to apply, the title, the tracking number, the source to use (when MSI is enabled), and if you want to send a shipping email.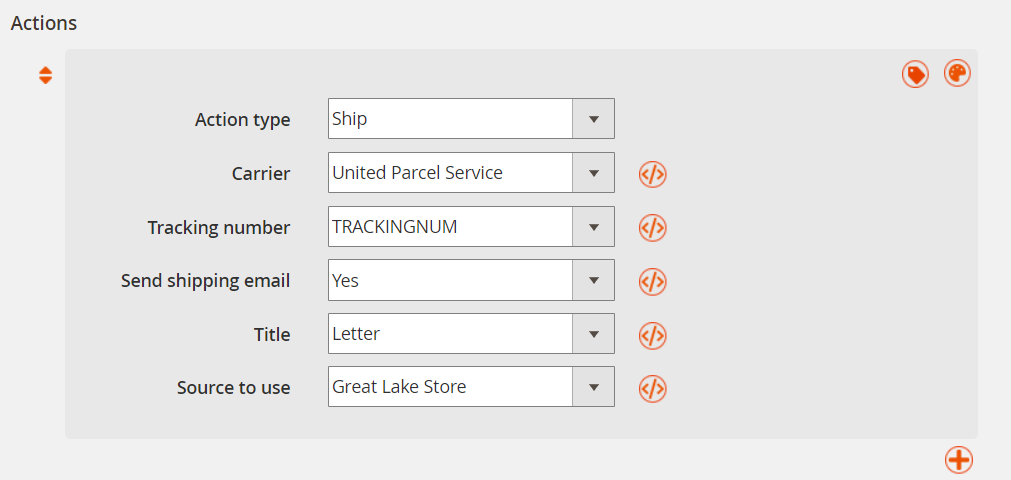
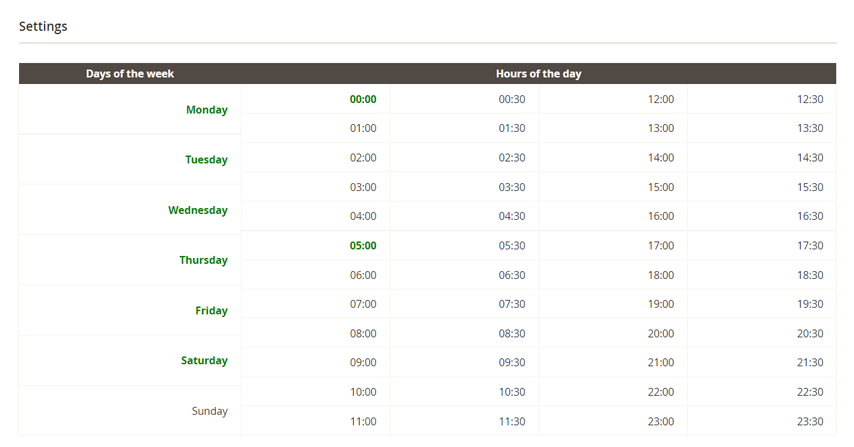
Scheduled Tasks
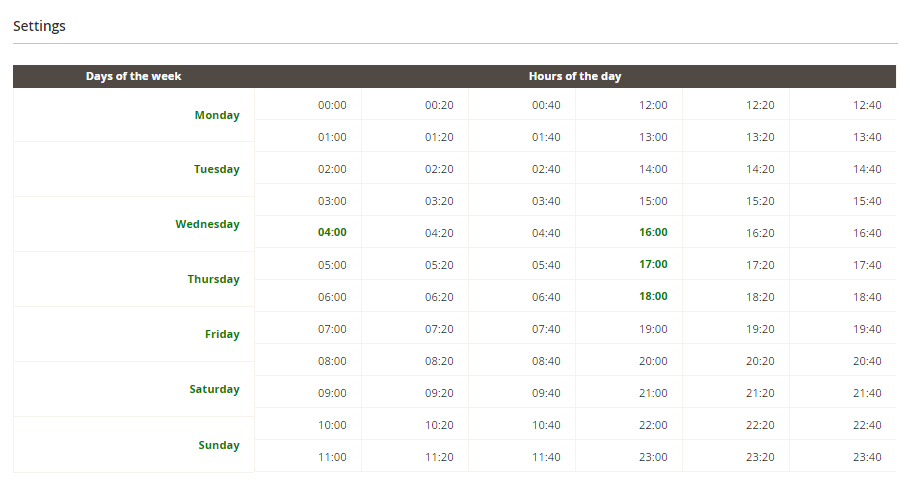
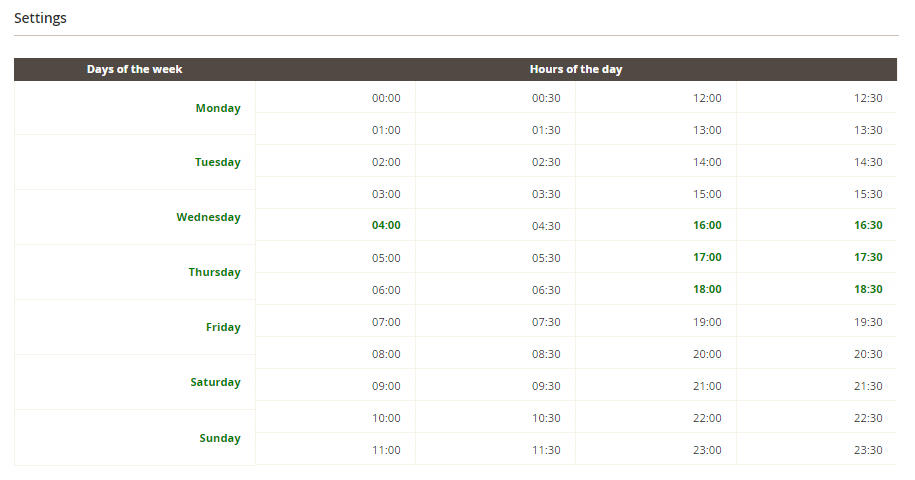
You can schedule the profile to be executed for all days of the week and with a default interval of 30 minutes between each execution.
The cron interval can be configured in the General Settings from:
StoresSettingsConfigurationWyomindMass Order Update
Run your Mass Order Update profiles
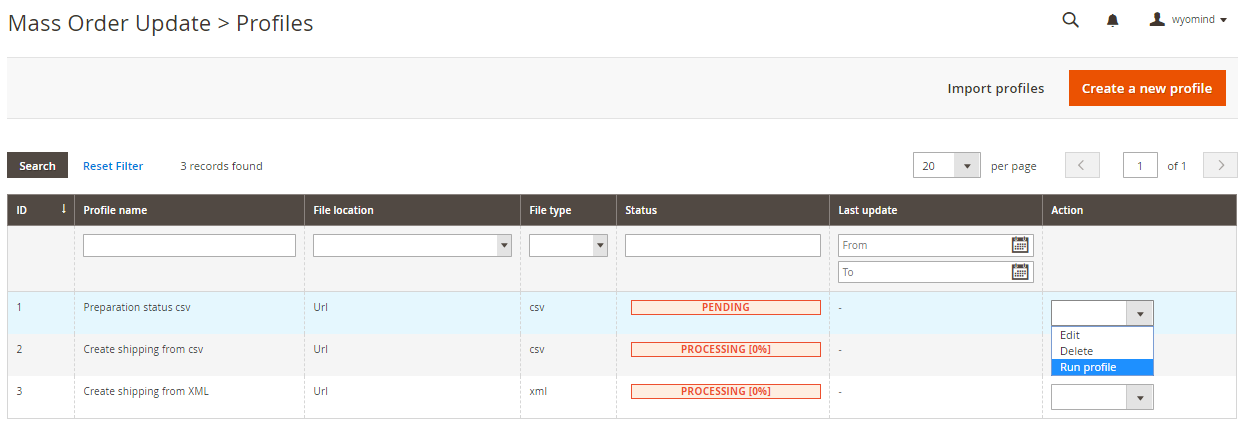
From the profiles grid
To run the profile from the grid, you just need to click on RUN PROFILE from the Action dropdown on the right column.
The status will then be updated with a progress bar.
From the profile's page
With the cron tasks
When the scheduled tasks are configured for the profile, then the profile will be automatically run at the day and the time selected.
So that the scheduled tasks work well in Mass Order Update, the main cron task in Magento must be configured properly.
For more details about how to configure the cron tasks in Magento, look at the official Magento user guide:
http://devdocs.magento.com/guides/v2.0/config-guide/cli/config-cli-subcommands-cron.html
You will receive an email each time the cron task is run if you have enabled the reporting in:
StoresSETTINGSCOnfigurationWyomind Mass Order Update
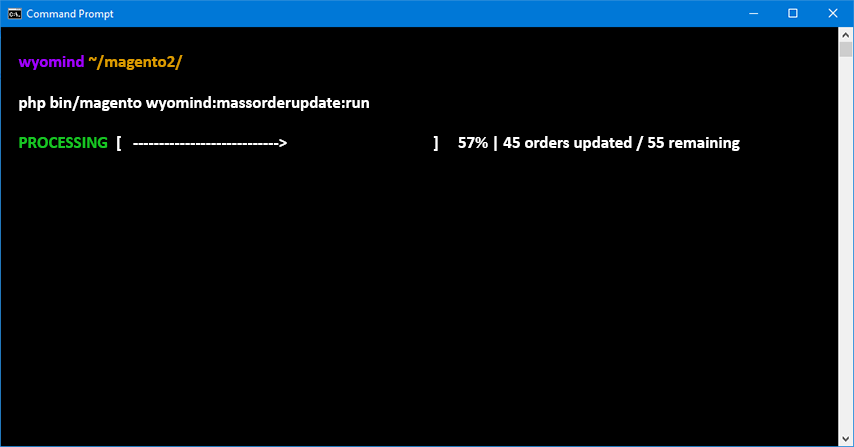
With the Command Line Interface
Mass Order Update includes command lines available from any shell console.
To run the profile:
bin/magento wyomind:massorderupdate:run [-p|--profile_ids[="..."]]For example, for profile 2, run:
bin/magento wyomind:massorderupdate:run -p 2Show the Mass Order Update report
The report will give you more information on the rules that have been executed for each order.
You can display the report from the profiles' grid by clicking on Show report from the Last Import column
Statuses
You can find different kinds of status in the report:
- notice
The notice displays what the profile has tried to execute. - success
It means the profile has successfully executed the rule. - error
It means the profile could not execute the rule.
Notifications
PHP API for Mass Order Update
Mass Order Update allows you to fully customize the parameters of your actions by using PHP scripts in different ways.
API coding standards
For each line in the Rules tab of your profile, you can add your own custom script based on a PHP syntax.
To add your custom script, click on </> at the end of the option you want to edit.
Opening and closing tags
Every script must include the opening PHP tag: <?php
For example:
<?php /* Your custom script */ return $self;Outputting a value
Use the return instruction to output any value in your profile.
For example:
<?php return 'Your order has been cancelled';Variable $cell
You can call any column of the source file using $cell["name of the column"]. It is an array that indexes each column numerically (1,2,3,...) and with a key corresponding to the name of the column header, so you can also use $cell[INDEX].
For example:
return $cell["Header 2"]return $cell[12]Variable $self
Use $self to retrieve the current value of the column and manipulate the data.
For example:
return 'Order shipped. The package tracking number is ' . $self;Variable $order
Use $order to retrieve any information of the order.
For example:
<?php
if ($order->getGrandTotal() > 500)  return 'wait_fraud_control'; else return 'preparing';
Examples of use
Below are some examples of use with the PHP API.
Return a delivery date in a comment
You could retrieve the delivery date available in your source file for each order in a comment.
Choose Add comment as Action type. In Comment, select the name of the field for the delivery date and add the below code:
<?php return 'Your order will be delivered on ' . $self;
Access the order with the $order variable
To retrieve the carrier code when it is not available in the source file, you may be able to deduct it from the order's information using the below code:
<?php
$explShippingMethod = explode('_', $order->getShippingMethod());
$carrierCode = $explShippingMethod[0];
return $carrierCode;

 Magento 2

