solutions for e-commerce

13 years of business 2563 reviews 4.9 average rating
Magento 2

Cron Scheduler Pro

Cron Scheduler Pro adds many features to the free version of Cron Scheduler that not only allows to monitor the cron jobs but that also allows to manage each cron task individually and directly from the Magento 2 back-office or via the command line interface.

5/5 rated
9 Reviews
from €245
User guide

Cron tasks in Magento

Cron Scheduler Pro is an extension that is solely available for Magento 2 and freely inspired by the excellent AOE Scheduler for Magento 1 (https://github.com/AOEpeople/Aoe_Scheduler).

Cron Scheduler Pro makes the cron tasks easier and more intuitive to manage. However, this extension doesn't dispense to configure the main cron task from the server side. For more information about how to configure the main cron task at the server level, please refer to the official Magento guide: http://devdocs.magento.com/guides/v2.0/config-guide/cli/config-cli-subcommands-cron.html

In Magento, the cron tasks mechanism requires to understand a few basic principles:

  1. The main cron task that runs on the server triggers regularly (ideally each minute).
    bin/magento cron:run
  2. The above command analyses each cron job (configured in the different enabled modules) and for each one of them, it programs the cron tasks for a few hours ahead depending on your preferences in:
    Storesconfigurationsystem cron
  3. Then, the same command runs the cron tasks that match with the current time, flags the tasks that are too old as missed and cleans up the history of the tasks. 

Configure Cron Scheduler in a general way

Cron scheduler only requires a few settings.

Email notification

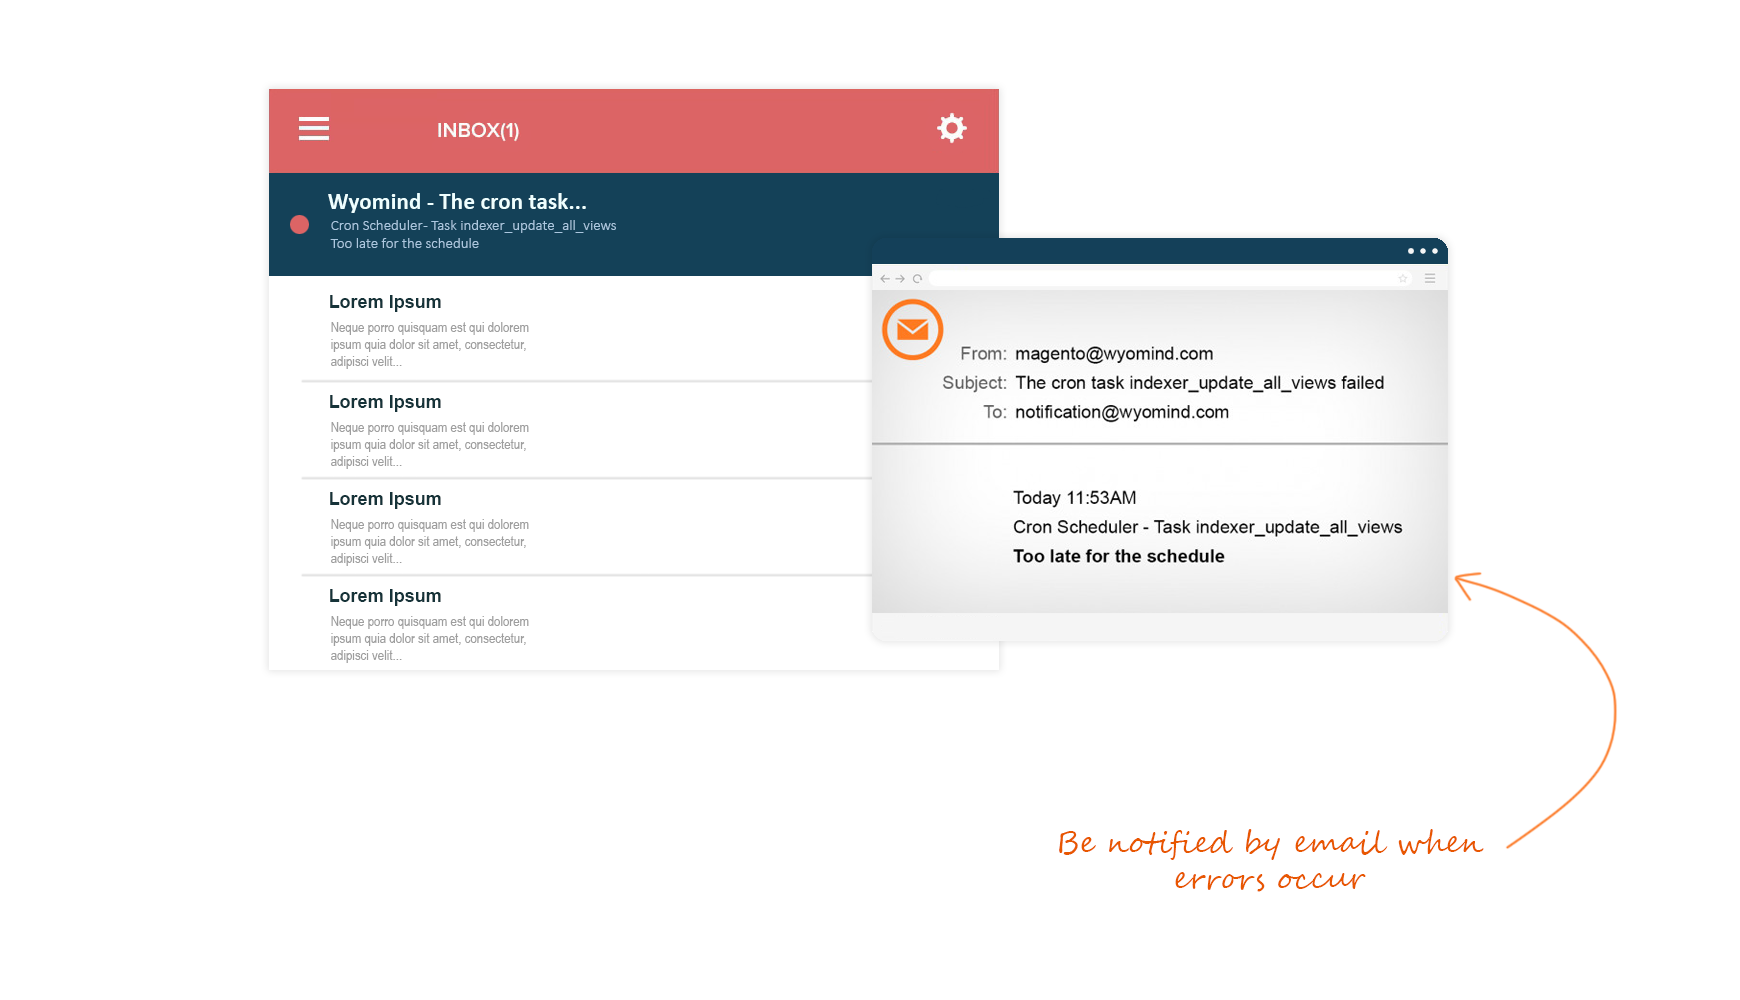
Define whether or not you want to receive an email alert when a cron task fails.
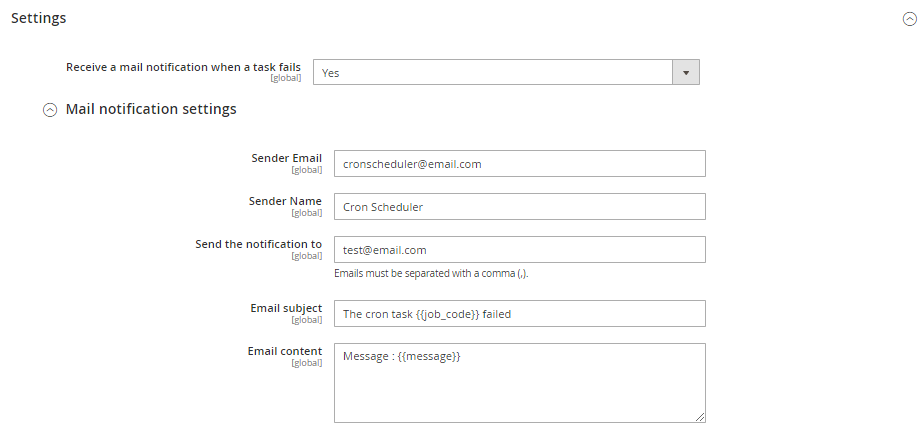
When the option is enabled, you have to fill in the below inputs.

Sender Email

The email address of the sender. It doesn't require to be a valid/existing email address.
cronsheduler@email.com

Sender Name

The name of the sender.
Cron Scheduler

Send the notification to

The email address of the recipient. Each address must be separated by a comma.
test@email.com

Email subject

The subject of the email. You can use the following placeholders:
  • {{job_code}}
    Code of the cron job.
  • {{executed_at}}:
    Date/time of the task (yyyy-mm-dd hh::mm::ss).
  • {{message}}
    Error message that is generated by the cron task.

The cron task {{job_code}} failed

Email content

the content of the message. You can use the following placeholders:
  • {{job_code}}
    Code of the cron job.
  • {{executed_at}}
    Date/time of the task (yyyy-mm-dd hh::mm::ss).
  • {{message}}
    Error message that is generated by the cron task.
  • {{file}}
    File where the error happens.
  • {{line}}
    Line number in the file where the error happens.
  • {{origin}}
    Magento backoffice or CLI or API.
  • {{user}}
    User's name (for admin users or user's name of the API) or CLI.
  • {{ip}}
    User's IP.
  • {{full_trace}}
    Shortcut for all above placeholders.

Message : {{message}}

Backoffice notification

Define whether or not you want to receive a notification in your Magento backoffice when a cron task fails.
When the option is enabled, you have to fill in the below inputs.

Notification subject

The subject of the notification. You can use the following placeholders:
  • {{job_code}}
    Code of the cron job.
  • {{executed_at}}
    Date/time of the task (yyyy-mm-dd hh::mm::ss).
  • {{message}}
    Error message that is generated by the cron task.

The cron task {{job_code}} failed

Notification content

The content of the notification. You can use the following placeholders:
  • {{job_code}}
    Code of the cron job.
  • {{executed_at}}
    Date/time of the task (yyyy-mm-dd hh::mm::ss).
  • {{message}}
    Error message that is generated by the cron task.
  • {{file}}
    File where the error happens.
  • {{line}}
    Line number in the file where the error happens.
  • {{origin}}
    Magento backoffice or CLI or API.
  • {{user}}
    User's name (for admin users or user's name of the API) or CLI.
  • {{ip}}
    User's IP.
  • {{full_trace}}
    Shortcut for all above placeholders.

Message : {{message}}

Cron Scheduler views

Cron Scheduler offers three distinct views allowing to visualize and manage the cron tasks.

  • Tasks Timeline : Chronological view of the executed and scheduled cron tasks.
  • Task list : Grid view of the executed and scheduled cron tasks.
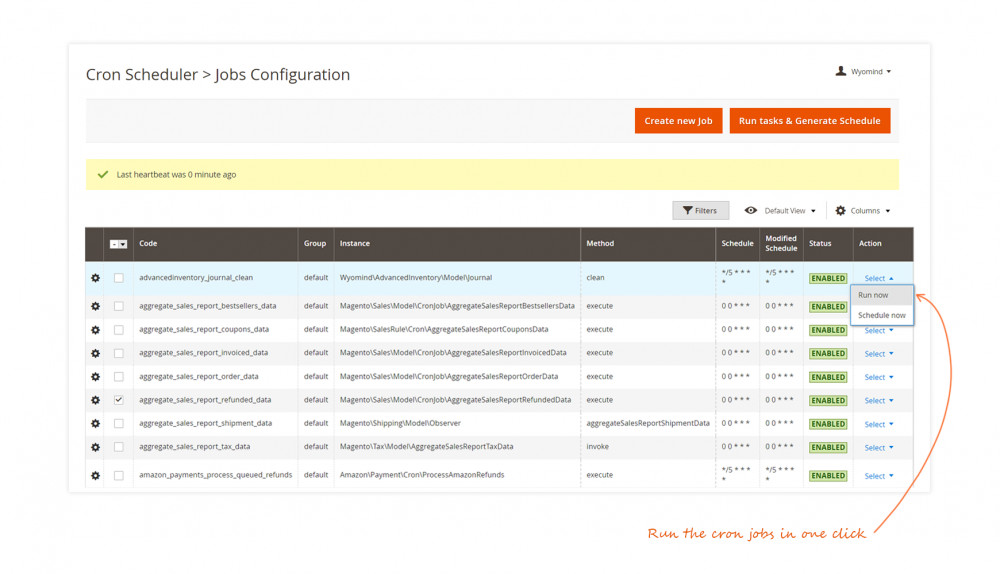
  • Job configuration : Grid view of all cron jobs that generate new cron tasks.

Tasks Timeline

To display the timeline, go to:
systemcron SchedulerTasks Timeline

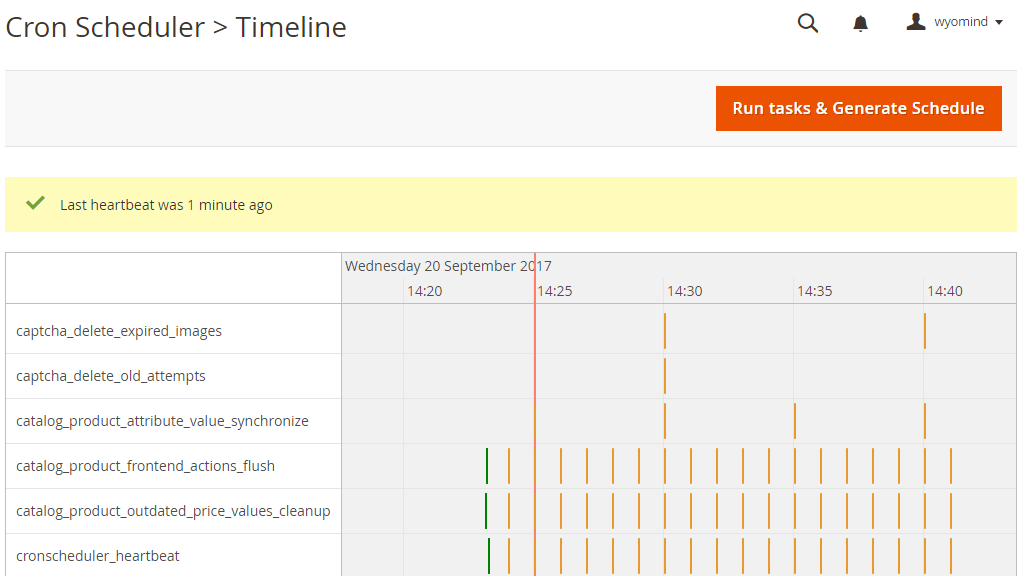
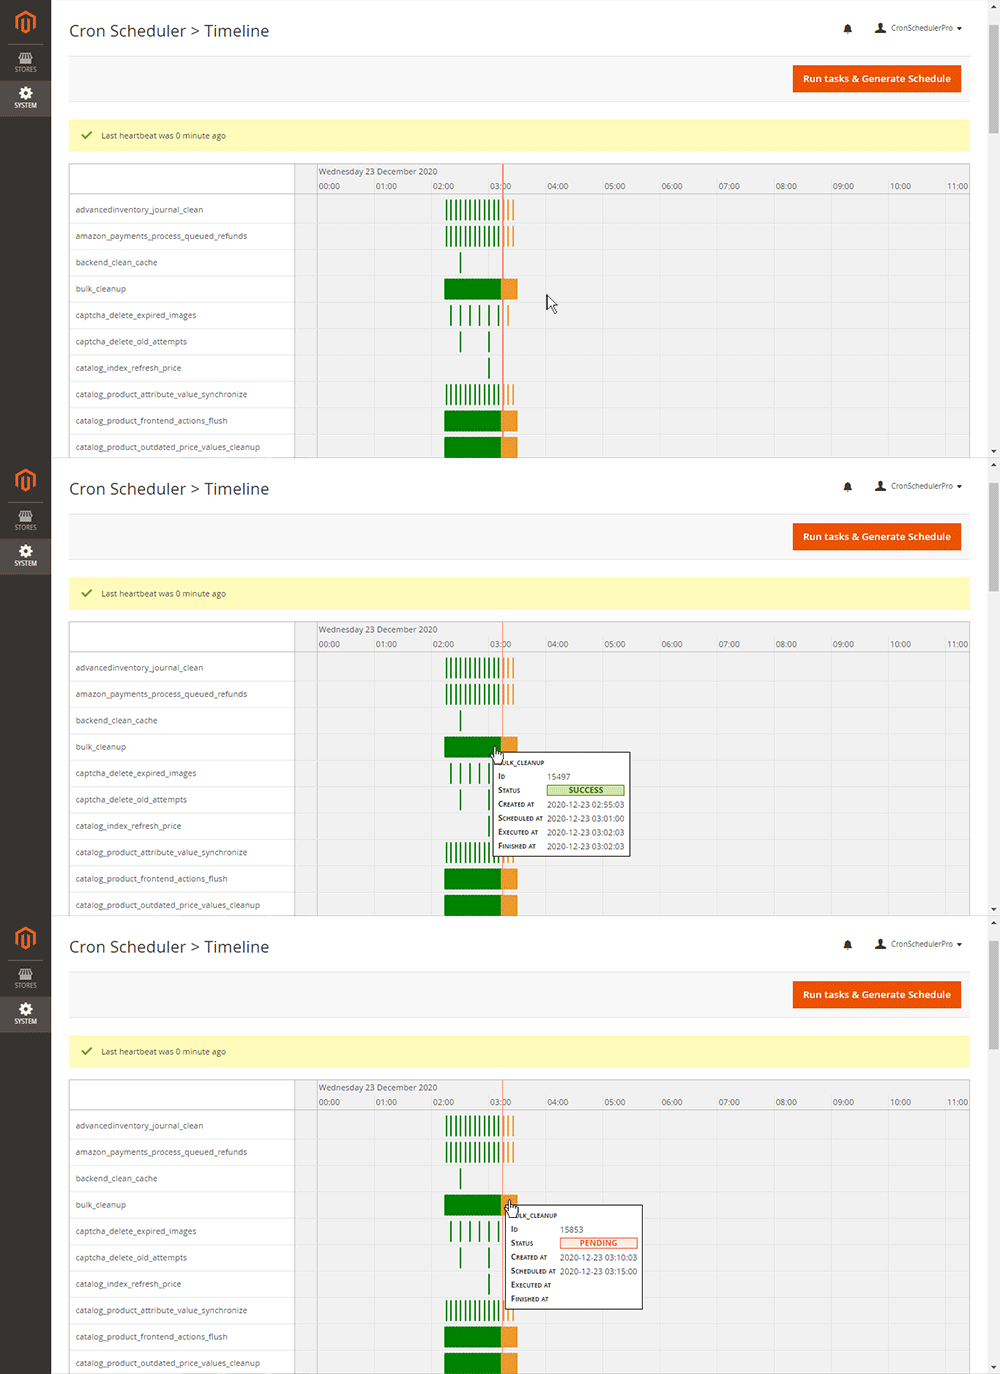
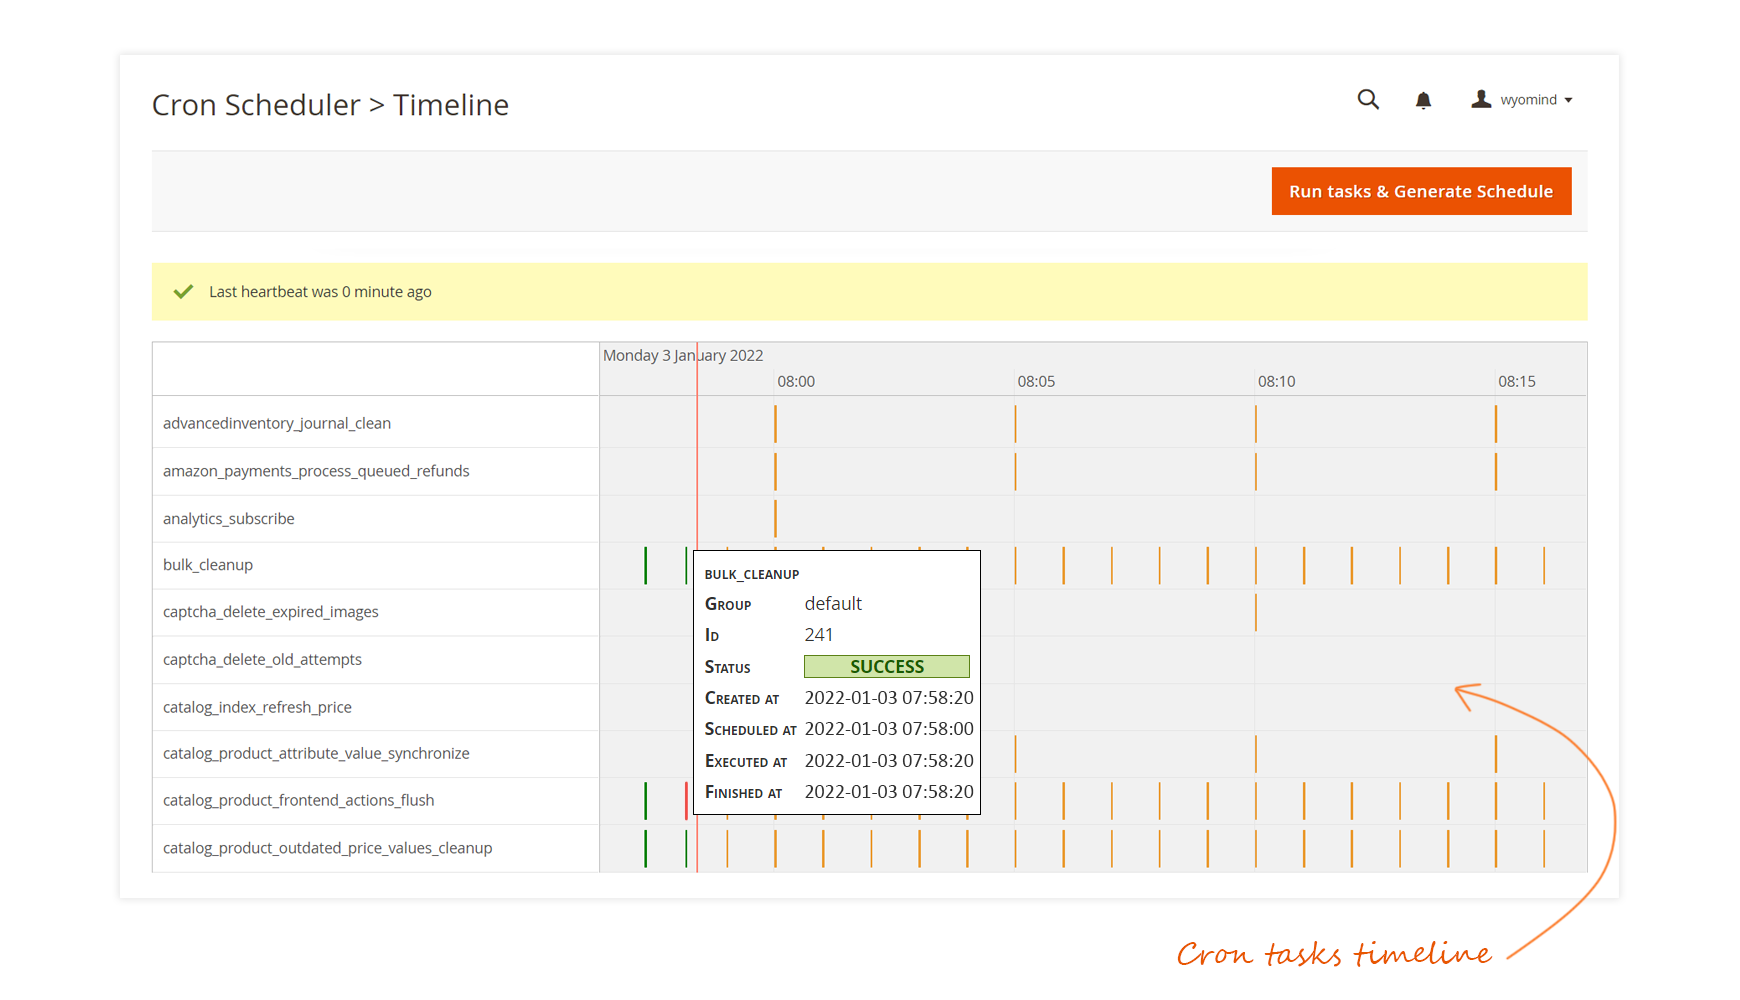
The timeline shows all the cron tasks executed and scheduled.

You can get more information by moving the mouse over each task mark.

Zoom in and out using the mouse wheel on the timeline.

Tasks List

To display the tasks list, go to:
systemcron SchedulerTasks list

The grid lists all the cron tasks executed and scheduled.

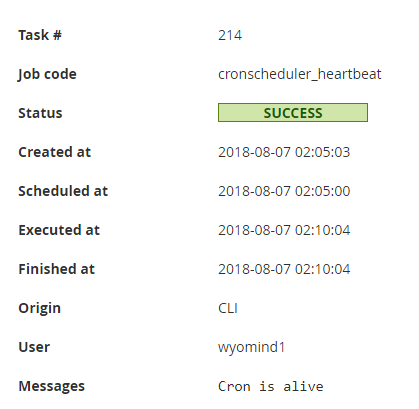
You can get more information by clicking on View more in the right column.

You can also delete the cron tasks by ticking the checkboxes and by clicking on Delete in the mass action drop-down.

Jobs Configuration

To display the jobs configuration list, go to:
systemcron Schedulerjobs Configuration

This grid lists all the cron jobs that generate new cron tasks.

Create a new cron job

Attention, the cron job configuration is for Magento 2 advanced users.

Vous can create new cron jobs thanks to Cron Scheduler Pro without having to create new modules.

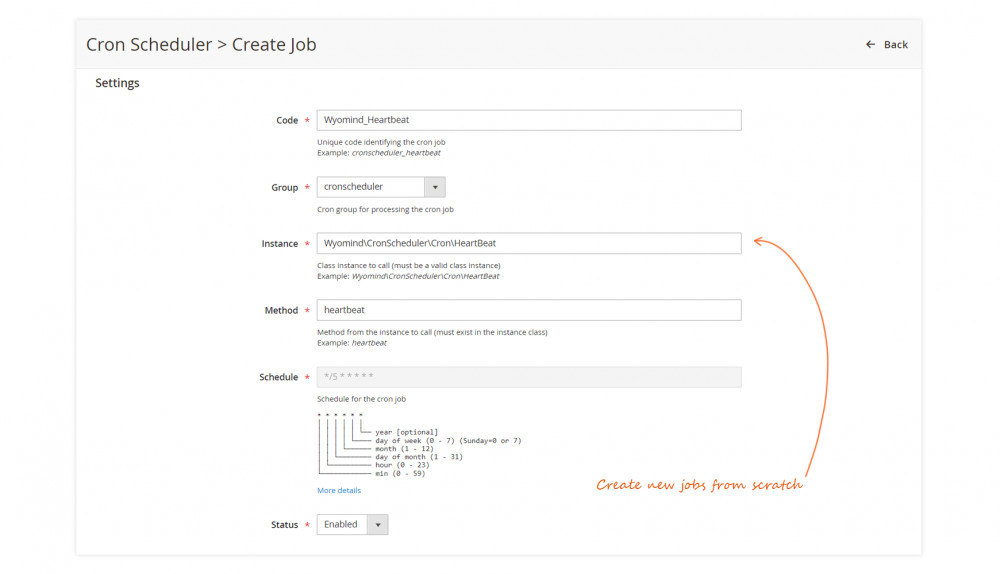
Click on Create a new job.
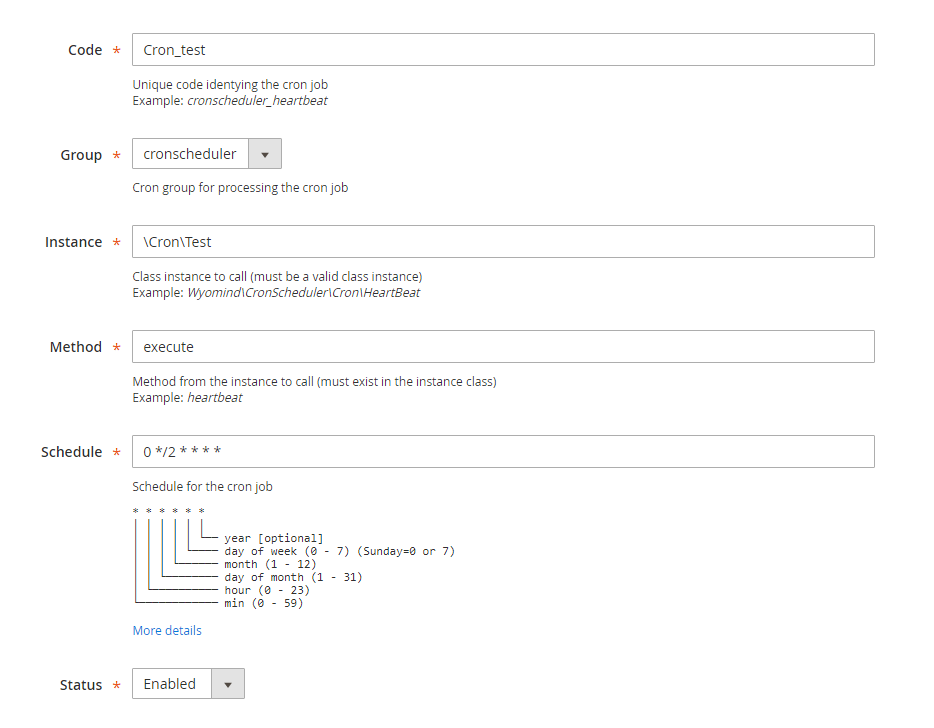
Then fill the form:

  • Code
    The unique code of the cron job.
  • Group
    The group to which belongs the new job.
  • Instance
    The PHP class to be used.
  • Method
    The PHP method to be used from the PHP class.
  • Frequency
    The frequency of the cron tasks to generate.
    The frequency must be written as a cron expression.
    See more: https://en.wikipedia.org/wiki/Cron
  • Status
    The status of the cron job: enabled or disabled.
    A disabled cron job does not generate any cron tasks.

Save the new job by clicking on save.

  • The new cron job appears with a user icon.
  • The system cron jobs appear with a cogwheel icon.

Example of a custom cron job in app/code/Cron.php

<?php 
 namespace Cron;
 class Test {
 public function execute($schedule) {
 $om = \Magento\Framework\App\ObjectManager::getInstance();
 try{
 // YOUR LOGIC HERE
 $message="Test processus has run!";
 }
 catch(\exception $e){
 $message=$e->getMessage();
 } 
 $schedule->setMessages($message);
 $schedule->save();
 }
 }

Edit a new cron job

Attention, the cron job configuration is for Magento 2 advanced users.

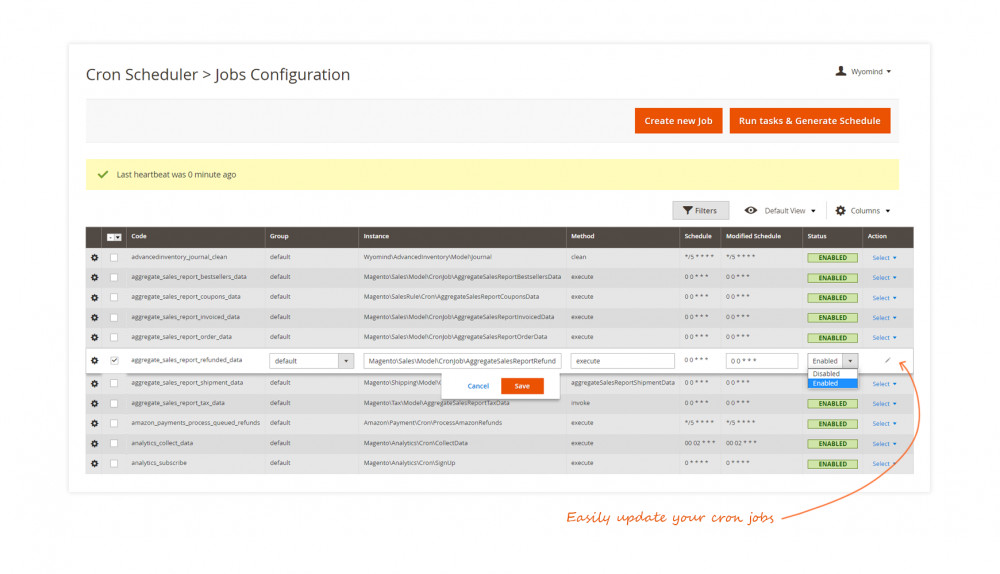
To edit a cron job, you only need to click on the line, then the line becomes editable.
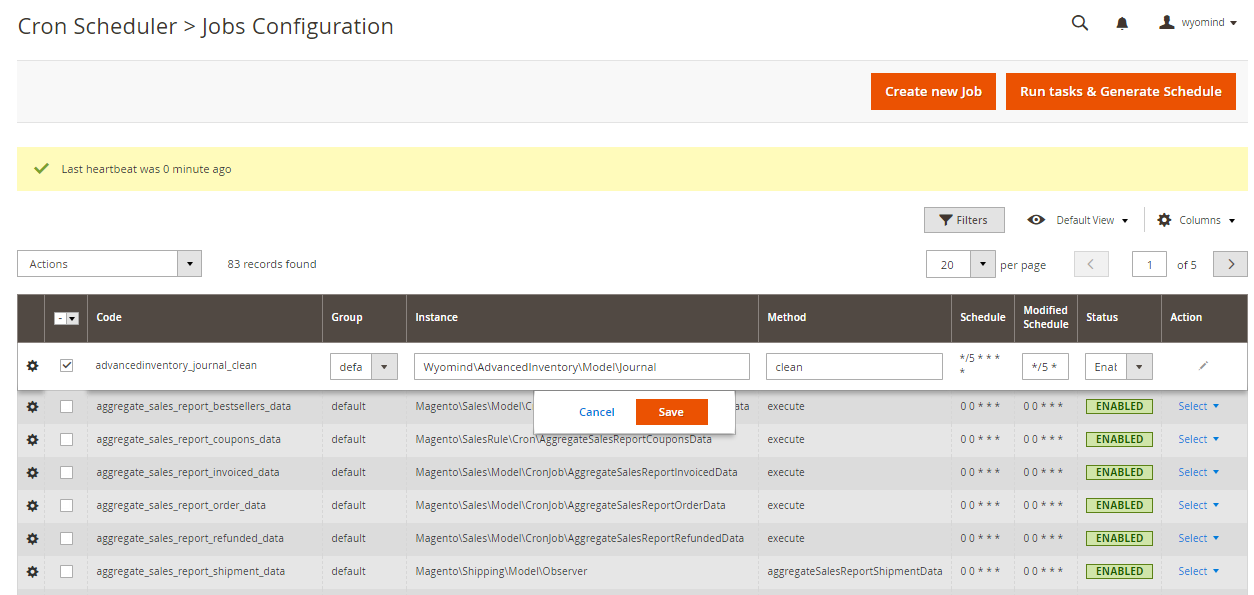
You can then update the following inputs:
  • Group
  • Instance
  • Method
  • Frequency
  • Status

Delete a cron job

Attention, the cron job configuration is for Magento 2 advanced users.

You can delete a custom cron job at any time but not the system cron jobs.
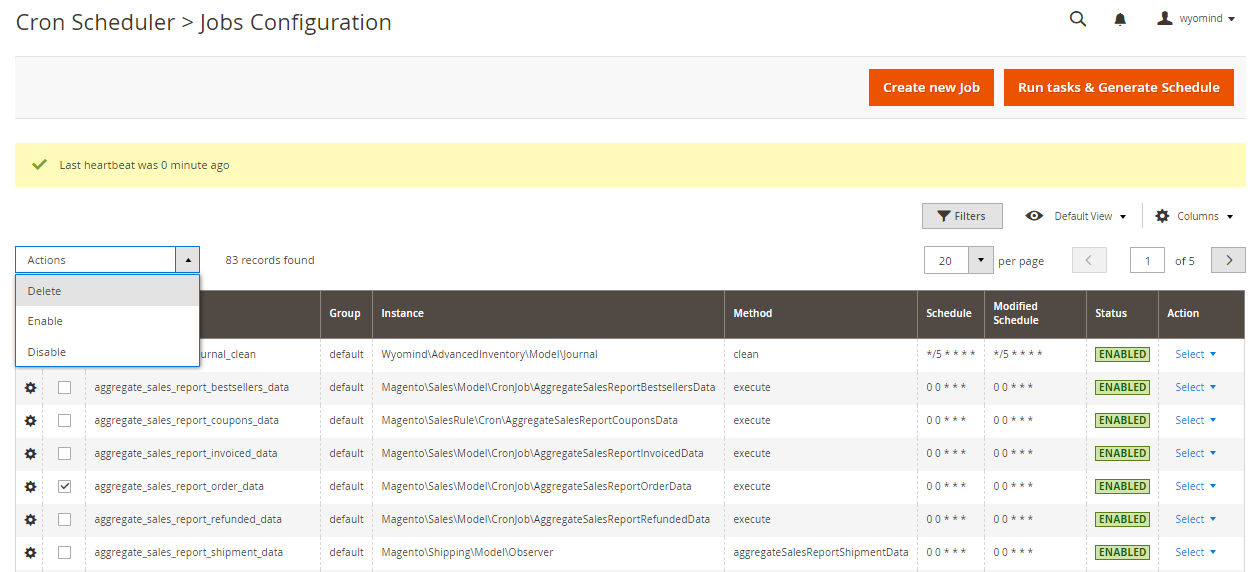
The system cron jobs must be disabled if you don't want to generate cron tasks.

Run tasks & Generate schedule with Cron Scheduler

From the back-office

At any time you can run all cron jobs and generate new tasks from your back office, exactly like the below command line does:

bin/magento cron:run

Run

You only have to click on run task & generate schedule from:
systemcron Schedulerjobs Configuration

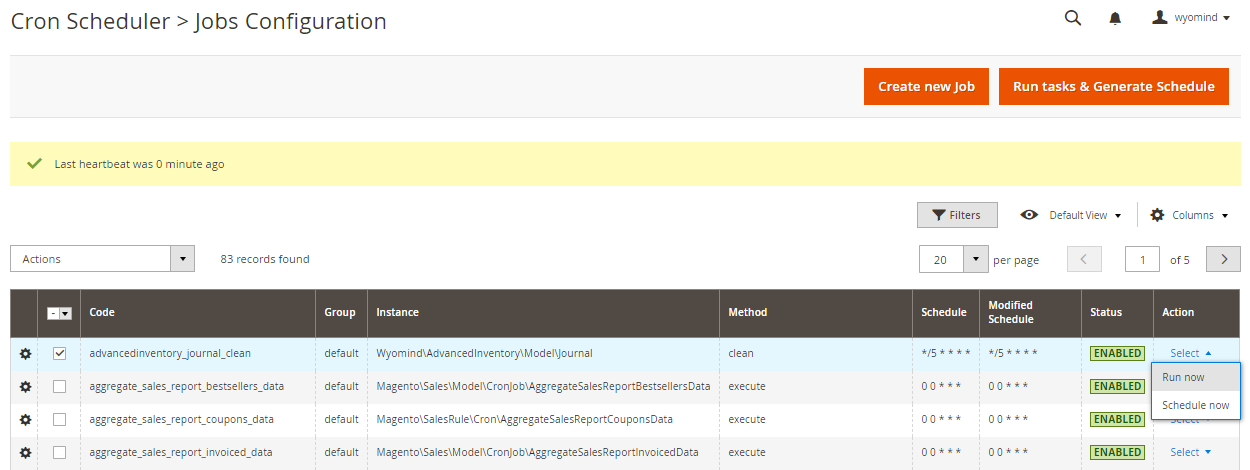
You can also run a particular cron job individually by clicking on run now on the right column of the Jobs Configuration view.

The task execution in the browser will block the page until the process is complete.

Schedule

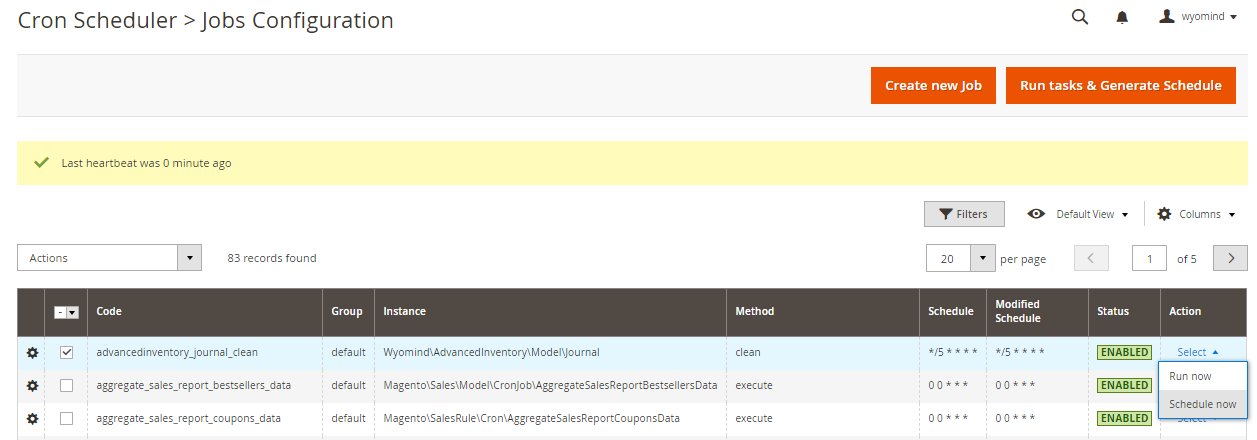
You can also schedule a cron job. 

The execution will be done within one minute of the cron job.

As it adds a task to the schedule, the process will be executed in the background, and the page is not blocked.

From the CLI

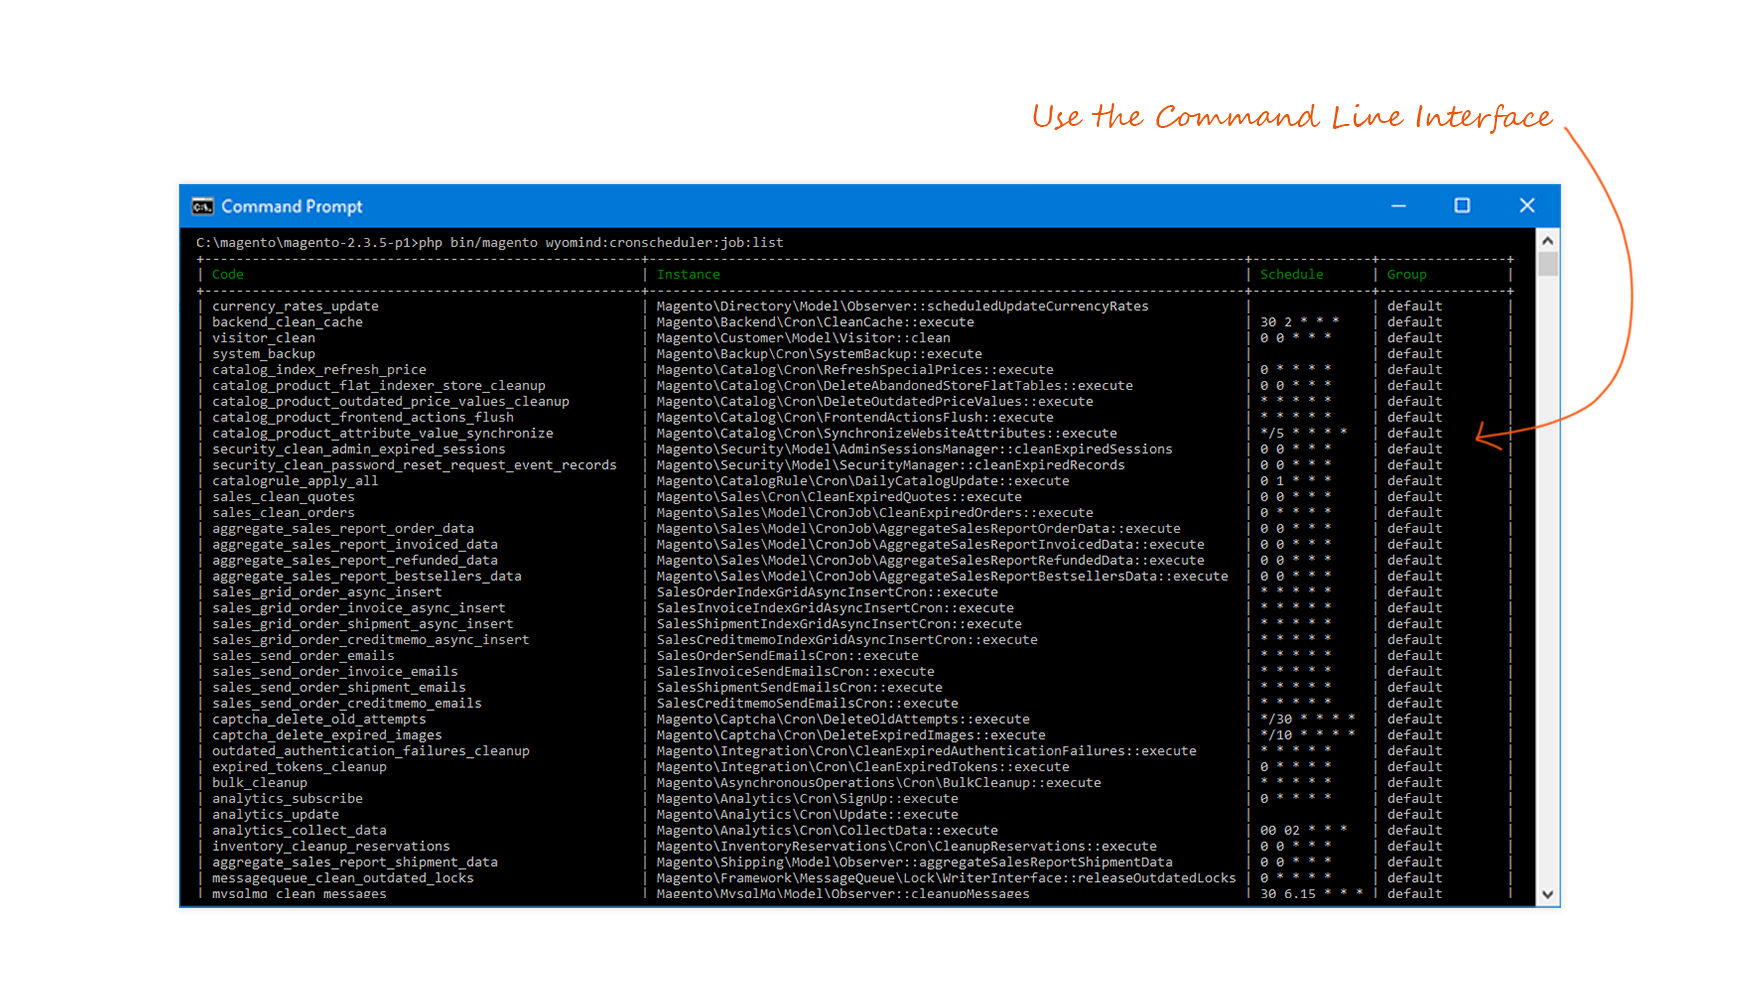
Cron Scheduler includes new command lines that allow managing the cron jobs from the CLI.

  • List all the cron tasks:
    wyomind:cronscheduler:task:list​
  • Show details about a given cron task:
    wyomind:cronscheduler:task:show task_id​
  • List all cron jobs:
    wyomind:cronscheduler:job:list​
  • Run a specific cron job:
    wyomind:cronscheduler:run job_code​

From the API

Cron Scheduler also includes an API that allows running each cron job individually.

The WSDL is available at the below URL:
http://demo2.wyomind.com/index.php/soap/default?wsdl&services=wyomindCronSchedulerProCronV1

Below is an example of the API usage with the SOAP library:

<html>
 <head>
  <title>Web API call samples for Cron Scheduler Pro</title>
 </head>
 <body>
  <?php
  if (!file_exists(__DIR__ . '/app/bootstrap.php')) {
  echo "The sample file must be placed in the Magento root folder!";
  return;
  }
  require __DIR__ . '/app/bootstrap.php';
  $bootstrap = \Magento\Framework\App\Bootstrap::create(BP, $_SERVER);
  $app = $bootstrap->createApplication('Magento\Framework\App\Http');
  $login = "LOGIN";
  $password = "PASSWORD";
  $consumerKey = 'd8durcngtxwf52nle30nx63vp5q6vl1o';
  $consumerSecret = 'ikoc08swj3odna2tytqmn91s69d2e0gw';
  $accessTokenSecret = 'yupmvtaqij6yfr9v47sefiwv91ve5qip';
  $accessToken = "g3rfdy7wuhujbhutthyofi9m4fe4pajg";
  $website = "http://www.website.com";
  $cronJob = "cronscheduler_heartbeat";
  // $cronJob = "dynamiccategory_reindex_all";
  echo "<pre>";
            /*******************************************************************************
  * Token based authentication
            *******************************************************************************/
  echo " .--------------------------------------------------------------------------.\n";
  echo " |  Token based authentication                                              |\n";
  echo " '--------------------------------------------------------------------------'\n";
  echo "\n";
  /**
  * SOAP V2 API
  */
  echo " == Executing the job '".$cronJob."' using the Soap v2 web API\n";
  echo "\n";
  $opts = ["http" => ["header" => "Authorization: Bearer " . $accessToken]];
  $context = stream_context_create($opts);
  $wsdlService = $website . "/index.php/soap/default?wsdl&services=wyomindCronSchedulerProCronV1";
  $soapClient = new \Zend\Soap\Client($wsdlService);
  $soapClient->setSoapVersion(SOAP_1_2);
  $soapClient->setStreamContext($context);
  // reun the job 'cronscehduler_heartbeat'
  $soapResult = $soapClient->wyomindCronSchedulerProCronV1run(array("jobCode" => $cronJob));
  if ($soapResult) {
  $result = json_decode($soapResult->result);
  echo "  >> Raw result: ".$soapResult->result."\n";
 if ($result->error) {
 echo "  >> Error when running the '".$cronJob."' job.\n";
  echo "  >> Message: " . $result->message;
 } else {
  echo "  >> The '".$cronJob."' job has been successfully executed.\n";
  }
  }
  echo "\n\n";
 ?>
 </body>
</html>

Take control over the cron tasks of your Magento® 2 Website!

Monitor and manage all your cron tasks through the CLI or from your Magento® 2 back-office.

  • Lifetime license
  • 12 months support & upgrade
  • 60 days money-back guarantee
  • Extensible source code
    Unlimited test domains
  • Free composer access
  • Marketplace approved
Want to know more?

Monitor and visualize all cron tasks running in the background of your Magento® 2 website

Visualize the cron tasks in a timeline that offers a clear and understandable view of what is going on in the background of your Magento® 2 website. 

Be notified about cron errors in real-time by email and/or in your back-office

If something goes wrong with the cron tasks, Cron Scheduler displays a notification in your back office and/or send you an email.

Manage each cron job individually from your Magento® 2 back-office

Easily enable/disable, update the frequency of any cron job. 

Run cron jobs individually from the same grid in one click.

Create new jobs from scratch with your settings. No headache!

Take control over cron jobs through the CLI or the Magento® API

Do you need to run your cron job individually by CLI or even trigger the cron job via the API? No problem!

Freqently Asked Questions
Pre-sales informations

This extension works with Magento Community Edition and also Magento Enterprise Edition. To know if Cron Scheduler Pro is compatible with your Magento version, please check the Compatibility tab.

Magento offers three variations of its product.

As their names have changed over the past few years, here is a recap:

  • Magento Open Sourcepreviously Magento Community Edition (CE), is a free and non-hosted e-commerce platform.
  • Magento Commerce: previously Magento Enterprise (EE), is the paid version of Magento and offers support services.
  • Magento Commerce Cloud: is the paid version of Magento and offers support and hosting services.
Cron Scheduler Free Cron Scheduler Pro

Cron tasks Timeline

Display all cron tasks on a timeline

Cron tasks list

Display all the cron tasks in a grid

Cron jobs configuration

Display all the cron job configurations in a grid

Run and schedule button

Trigger the cron process manually

Heartbeat notification

Display a notification about the healthyness of the cron jobs

Activate/deactivate cron jobs

Enable/disable each cron task individually

Cron jobs frequency update

Update the cron expression that control the cron tasks frequency

Add new jobs

Create new custom cron jobs 

Error notification by email

Notification by email when any cron task fails

Error notification in the back-office

Notification in the backoffice when any cron task fails

Run specific cron jobs manually 

Trigger any cron job manually from the admin

Access to  a new CLI

Manage the cron jobs and the cron tasks via the CLI 

Access to the API 

Trigger the cron job via the API

License and domains

A license is valid for an unlimited period of time on one single installation

  • If you're using more than one installation, you will have to buy a separate license for each instance.
  • if you're running several domains on a same installation, you will need only one license for all of them.
Although your license doesn’t have a limited period of validity, your Support & Upgrade period does. By purchasing a module, you’ll be granted a 12-month support period for free. Passed this period, you will have to pay for a new one (see FAQ: Extend your Support period)

You can pre-register your live domain to your license in advance.

Thanks to this option, you'll be able to get the module ready to use on your domain before it goes live.

To pre-register your production domain: 

  1. Go to:
    mY accountLicenses & DOwnloads
  2. Click on the Settings icon next to the module you want your domain to pre-register on.
  3. Click on the link at the bottom of the page saying:
    Do you want to pre-register your domain in order to be ready to go live?
  4. Finally, enter your domain name and click on pre-register now .

Attention, this doesn't mean your license is activated. You'll still have to activate it on your new domain when the module is installed. 

One license is valid for an unlimited period of time on one installation only. However, it is possible to extend or transfer your license in 2 cases: 

  • If you would like to add your testing environments to your license. 
    In that case, it is possible to extend your license to an unlimited number of domains for free.
    For  mywebsite-staging.com or mywebsite-dev.com
  • If you want to transfer your license to another live domain.
    In that case, the Support & Upgrade period for your license must still be active.

To be able to use Cron Scheduler Pro on both your production and testing environments, follow the instructions below:

  1. Download Cron Scheduler Pro.
    (see FAQ: Extensions download)
  2. Install Cron Scheduler Pro on your environment.
    (see FAQ: Modules installation in Magento or in WooCommerce)
  3. Activate the license.
    (see FAQ: Licenses activation in Magento or in WooCommerce)

Also, if you are managing a large amount of domains, please contact us so that we can automatically whitelist these domains.
Modules versioning and download

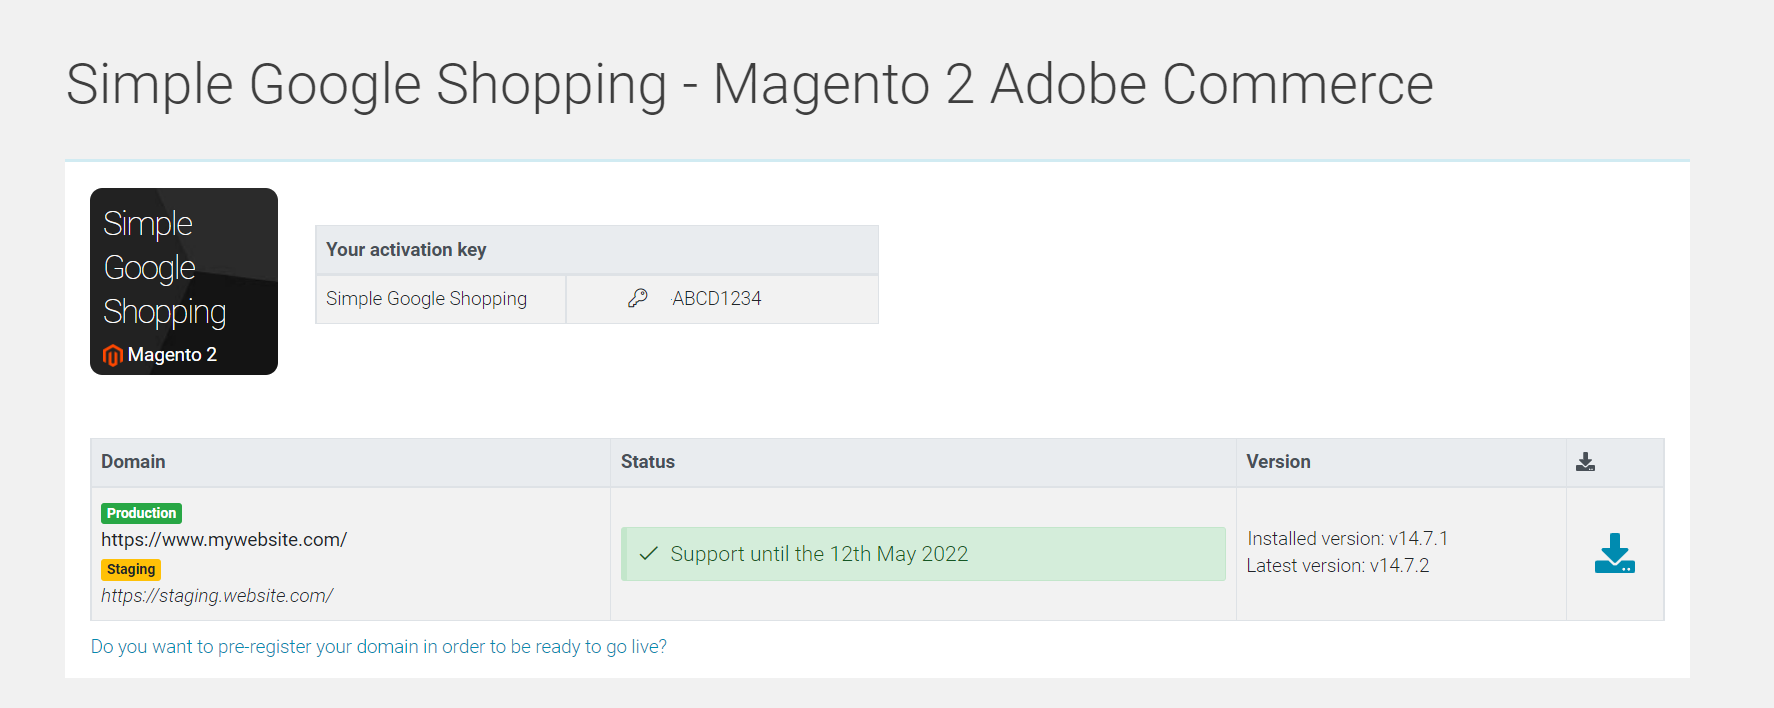
In order to download Cron Scheduler Pro, log into your Wyomind account:

    1. Go to:
      my accountLicenses & downloads 
    2. Click on the settings icon next to Cron Scheduler Pro.

      A new window opens.

    3. Click on the download icon.


Only the latest extension version released within your Support & Upgrade period is available. In order to get the very latest extension version make sure your Support & Upgrade plan is up to date.

When purchasing a module from wyomind.com, you benefit from 12 months of upgrade. Within this period you can at any time download the latest version of the module directly from your account.

To upgrade Cron Scheduler Pro, follow the steps below:

  1. Go to:
    my accountLicenses & Downloads
  2. Click on the settings icon next to Cron Scheduler Pro.
  3. Click on the download icon.
  4. Install the new version of Cron Scheduler Pro in your Magento admin or your WooCommerce back-office.

Modules Installation/Uninstallation

You can install Cron Scheduler Pro using Composer software in two cases:

  • if you purchased Cron Scheduler Pro on Magento Marketplace.
  • if you purchased Cron Scheduler Pro on Wyomind.com AND requested access to our repository:
    repo.wyomind.com
  1. Add to your composer configuration our repository:
    composer config repositories.wyomind composer https://repo.wyomind.com 

  2. Execute Composer command:
    composer require wyomind/cronschedulerpro
  3. Then go in your Command Line Interface and execute:
    bin/magento setup:upgrade ​
  4. If you are using a production mode, also execute:
    bin/magento setup:static-content:deploy  ​
    bin/magento setup:di:compile​

To uninstall Cron Scheduler Pro, start with disabling the extension running the following command:

bin/magento module:disable Wyomind_CronSchedulerPro

Then, you have 2 ways to uninstall the extension depending on how the extension has been previously installed: 

  • Manual installation

    Run the cronschedulerpro-uninstall.sh file (you can find it in the extension zip folder) from your Magento root directory:

    sh cronschedulerpro-uninstall.sh


  • Installation via Composer

    Run the below command line:

    composer remove wyomind/cronschedulerpro

Once the uninstallation is over, refresh your cache and enable the compiler back again (if you use it). 

You can install Cron Scheduler Pro via Web Setup Wizard if you purchased it from Magento Marketplace only.

To know how to proceed, all steps are described in the link below: 
http://docs.magento.com/m2/ce/user_guide/system/component-manager.html

Next step is to activate your license:
Extension activation

You can install Cron Scheduler Pro manually. 

  1. Download Cron Scheduler Pro (zip file) from:
    my account my downloads
    Refer to the FAQ: Extensions download
  2. Once Cron Scheduler Pro is downloaded, open the folder and unzip it.
  3. Copy the content of the unzipped folder and paste all files and directories in your Magento 2 root directory.
  4. In your Command Line Interface, execute:
    composer require mtdowling/cron-expression>=1.2​
    bin/magento setup:upgrade 

    If you are using a production mode, also execute:
    bin/magento setup:static-content:deploy  
    bin/magento setup:di:compile  
Modules activation

Once Cron Scheduler Pro is installed, you have to activate the license. For previous versions, you can activate the license from your back-office:

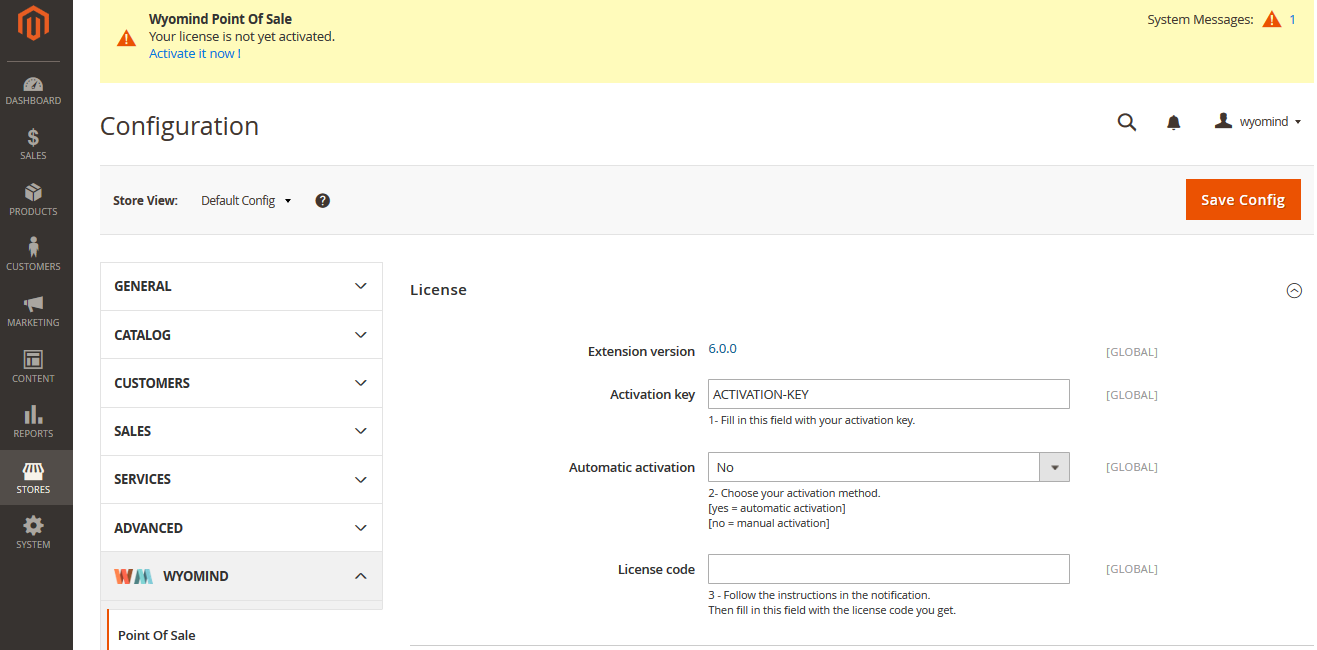
    1. Go to your Magento admin panel. A message pops up at the top of the page.


      If the message doesn't appear then you must check that:

         1. The Adminhtml_Notifications and Wyomind_Core modules are well enabled.
         2. The HTML output of the Adminhtml_Notifications and Wyomind_Core modules are not disabled in:
      storesconfigurationadvanced advanced
         3. The encryption key well exists in app/etc/env.php:
      <?php
       return array(
       'backend' => array(
       'frontName' => 'admin'
       ),
       'crypt' => array(
       'key' => '1e8f3c6772b7a6a6689c3c8cefa4ccf0'
       ),
       /* ... */
       )
      ?>​
    2. Copy your activation key in:
      StoresConfigurationWyomind Your extension

      You can find your activation key in 2 different places:
      In the confirmation email that you received after purchasing Cron Scheduler Pro.
      In your Wyomind account:My account Licenses & downloads
      Select Cron Scheduler Pro and click on  .

      A new page opens where you'll find your activation key (see below).


    3. In your Magento admin go to:
      StoresConfigurationWyomind Your extension

      Paste the activation key in the Activation Key field and choose between the automatic (yes) or the manual (no) activation method:
      By choosing Yes, the connection to Wyomind license server will be automatic.
      By choosing No, you will have to log on to Wyomind license server yourself.

    4. Click on Save config .
    5. A message appears at the top of your admin panel. Click on that link: 
      Activate it now!
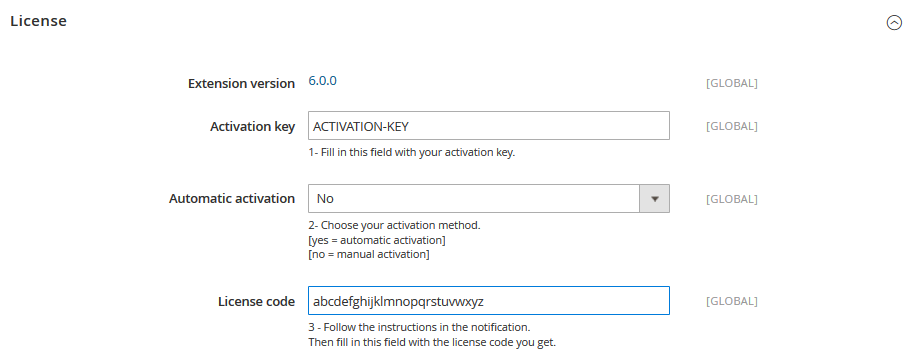
    6. Copy and paste the license code in the License code field from your admin or simply click on Activate now! 


    7. Finally, refresh your cache, log out and log in back straight after, to complete the installation.

When the extension includes other modules, repeat the steps described above for each one, using the corresponding activation keys (each module has its own activation key).

Add another domain to your license


To activate the license on another domain (test, staging...):

  1. Once the extension is installed on the new domain, copy your activation key in:
    StoresConfigurationWyomind Your extension
  2. After having saved the configuration, a notification appears. Click on Add this domain to my license.

  3. A transfer request will then be sent to our team within an hour.
    Once the request is taken care of, you will receive a confirmation email.
    If your transfer request is accepted, you can use Cron Scheduler Pro on both environments at the same time.

Note that the order in which you activate your license on your domains does not matter. You can start with your staging/dev/local environment or with your live domain, the process will be the same.

Also, if you have loads of staging domains, or if you are an agency managing load of domains for your customers, please contact us so that we can automatically whitelist these domains.

Once Cron Scheduler Pro is installed, you have to activate the license.

For this, you can use the below command line (change the Activation key with the corresponding value):

bin/magento wyomind:license:activate Wyomind_CronSchedulerPro <YOUR_ACTIVATION_KEY>

To retrieve the list of all the available modules as well as the licenses status, please use:

bin/magento wyomind:license:status


 Among the different status, you can find: 

  • registered = your license is registered
  • pending = you need to run the activation command line
  • invalidated = the license has been invalidated due to a wrong activation key or a license infringement


To activate several licenses at the same time, use:

bin/magento wyomind:license:activate \
Wyomind_Extension1,Wyomind_Extension2 \
ACTIVATION_KEY_1,ACTIVATION_KEY_2

or:

bin/magento wyomind:license:activate \
Extension1,Extension2 \
ACTIVATION_KEY_1,ACTIVATION_KEY_2
Magento 2 Compatibility

Magento 2® Open Source

  • 2.0
  • 2.0
  • 2.0.1
  • 2.0.1
  • 2.0.2
  • 2.0.2
  • 2.0.3
  • 2.0.3
  • 2.0.4
  • 2.0.4
  • 2.0.5
  • 2.0.5
  • 2.0.6
  • 2.0.6
  • 2.0.7
  • 2.0.7
  • 2.0.8
  • 2.0.8
  • 2.0.9
  • 2.0.9
  • 2.0.10
  • 2.0.10
  • 2.0.11
  • 2.0.11
  • 2.0.12
  • 2.0.12
  • 2.0.13
  • 2.0.13
  • 2.0.14
  • 2.0.14
  • 2.0.15
  • 2.0.15
  • 2.0.16
  • 2.0.16
  • 2.0.17
  • 2.0.17
  • 2.0.18
  • 2.0.18
  • 2.1
  • 2.1
  • 2.1.1
  • 2.1.1
  • 2.1.2
  • 2.1.2
  • 2.1.3
  • 2.1.3
  • 2.1.4
  • 2.1.4
  • 2.1.5
  • 2.1.5
  • 2.1.6
  • 2.1.6
  • 2.1.7
  • 2.1.7
  • 2.1.8
  • 2.1.8
  • 2.1.9
  • 2.1.9
  • 2.1.10
  • 2.1.10
  • 2.1.11
  • 2.1.11
  • 2.1.12
  • 2.1.12
  • 2.1.13
  • 2.1.13
  • 2.1.14
  • 2.1.14
  • 2.1.15
  • 2.1.15
  • 2.1.16
  • 2.1.16
  • 2.1.17
  • 2.1.17
  • 2.1.18
  • 2.1.18
  • 2.2
  • 2.2
  • 2.2.1
  • 2.2.1
  • 2.2.2
  • 2.2.2
  • 2.2.3
  • 2.2.3
  • 2.2.4
  • 2.2.4
  • 2.2.5
  • 2.2.5
  • 2.2.6
  • 2.2.6
  • 2.2.7
  • 2.2.7
  • 2.2.8
  • 2.2.8
  • 2.2.9
  • 2.2.9
  • 2.2.10
  • 2.2.10
  • 2.2.11
  • 2.2.11
  • 2.3
  • 2.3
  • 2.3.1
  • 2.3.1
  • 2.3.2
  • 2.3.2
  • 2.3.3
  • 2.3.3
  • 2.3.4
  • 2.3.4
  • 2.3.5
  • 2.3.5
  • 2.3.6
  • 2.3.6
  • 2.3.7
  • 2.3.7
  • 2.4
  • 2.4
  • 2.4.1
  • 2.4.1
  • 2.4.2
  • 2.4.2
  • 2.4.3
  • 2.4.3
  • 2.4.4
  • 2.4.4
  • 2.4.5
  • 2.4.6
  • 2.4.7

Magento 2® Adobe Commerce

  • 2.0
  • 2.0
  • 2.0.1
  • 2.0.1
  • 2.0.2
  • 2.0.2
  • 2.0.3
  • 2.0.3
  • 2.0.4
  • 2.0.4
  • 2.0.5
  • 2.0.5
  • 2.0.6
  • 2.0.6
  • 2.0.7
  • 2.0.7
  • 2.0.8
  • 2.0.8
  • 2.0.9
  • 2.0.9
  • 2.0.10
  • 2.0.10
  • 2.0.11
  • 2.0.11
  • 2.0.12
  • 2.0.12
  • 2.0.13
  • 2.0.13
  • 2.0.14
  • 2.0.14
  • 2.0.15
  • 2.0.15
  • 2.0.16
  • 2.0.16
  • 2.0.17
  • 2.0.17
  • 2.0.18
  • 2.0.18
  • 2.1
  • 2.1
  • 2.1.1
  • 2.1.1
  • 2.1.2
  • 2.1.2
  • 2.1.3
  • 2.1.3
  • 2.1.4
  • 2.1.4
  • 2.1.5
  • 2.1.5
  • 2.1.6
  • 2.1.6
  • 2.1.7
  • 2.1.7
  • 2.1.8
  • 2.1.8
  • 2.1.9
  • 2.1.9
  • 2.1.10
  • 2.1.10
  • 2.1.11
  • 2.1.11
  • 2.1.12
  • 2.1.12
  • 2.1.13
  • 2.1.13
  • 2.1.14
  • 2.1.14
  • 2.1.15
  • 2.1.15
  • 2.1.16
  • 2.1.16
  • 2.1.17
  • 2.1.17
  • 2.1.18
  • 2.1.18
  • 2.2
  • 2.2
  • 2.2.1
  • 2.2.1
  • 2.2.2
  • 2.2.2
  • 2.2.3
  • 2.2.3
  • 2.2.4
  • 2.2.4
  • 2.2.5
  • 2.2.5
  • 2.2.6
  • 2.2.6
  • 2.2.7
  • 2.2.7
  • 2.2.8
  • 2.2.8
  • 2.2.9
  • 2.2.9
  • 2.2.10
  • 2.2.10
  • 2.2.11
  • 2.2.11
  • 2.3
  • 2.3
  • 2.3.1
  • 2.3.1
  • 2.3.2
  • 2.3.2
  • 2.3.3
  • 2.3.3
  • 2.3.4
  • 2.3.4
  • 2.3.5
  • 2.3.5
  • 2.3.6
  • 2.3.6
  • 2.3.7
  • 2.3.7
  • 2.4
  • 2.4
  • 2.4.1
  • 2.4.1
  • 2.4.2
  • 2.4.2
  • 2.4.3
  • 2.4.3
  • 2.4.4
  • 2.4.4
  • 2.4.5
  • 2.4.6
  • 2.4.7
User's reviews
Log into your account to leave your review and get up to 3 months of free Support & Upgrade.

11th August 2022

Essential for cron debugging and optimisation

The visualisation makes it easy to review historical cron task performance and helps to identify optimisation opportunities, while also making it easy to make those changes without having to override 3rd party module cron schedules via code changes.

12th June 2021

Very useful plugin

The plugin is very usufull to indentify any issue regarding Cron Job. It's really recommended to investigate a problem that block your Magento ecommerce

Andrea G. - Ecommerce Agency

27th March 2021

Highly Recommended

It has many unique features which worths to buy the Pro version.

3rd March 2021

Great!

Great way to monitor your cron jobs and launch them.

Michael - Developer - User for more than 5 years |Magento 2

28th July 2020

Definitely a must have

The cron scheduler works great and ever since we installed it on our magento 2.3.5 store. We were able to visualize the cron jobs and make adjustments, never cron issues again!

Steven - Merchant - User for more than 4 years |Magento 2

16th February 2019

Nice Module for Cron Scheduling

Cron Scheduler Pro helped us with cron management as it is not great visually speaking out of the box in Magento 2

John - User for more than 6 years |Magento 2

14th February 2019

Nice Module for Schedular

Its nice module to review all the cron schedule at one place in the admin and have an option to enable and disable will make this one level up!!

21st September 2018

Great monitor system

We have a lot of 3rd party module and it was hard to monitor cron jobs. Thanks to this module, we can monitor them very efficiently

Kazuki - User for more than 6 years |Magento 2

5th July 2018

Very helpful and simply works as advertised! A+++

Cron Scheduler Pro helped us make sense of unnecessarily complicated and unreliable cron management in Magento 2.2. Wyomind support have been super helpful and responsive. Overall thrilled with this extension and grateful the devs took time to make it. A+++

ZalmanG - User for more than 6 years |Magento 2
Changelog

Compatibility

  • Fix compatibility issue with Php v8.2

Initial release for the master version

Initial release for the legacy version

Compatibility

  • Compatibility with Magento v2.4.6 + PHP v8.2

Improvements

  • Apply database upgrade and database install from patches instead of the setup scripts
  • Remove drop table instruction in setup patches
  • Fix for a missing file: Controller/Adminhtml/Job/Schedule.php
  • Fix for editing jobs inline
  • The license is not reactivated if the module is not installed yet

Enhancement

  • Possibility to schedule a cron job (executed the minute after the job)
  • Use of the md5() function

Enhancements

  • Sample data updated

Enhancement

  • Improved license management system (Clear code)

Compatibility

  • Compatibility with Magento 2.3.3
  • Fix for Magento 2.3.5
  • License system enhancement

Compatibility

  • Compatibility with Magento 2.3.5
  • Scenario added for the demo
  • Compatibility fix for Magento 2.3.3
  • Compilation fix for Magento 2.2.1 to 2.2.4

Compatibility

  • Compatibility with Magento 2.2.9
Patch v1.4.2.1

  • Sample data available for the demo

Enhancement

  • Magento v2.2.5 compatibilty
Patch v1.4.0.6

  • Compatibility fix with Magento 2.2.6

Patch v1.4.0.5

  • Minor fix

Patch v1.4.0.4

  • Minor fix on files

Patch v1.4.0.3

  • Fix on a file depending on Magento version

Patch v1.4.0.2

  • Minor fix for Magento 2.2.5

Patch v1.4.0.1

  • Fix for the files copy depending on the version of Magento during the extension installation

Improvement

  • Depending on the Magento system version some files are now activated on the setup/recurring script and not in the setup/upgradeData script anymore
Patch v1.3.1.2

  • Fix on variable

Patch v1.3.1.1

  • Minor bug fix

Enhancement

  • Files are now automatically updated depending on the Magento version while installing the module
Patch v1.3.0.3

  • Fix on variable

Patch v1.3.0.2

  • Useless files removed

Patch v1.3.0.1

  • Fix the command line scripts to avoid any issue with a setup:upgrade command

Compatibility

  • Compatibility with Magento v2.2

Enhancements

  • Magento v2.2.1 compatibilty

Compatibility

  • Compatibilty with Magento v2.0.x, v2.1.x and v2.2.x
Patch v1.0.1.5

  • Fix for the API files

Patch v1.0.1.4

  • fix for the ACLs

Patch v1.0.1.3

  • Fix for the di compilation

Patch v1.0.1.2

  • API usage example updated

Patch v1.0.1.1

  • Fix for the ACL
  • Wording update

First Public release

Patch v1.0.0.3

  • Fix for the API files

Patch v1.0.0.2

  • API usage example updated

Patch v1.0.0.1

  • Fix for the ACL
  • Wording update

Demo store
Front-end
Back-end
Login
CronSchedulerPro
Password
CronSchedulerPro123

Recommended Magento 2 extensions

from €245
5/5 rated
3 Reviews

Let your customers collect their orders from any of your stores when checking out. Locations can be displayed on a Google Map and managed by store-views and/or customer groups. Click & Collect supports and enhances the Magento 2 MSI module.

more details
from €345
5/5 rated
115 Reviews

Mass Product Import & Update allows you to update and import products massively in Magento in record time through CSV or XML files available from your website's server, or any remote server through FTP or HTTP.

more details
from €295
5/5 rated
1 Review

Optimize your order management and automate the orders' assignation to the appropriate sources by creating custom algorithms and keep your stocks up to date with MSI Order Management.

more details
from €195

Control the access to the orders, the products, and the stock management for each source and for each user registered in your Magento admin with MSI Permissions for Magento 2.

more details

Stay tuned and get a coupon code of 10% off any purchase while creating your account!

Subscribe now for updates, promotions and products launch twice a month at most.

Please indicate a valid email