

The basic knowledge about Magento and order management
How Magento deals with the customer's orders?
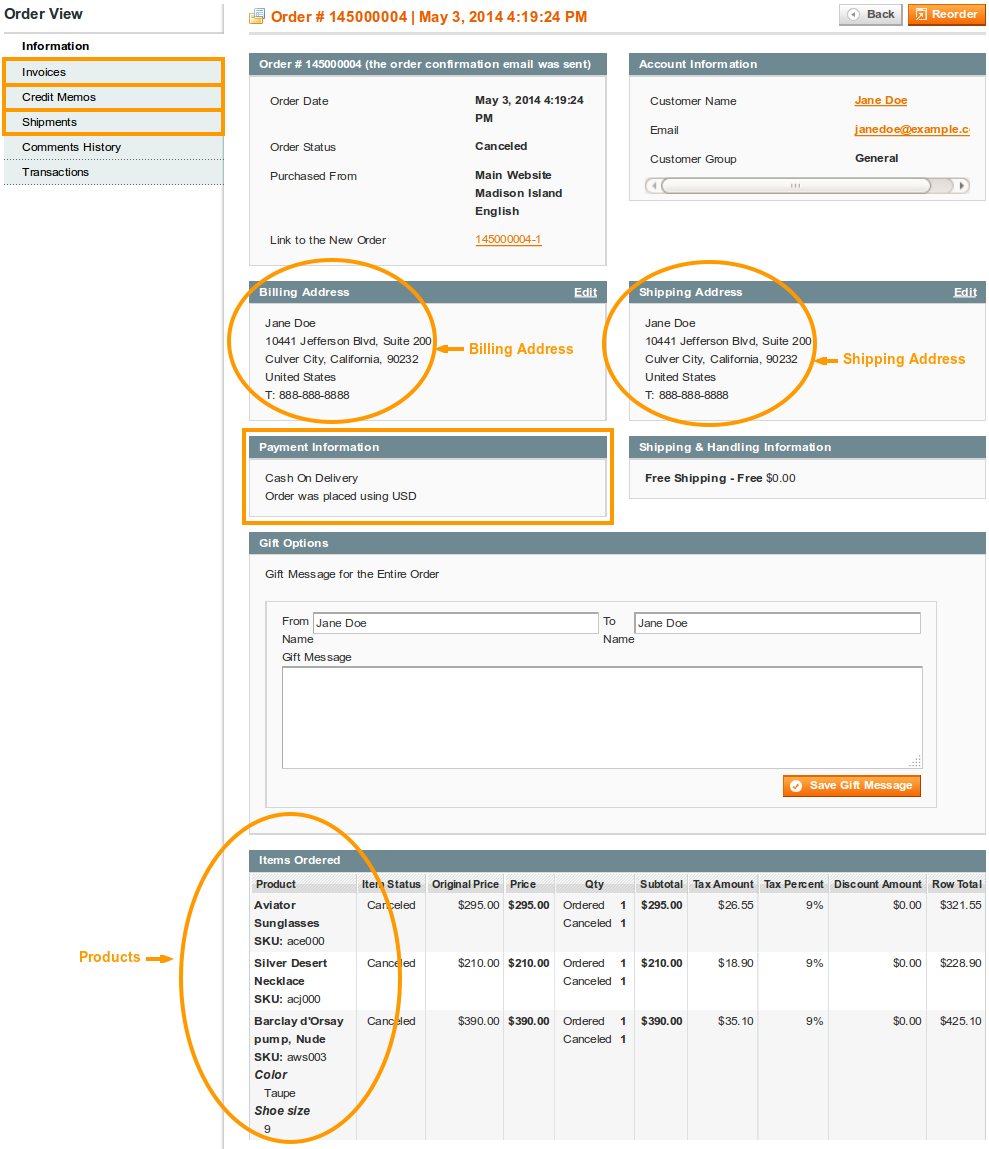
Orders in Magento are arranged as a structured group of data that are shared in different database table instances.
The main instance is the Order table that contains the summary of each order placed (date, total amount, tax, customer,...).
Attached to this instance there are 3 sub-instances concerning the order details:
- Product
- Shipping address
- Billing address
Those instances describe which products have been ordered and gives details about the customer's addresses.
There are 4 other sub-instances that help to store the different steps in the order process:
- Payments
- Invoice
- Shipment
- Credit memo
The above instances can be simply summarized:
Of course, there is much more data that you can extract from your Magento database and this is where Mass Order Export can help.
How Mass Order Export exports the Magento Data?
Mass Order Export enables the export of all the order data into XML or TXT/CSV files.
These files can then be transferred into your CRM/ERP software or can be used for reporting purposes.
The way this extension deals with the order data is very simple. When configuring your export profile, you have to complete a template in which you can use static and dynamic values.
Static and Dynamic values
Static values are data that don't change from one order to another and that are added to the output file to make it readable.
Dynamic values are data that are different for each order such as price, address, the product ordered...
Imagine you want to export all the orders placed into your Magento website and what you want to get is a simple TXT file including the order number and the total amount of each order. What you get should look like:
#123456789 	$150.00
#234567891	$275.00
#345678912	$450.00
Your template would be very simple:
#{increment_id} ${total_paid}# and $ are static values while {increment_id} and {total_paid} are dynamic values that changed for each order.
The instances
{increment_id} and {total_paid} refer to the Order instance and could also be written as {increment_id order} and {total_paid order}.
You might need to complete your export file with the method used by your customers to pay their orders. This data can be found in the Payment instance and you should use {method payment}. This syntax means you want to know the value of the payment method for each order.
How to use Mass Order Export in 4 steps?
Mass Order Export is quite easy to use. You'll need 4 steps to configure your extension. Once these steps completed, your extension will be ready to use.
STEP 1: Configure Mass Order Export in a general way
To configure your extension, first go to:
SystemConfigurationWyomindMass Order Export
There you get two subtabs.
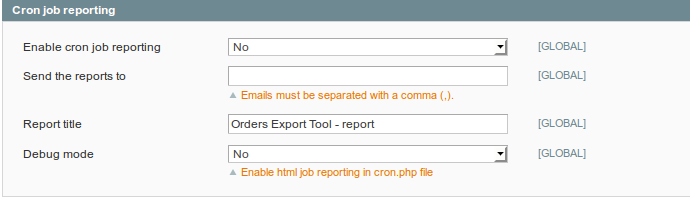
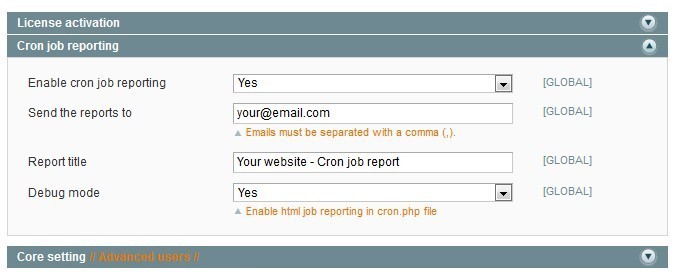
Cron job reporting
Mass Order Export allows you to enable cron job reporting.
- Send the reports to
You have the possibility to send these generation reports to email addresses (they must be separated by a comma). - Report title
You can also change the report name - Debug mode
Decide to enable the debug mode or not.
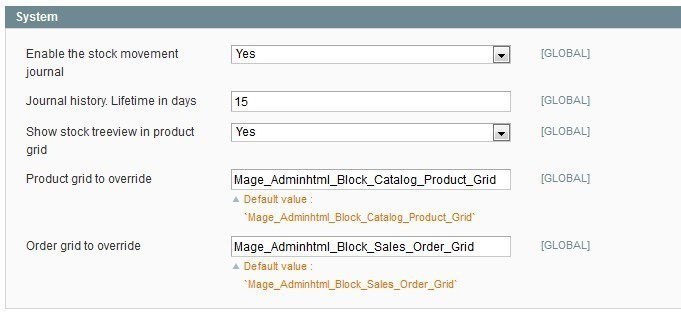
Core setting
Note that the Core Settings part is for advanced users.
- Orders grid to display
The default value is "Mage_Adminhtml_Block_Sales_Order_Grid" - Profile IDs to execute while placing an order
You will also have the possibility to execute profiles when an order is placed by filling the profile ids that you will find in:
SALESMass Order ExporTExport Profiles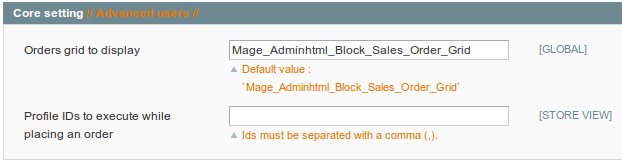
STEP 2: Configure your profiles
During that step, the different tabs that can be found in the configuration of a profile will be described. First, the profile configuration will be detailed followed by the different kinds of templates, the filters that can be created to adjust your configuration, the FTP configuration, and the scheduled tasks in order to generate the profile.
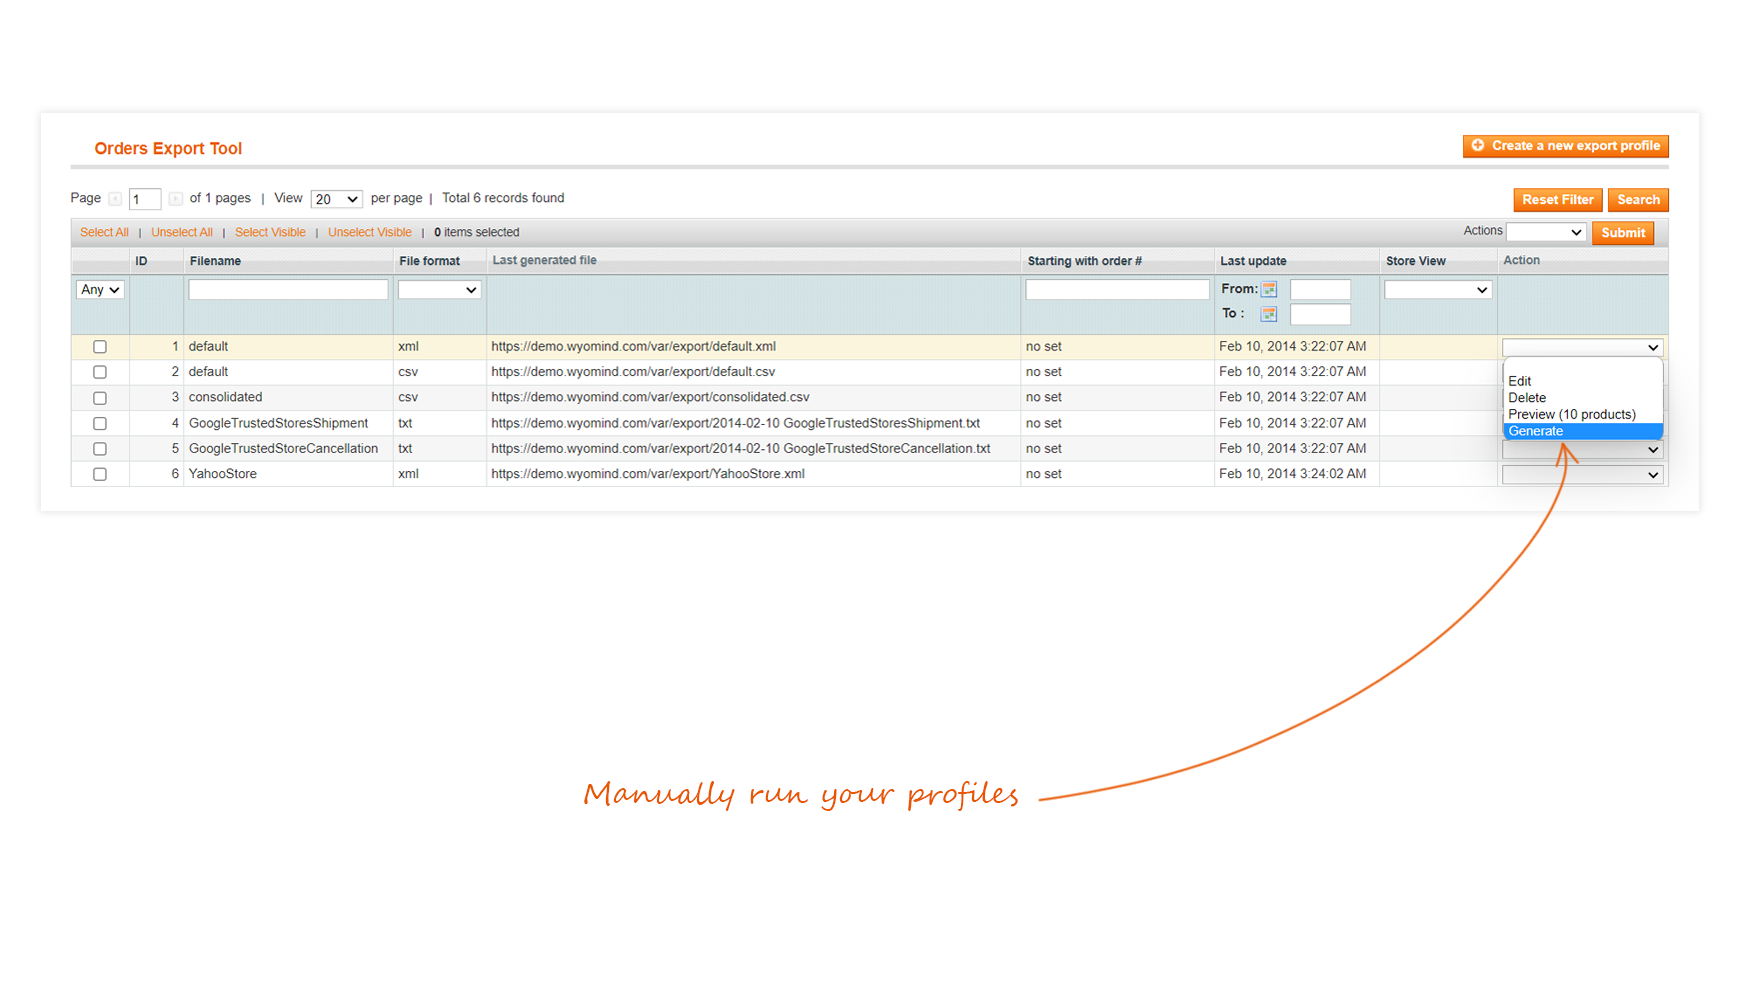
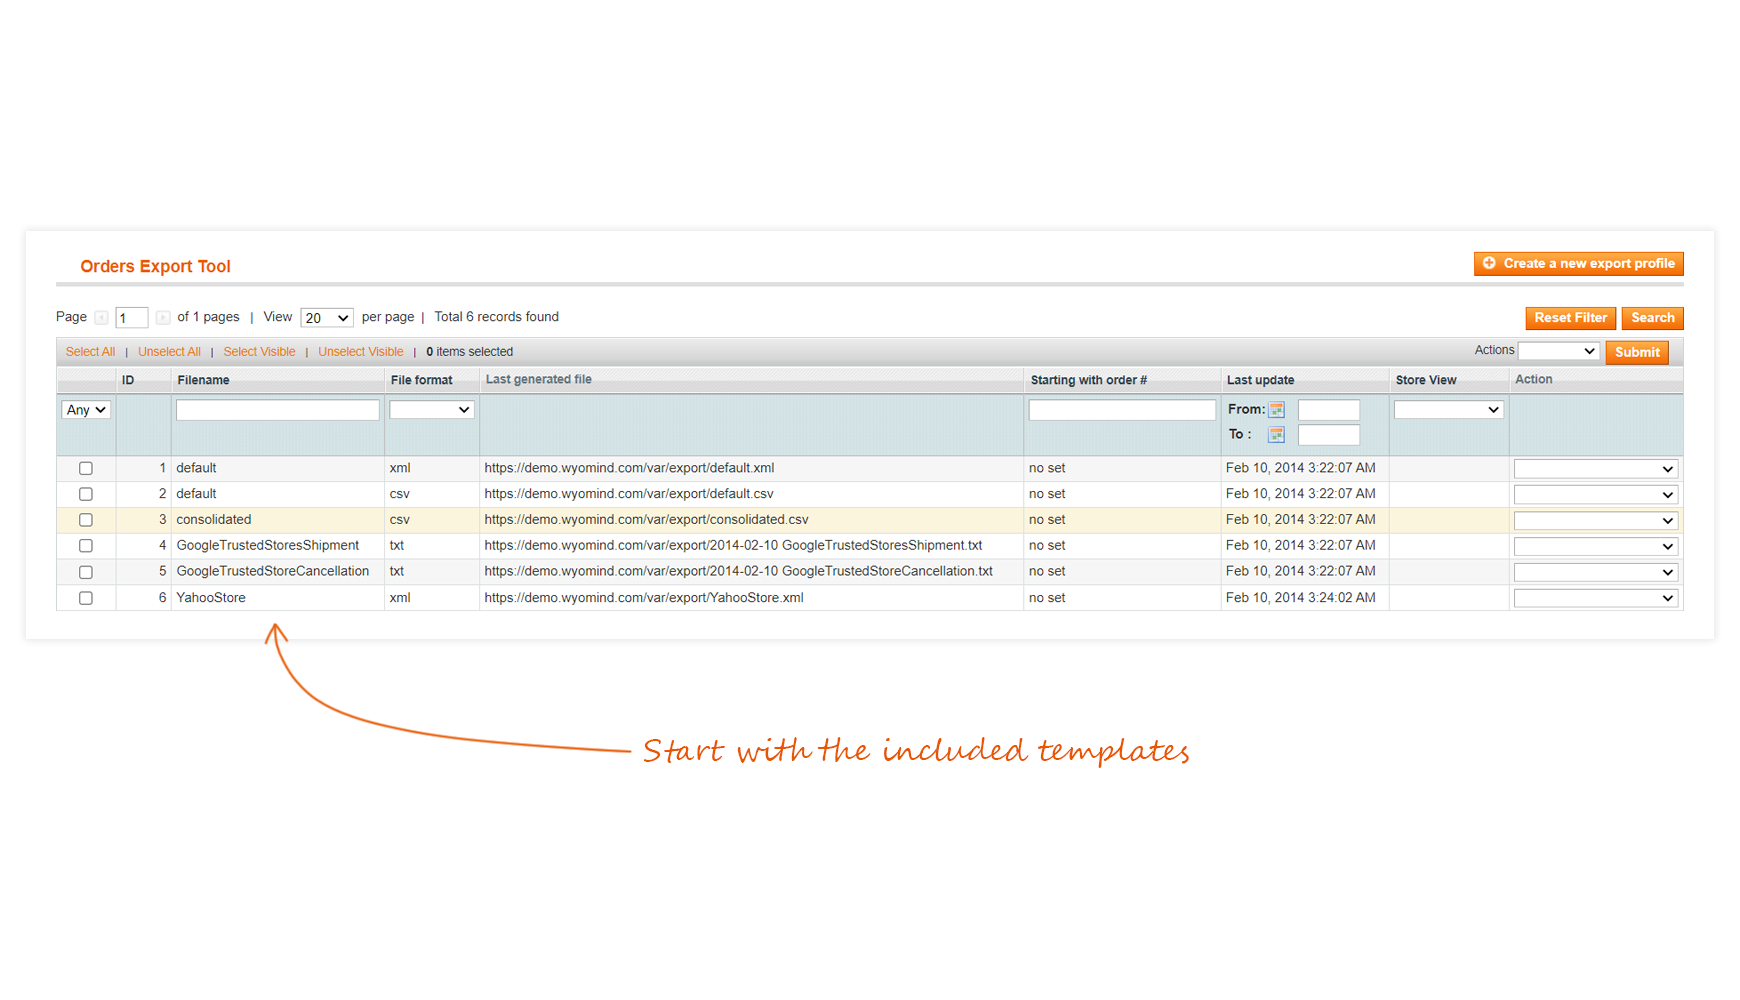
You can edit or create a new profile from:
SalesMass Order ExportExport Profiles
 From there, you have the possibility to delete or generate several profiles at a time.
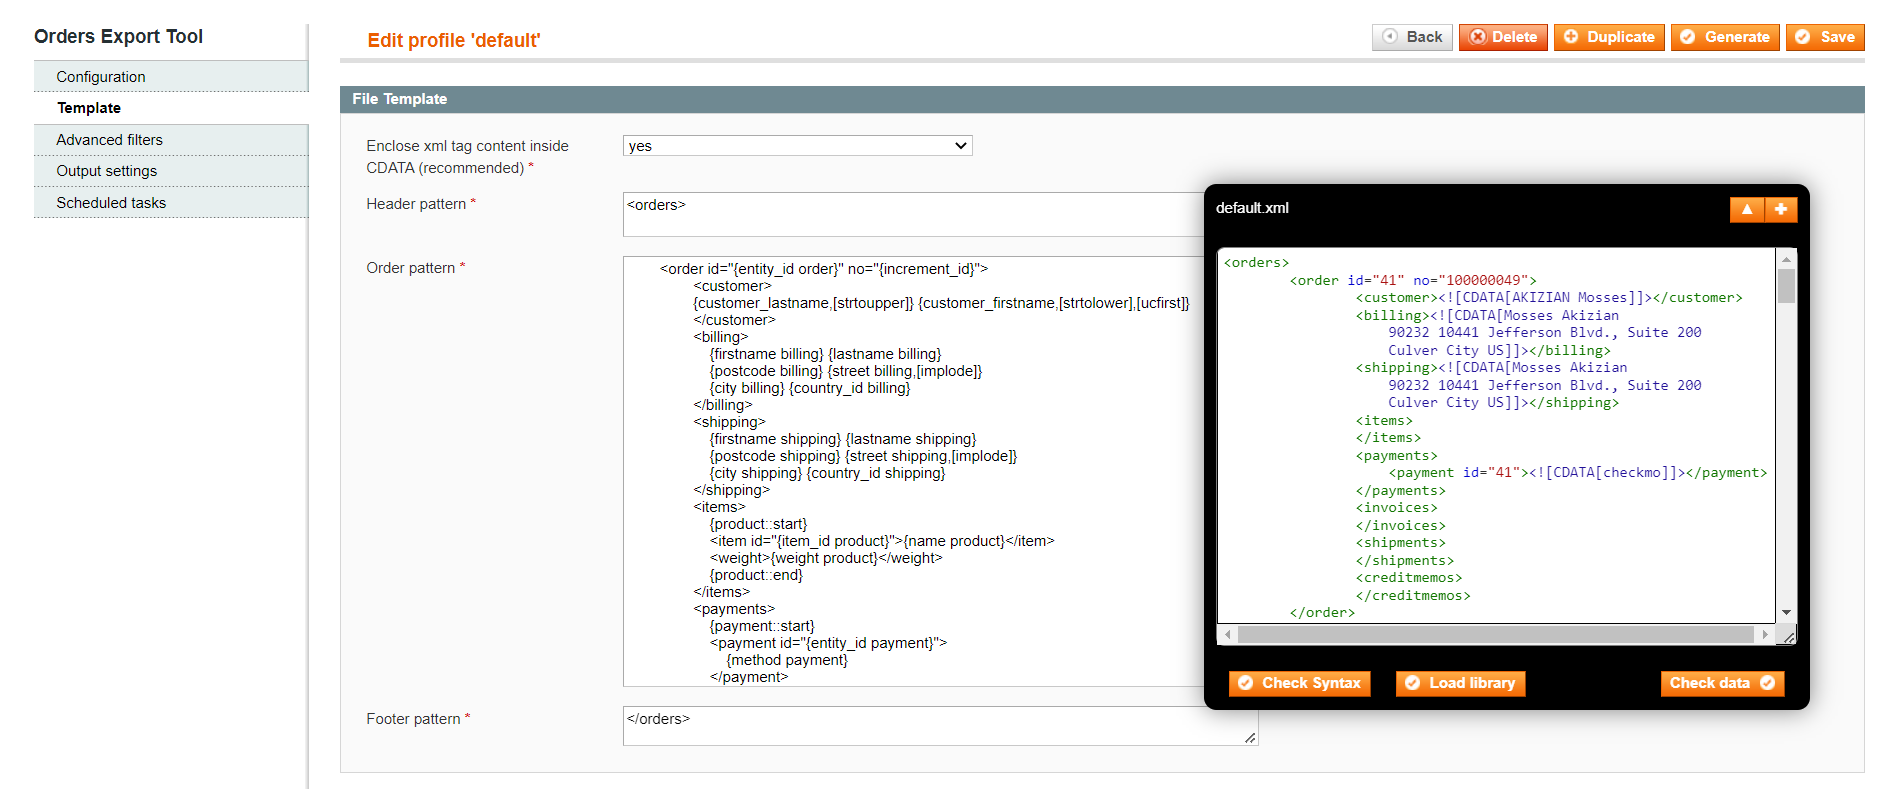
The Tool Box or so-called "Black Box"
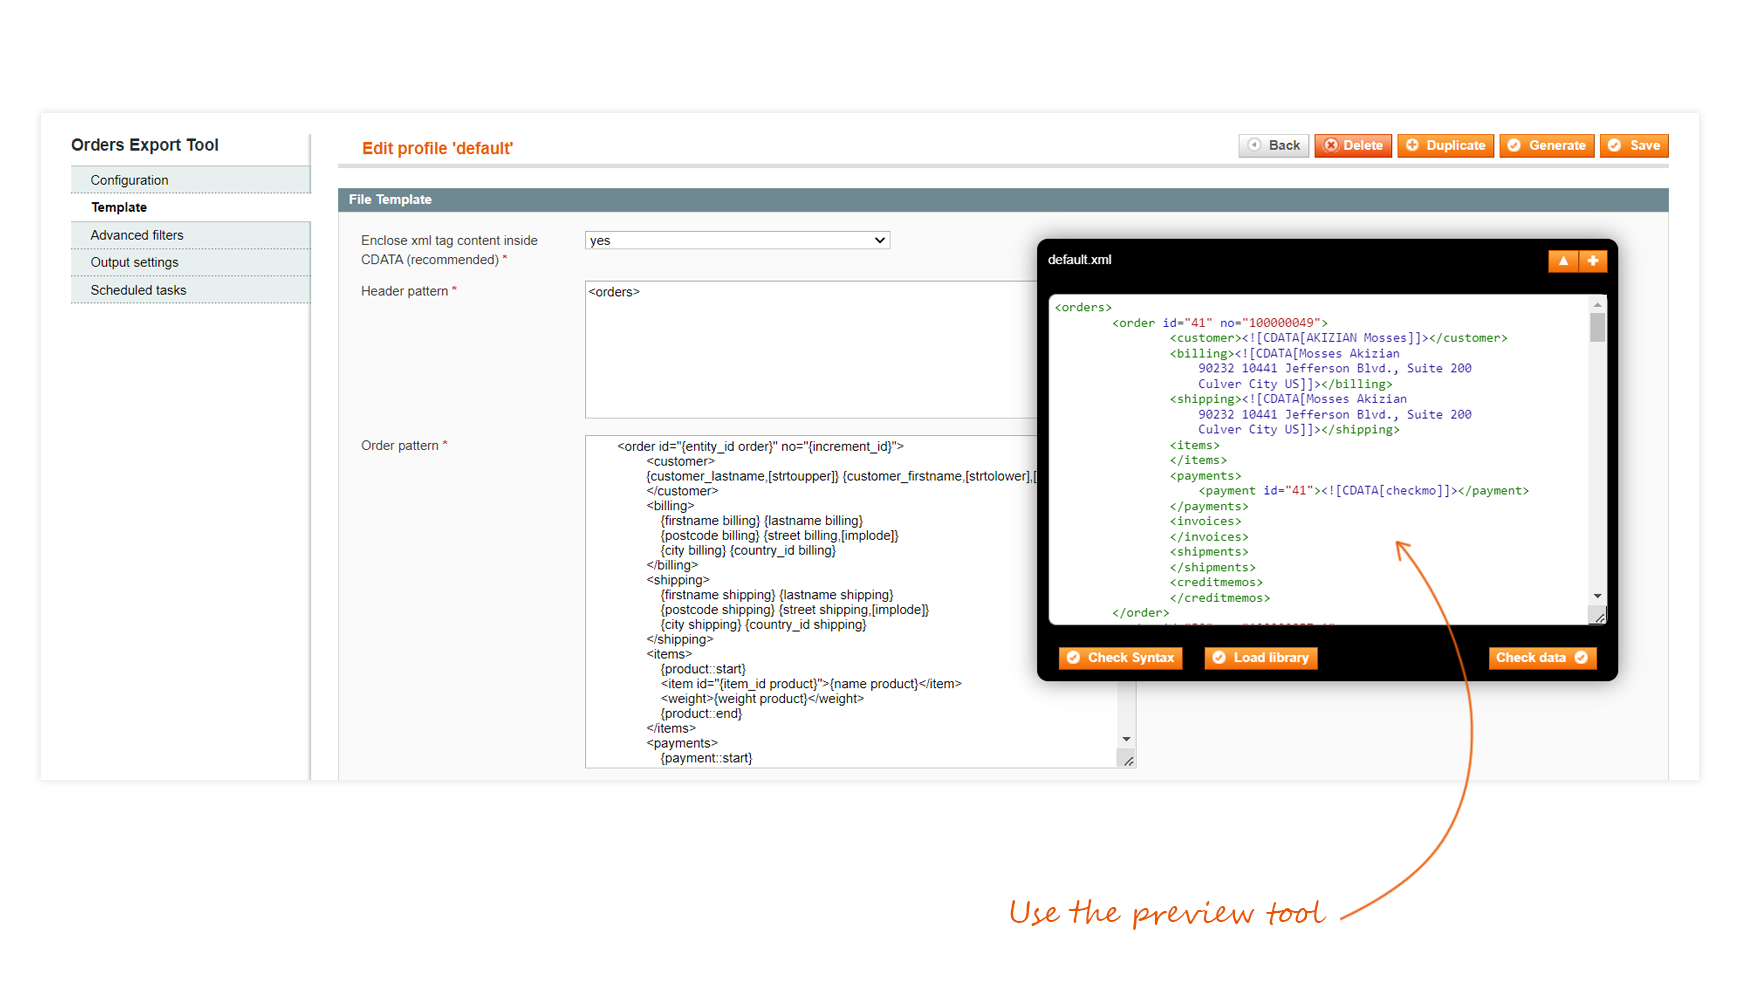
When creating a profile, you should see a black box on the right of your screen. The Mass Order Export extension includes that tool to help you create your profile and see what is wrong.
The black box is inevitably a very useful tool. This will help you to configure your data feed more quickly.
Here are the different options of the black box:
Check Syntax
This button allows you to check if your syntax is correct. It helps you to see if you have forgotten a bracket or a comma by underlining in yellow the part of text that contains a mistake.
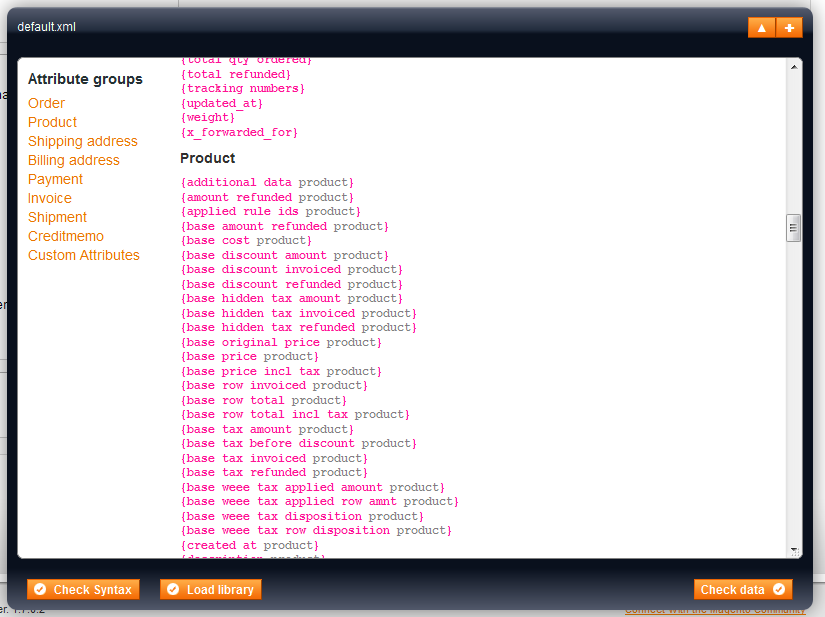
Library
You might want to know which syntax to use? No worries, Mass Order Export includes a full library of all data available for all instances: order, products, payment, invoice, shipment, creditmemo...
Check Data
When clicking on that button, you'll see a preview of your profile. It's very useful to see if the values are correctly retrieved or if your filters are working.
Configuration
When creating or editing an export profile in Mass Order Export, you have to be aware of some basic settings.
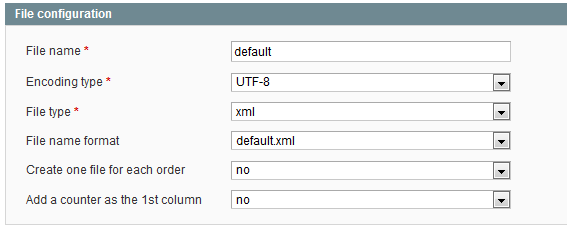
File configuration
- File name
The basename of the exported files (eg: myOrders), no need to add any file extension (XML, CSV, TXT), the extension does it for you. - Encoding type
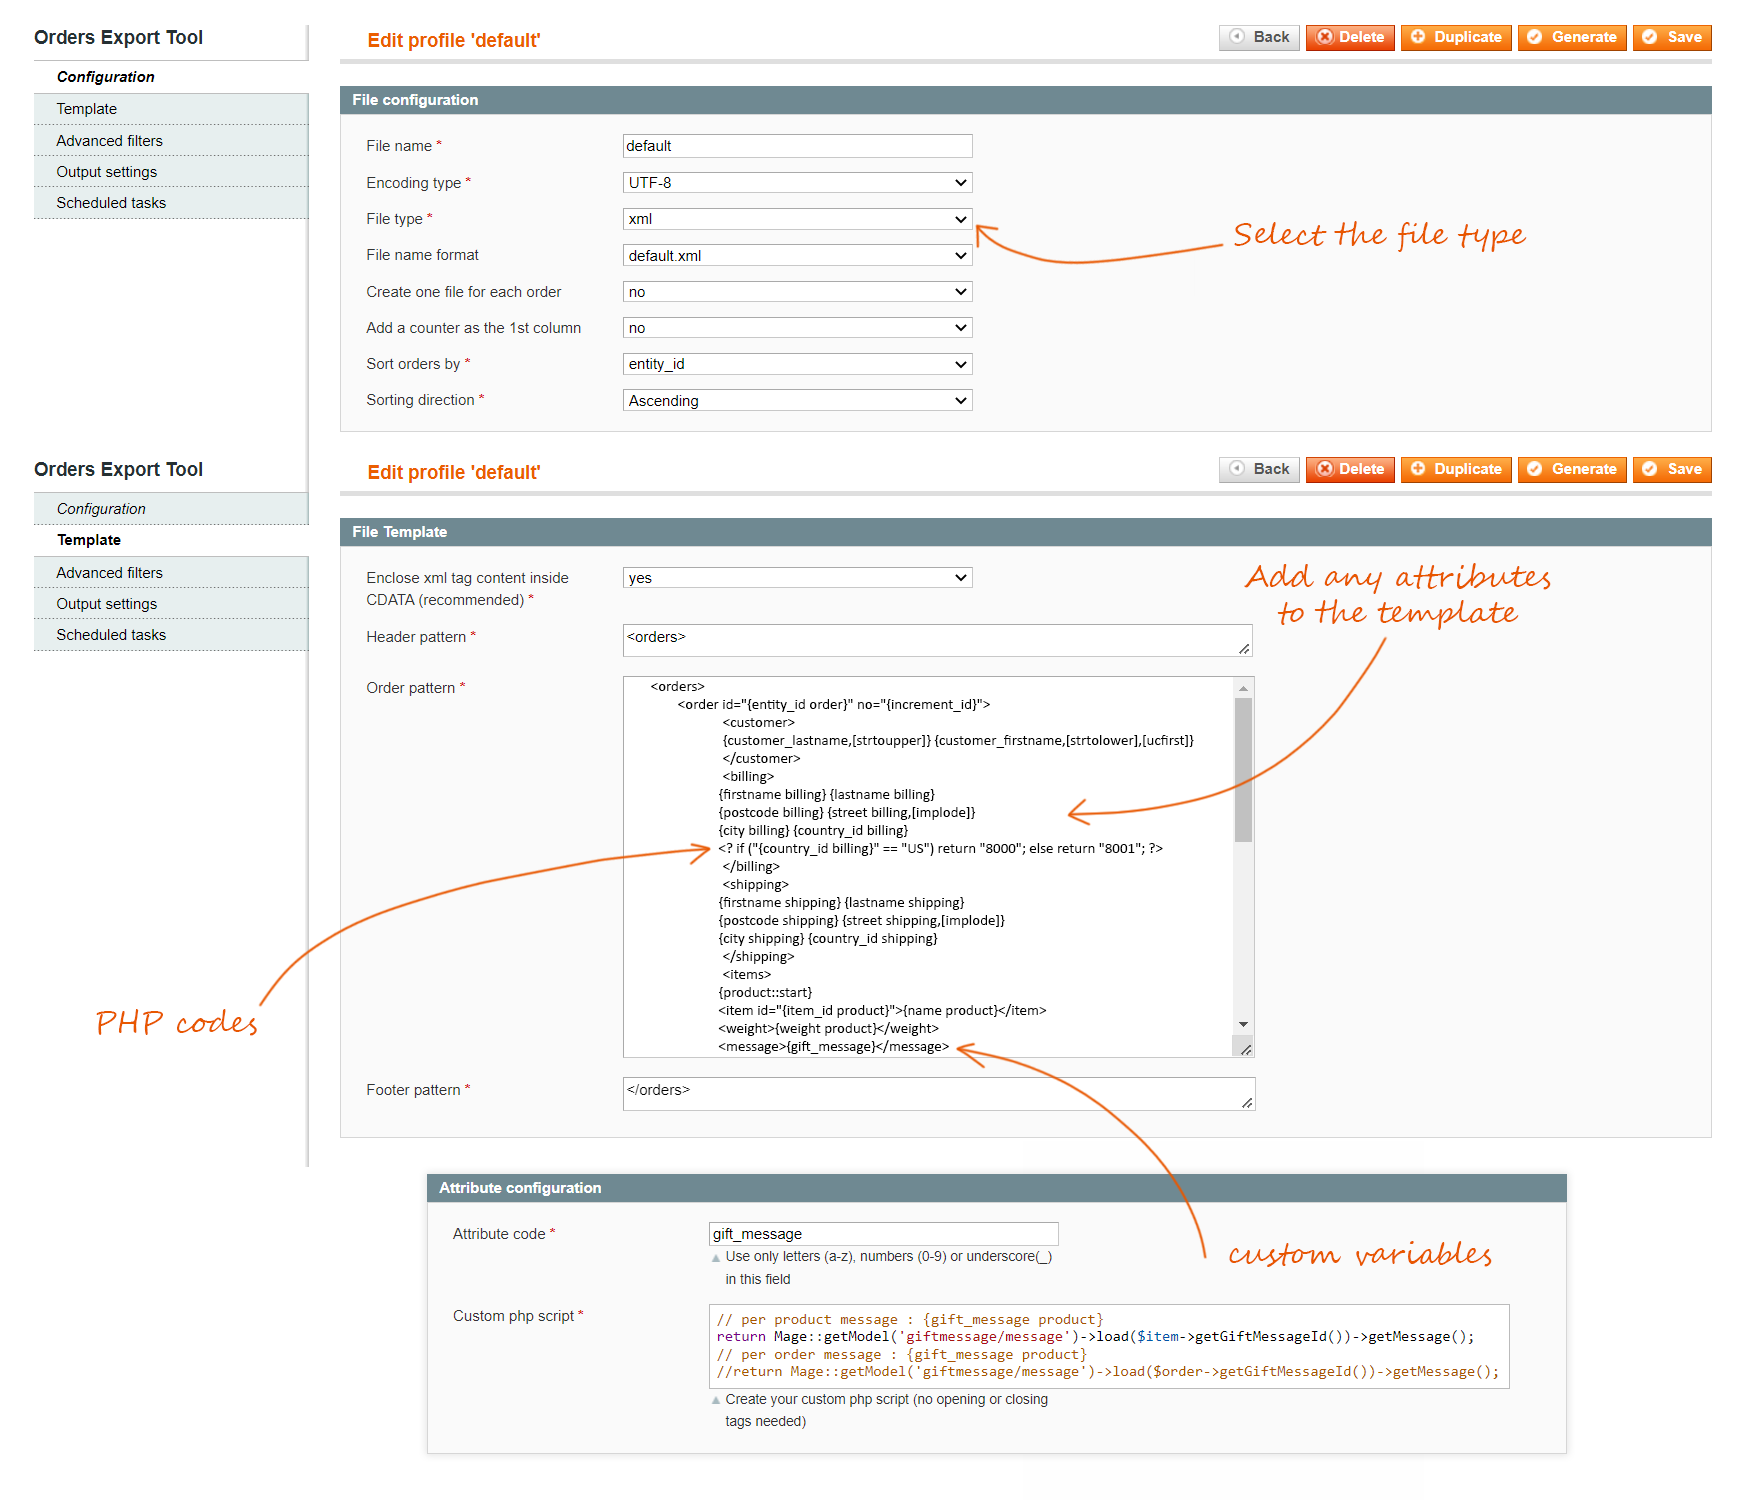
Choose the encoding type you want to use. - File type
This is the main setting that defines if you want either an XML file type or a CSV/TXT file type. Depending on this setting the template section will be managed differently. - File name format
Your file name can be completed with the current date at the time of the exportation. Different formats are available. - Create one file for each order
Choose to export one order per file or not. - Add a counter as the 1st column
Choose if you want the first column to be a counter. - Sort orders by
Define how you want the orders to be sorted. - Sorting direction
Choose ascending or descending sorting.
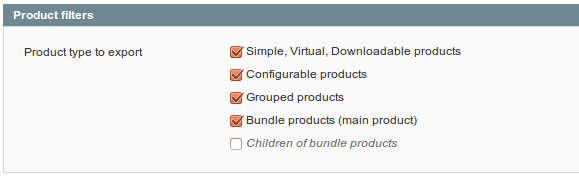
Product filters
Choose the types of products you want to export.
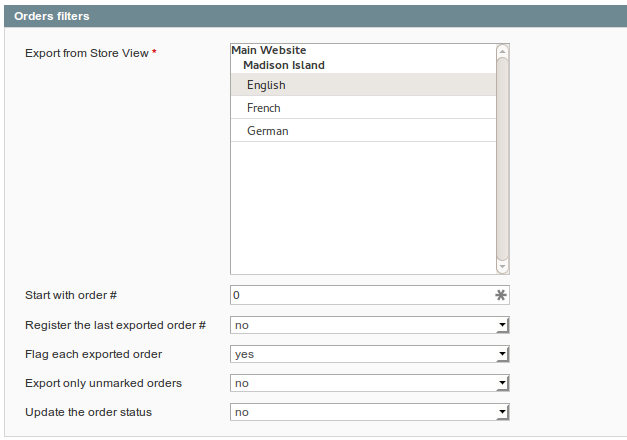
Orders filters
This section allows you to define which group of orders must be exported.
- Export from Store view
Allows you to choose one or more store views from your website(s) to use in the exportation process. - Start with order #
Allows you to specify an order number from which to start the export process. - Register the last exported #
Allows you to automatically register the last exported order into the 'Start with order #' input. - Flag each exported order
Allows you to flag each exported order as exported in:
SalesOrder - Export only unmarked orders
Allows you to specify that only the orders not yet flagged must be exported. - Update the order status
Allows you to update the order status or not.
Template
In this tab, you'll be able to configure your profile template according to your needs. Mass Order Export allows you to create different kinds of file:
- XML profile
- CSV / TXT profile
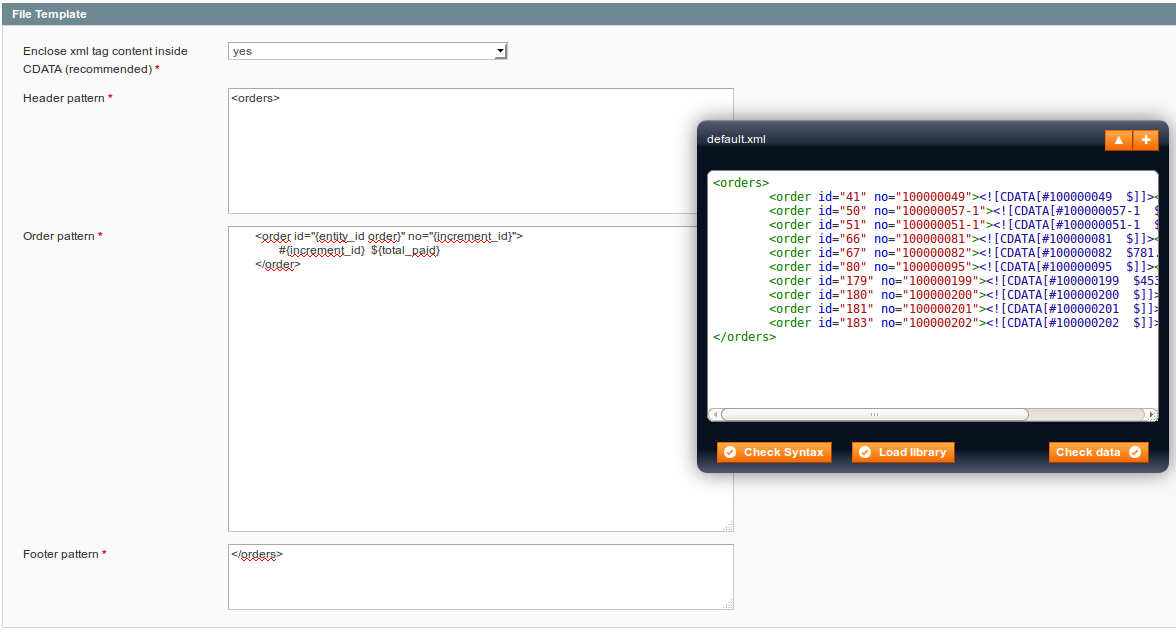
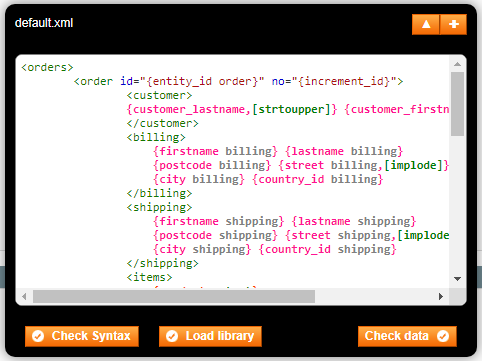
XML file template
An XML template is made up of 3 parts:
- Enclose xml tag content inside CDATA (recommended)
Choose to enclose the content of your XML tags between CDATA or not. - Header pattern
Is at the start of the file:
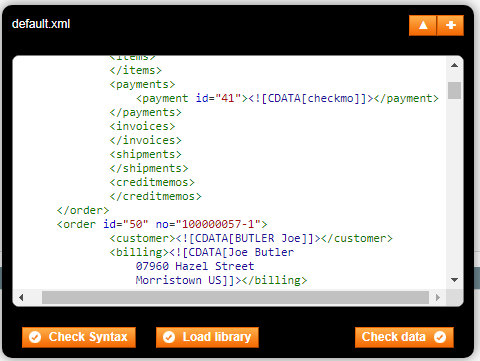
<orders> - Order pattern
Is iterated for each order included in the file:
<order> <customer> {customer_lastname,[strtoupper]} {customer_firstname,[strtolower],[ucfirst]} </customer> <billing> {firstname billing} {lastname billing} {postcode billing} {street billing,[implode]} {city billing} {country_id billing} </billing> <shipping> {firstname shipping} {lastname shipping} {postcode shipping} {street shipping,[implode]} {city shipping} {country_id shipping} </shipping> <items> {product::start} <item id="{item_id product}">{name product}</item> <weight>{weight product}</weight> {product::end} </items> <order> - Footer pattern
Is at the bottom of the file:
</orders>

The XML structure allows you to use iterative syntax in different parts of the template, as follows:
{product::start}
 <item id="{item_id product}">
  <name>{name product}</name>
  <weight>{weight product}</weight>
 </item>
{product::end}
In most cases, orders contain more than one product, so it may be useful to create an iteration that loops for each ordered product. All the content between the opening and closing markers will be repeated for each product and all dynamics values will be replaced:
{product::start}
 ...
{product::end}
These iteration markers can be used for all order instances:
{payment::start}
 ...
{payment::end}
{invoice::start}
...
{invoice::end}{shipment::start}
...
{shipment::end}{creditmemo::start}
...
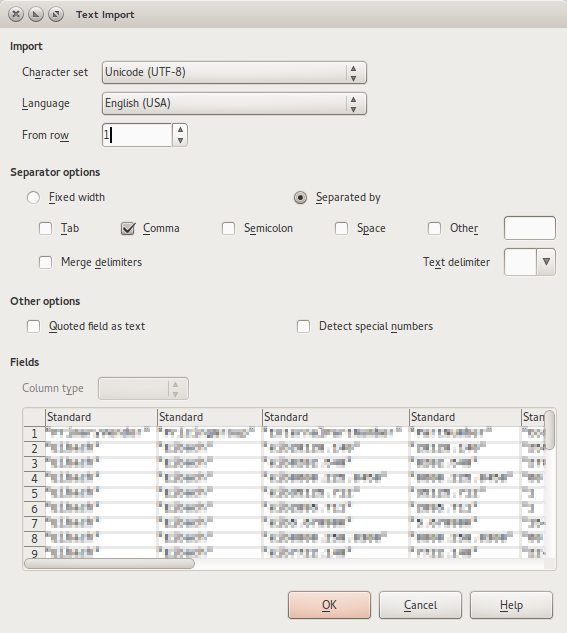
{creditmemo::end}CSV / TXT file template
To create a CSV/TXT data feeds, you just have to choose 'CSV' or 'TXT' in File type, in the Configuration tab. The template tab will be updated to match the file type.
- Include header
Allows you to include or not the column's name in the first row of your CSV/TXT file. - Columns name
Is for the attribute name that can be displayed at the top of the file. - Pattern
Works in the same way as in XML files.
Like in XML files, you're allowed to use PHP code if you want to customize the pattern. You just have to write your PHP code in one single line, and it will work perfectly.
You can add a field by using the button Add field. The fields can then be re-ordered easily by using the up and down arrows. - Field delimiter
Lets you choose which kind of delimiter you want to use to separate your fields. - Fields enclosure
Lets you choose which kind of enclosure you want for your data.

The main difference with the XML mode is that you can't use any iteration instructions. Instead, Mass Order Export uses an auto-consolidation internal process. This simply means if you try to get the value of any attribute of an instance (product for example) that contains several items, the extension will automatically duplicate the txt/csv line for each item.
With the following configuration:

Logically the module should export one line for each order, but some orders may contain several product items. The extension will create several lines for the same order, as in the following output example:
Order#         Product Name          Product Sku
#10000001      my product A          AAA
#10000001      my product B          BBB
#10000001      my product C          CCC
#10000002      my product D          DDD
#10000003      my product B          BBB
#10000003      my product E          EEE
...
Filters
In the Filters tab, you can define the types of orders and customers you want to include in your export profile. You have also the possibility to create more advanced filters that will best meet your needs.
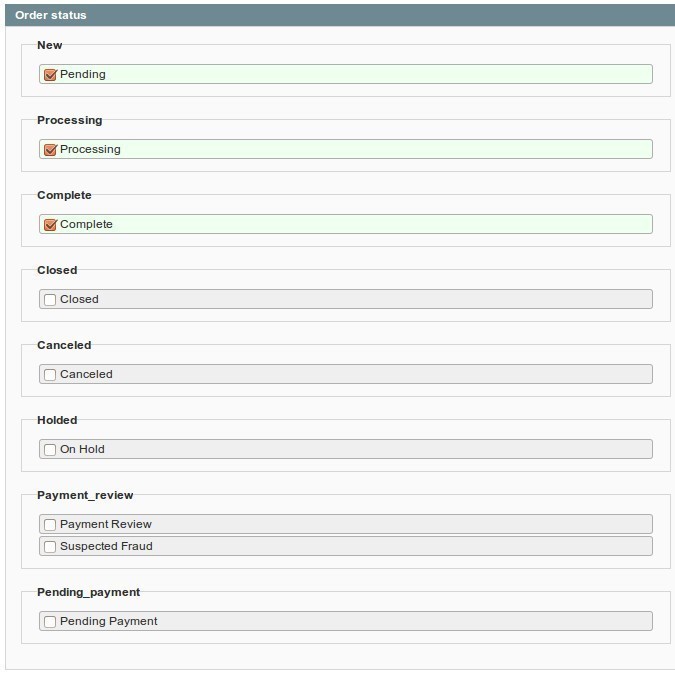
Order status
This section allows you to specify the type of order you want to export. At least one status must be selected.

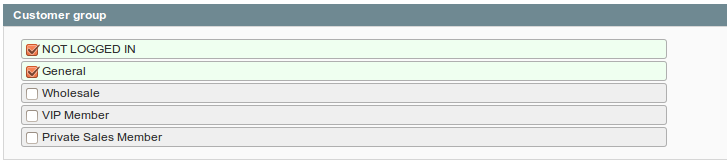
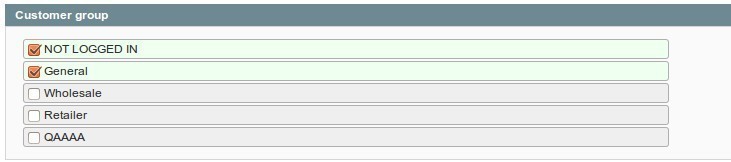
Customer Group
In this tab, choose the customer group of the orders you want to export. At least one customer group must be selected
Advanced Filters
In that tab, you can create more precise filters. For example, you can choose to export only one specific order by setting a filter:
order > increment_id | = | Id of your orderYou can also export orders placed by customers whose last name ends with 'son':
order > customer_lastname | like | %sonYou have a choice between several options:
- =, >, <...
Equal to, greater than, lower than, greater than or equal to, less than or equal to, different from. - LIKE / NOT LIKE
like: starts/ends with the character string / includes the character string.
Not like: doesn't start / end with the character string / doesn't include the character string. - IS NULL / IS NOT NULL
is null: the value is null.
is not null: the value is not null. - IN / NOT IN
in: is in (selection of several options).
not in: is not in (selection of several options).

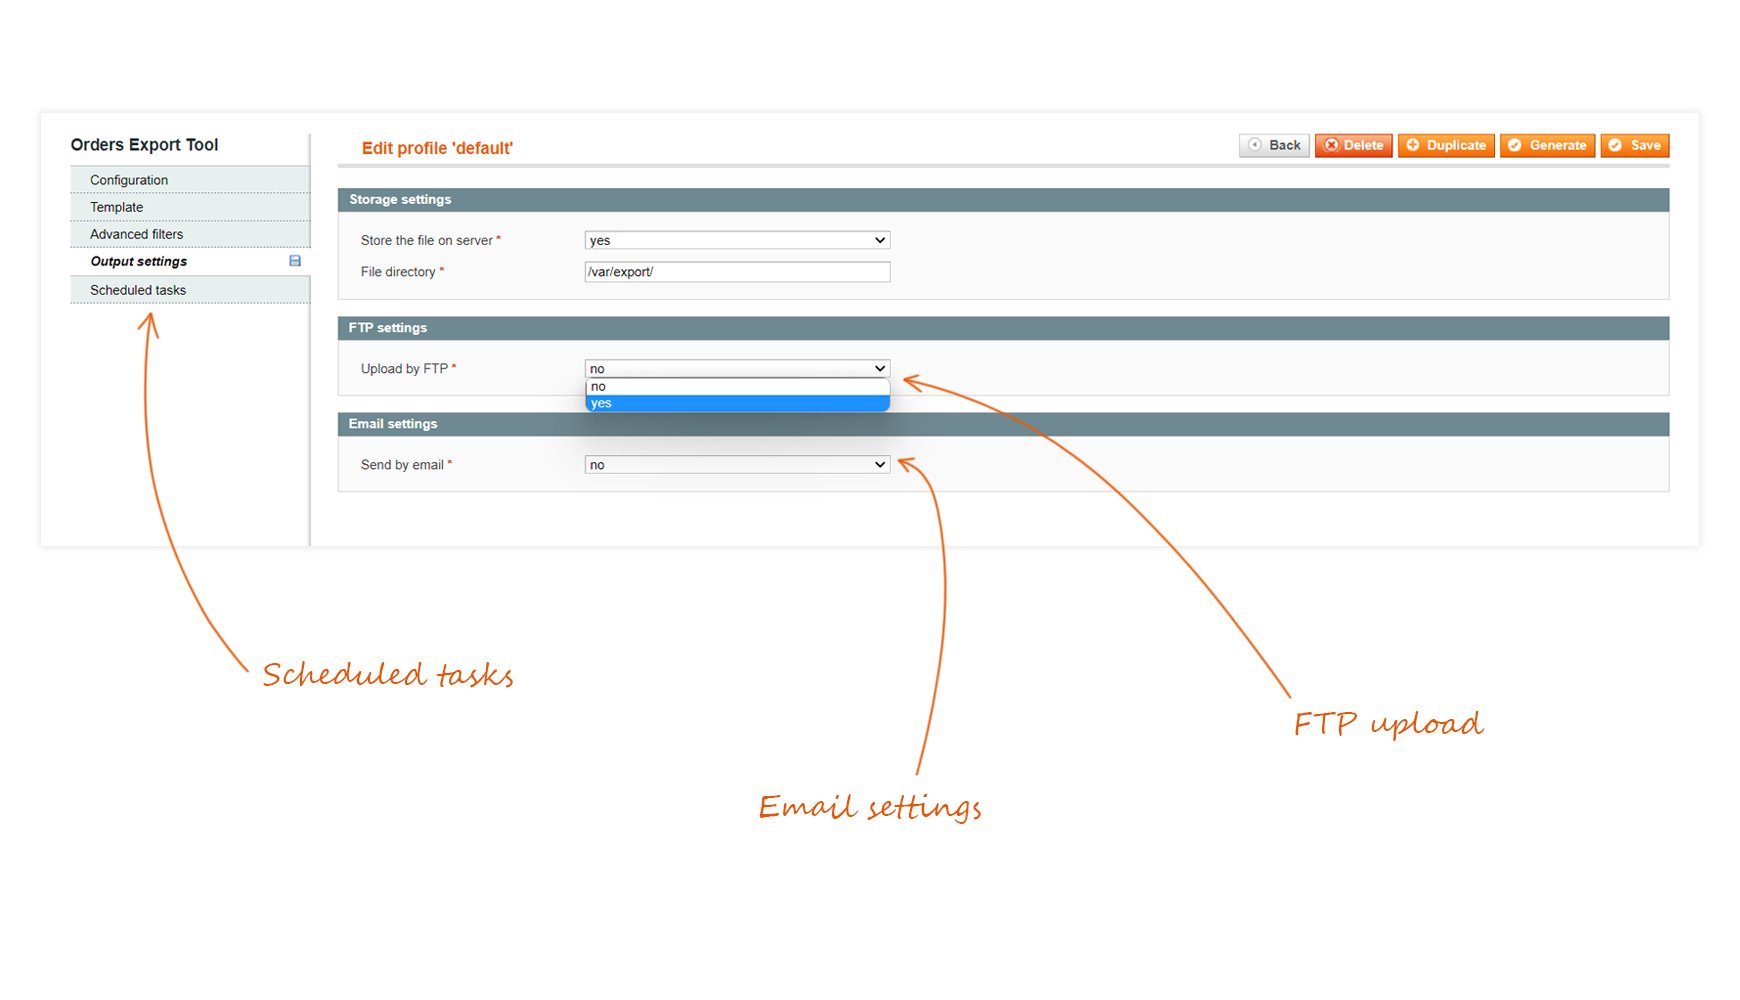
Output settings
With Mass Order Export, you have many possibilities to export your profiles.
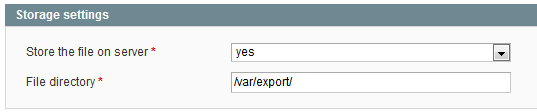
Storage settings
The first solution is to store your file directly on your server.
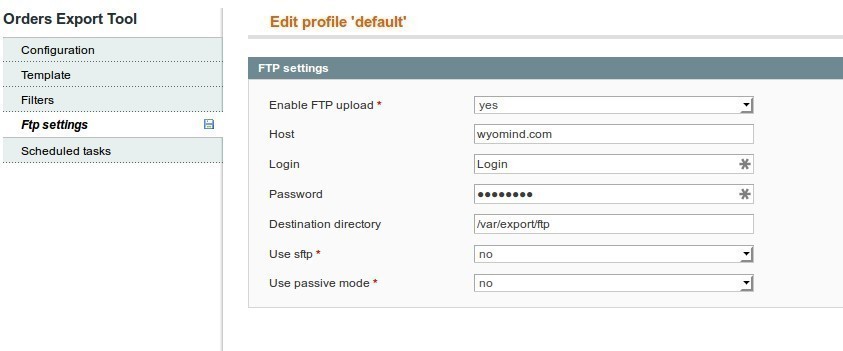
FTP settings
You can also configure the FTP settings. For example:
- Upload by FTP
Select Yes if you want to upload your data feed using FTP. - Host
In that field, fill in the host.
wyomind.com - Login
It is your login to connect to the server. - Password
It is your password to connect to the server. - Destination director
is a relative path from the entry directory when you connect to the FTP.
/var/export/ftp - Use SFTP
Select Yes if you are using SFTP. - Use Active mode
If you are using SFTP, you don't have to care about the passive/active mode.

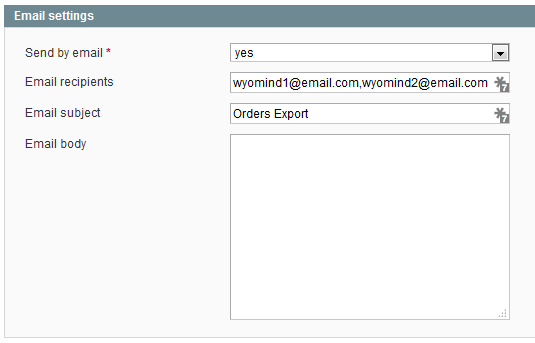
Email settings
Finally, you can choose to send your profiles by email. Don't forget to separate the email addresses with a comma.
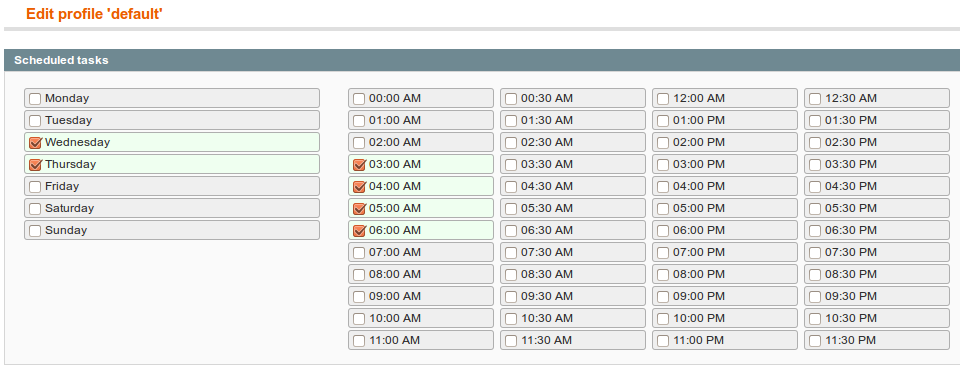
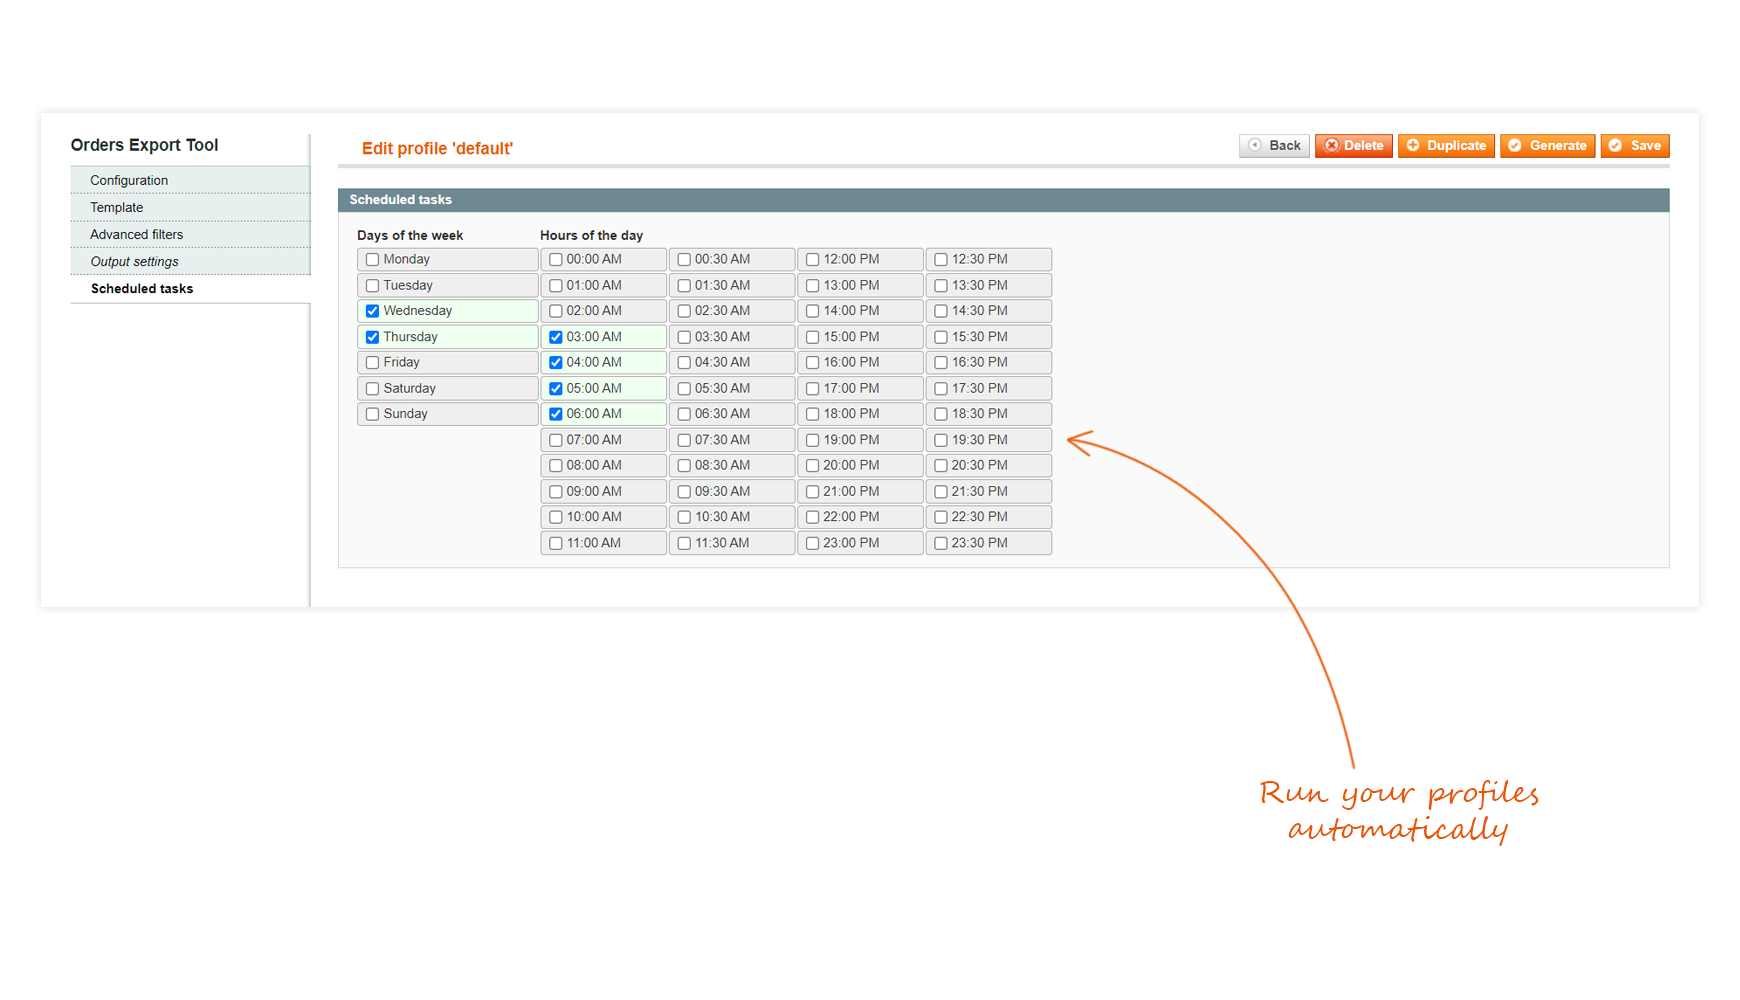
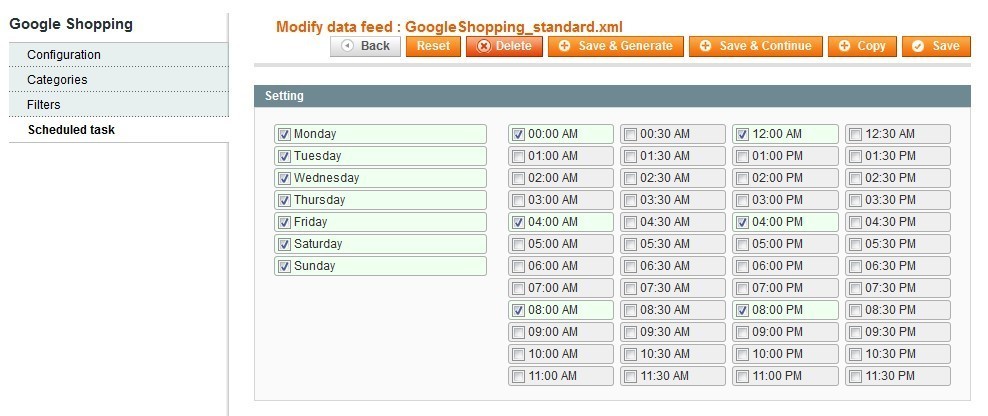
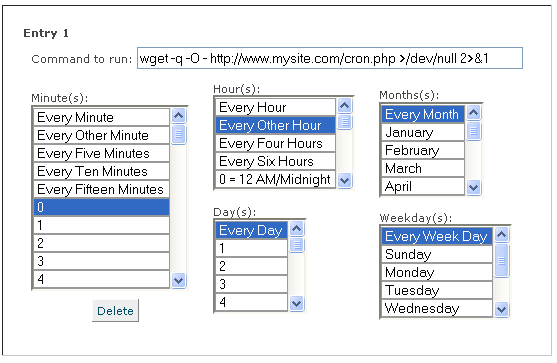
Scheduled tasks
In that tab, you can choose the days and hours when you want your profiles to be generated.
STEP 3: Export your orders
Now that your profiles are configured, you can export your orders into these files.
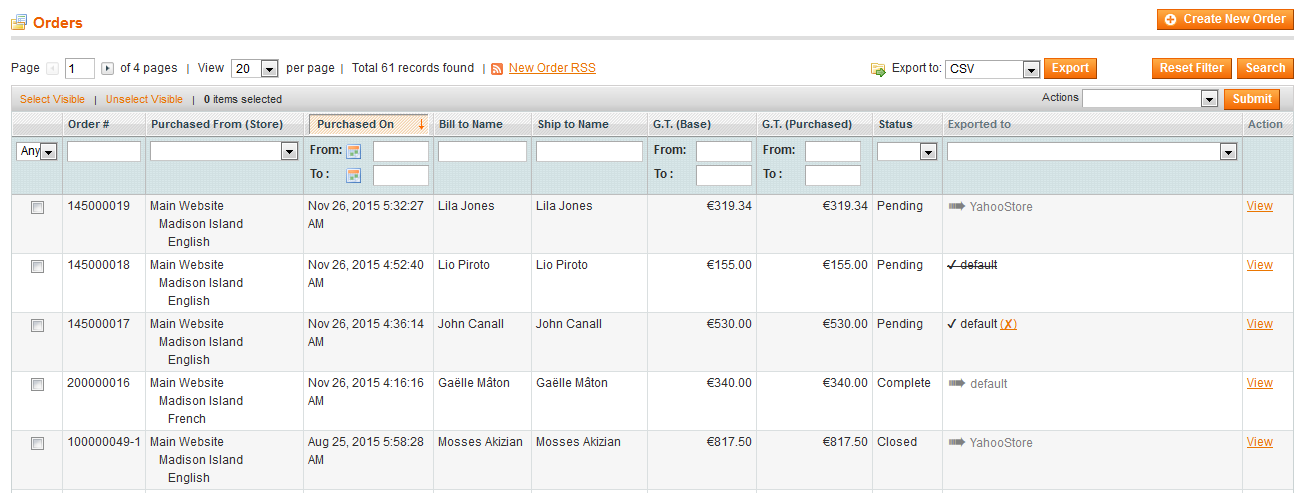
You will be able to see to which profile each order has been exported in:
SalesOrders
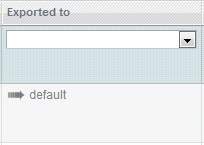
For each order, different notifications will be displayed in the Exported to column:
- √ default (X)
The order has been exported to the profile named default (only when the Mark each exported order option of the profile configuration is on YES). - No profile defined
There is no profile defined for the product(s) of the order. - => default
The profile defined for that order is default.
There are several ways of exporting your orders to anyone of your profiles.

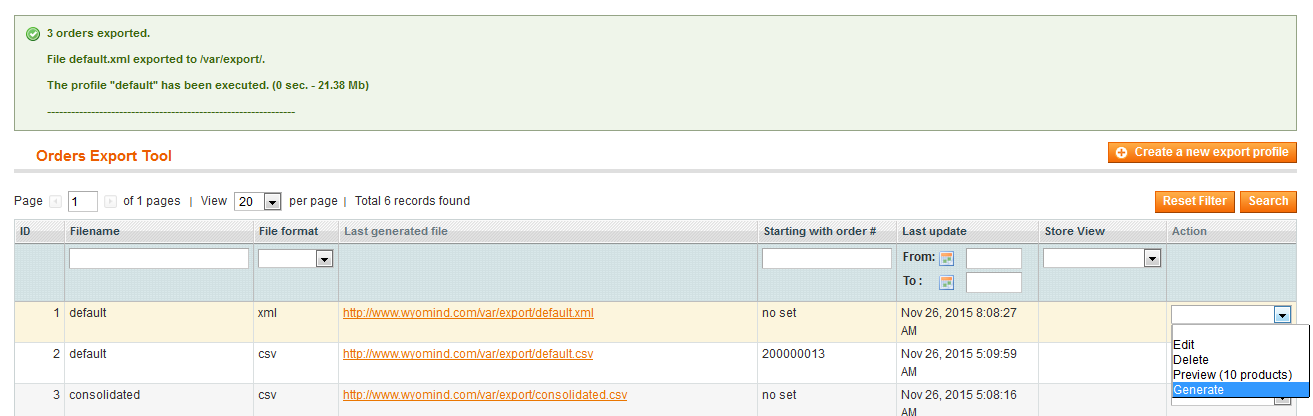
Generate the profile
By generating a profile, the orders that match with the profile configuration are automatically exported to that file.
Choose a profile and simply select the Generate option from the Action dropdown in
SalesMass Order ExportExport profiles
A message is displayed and indicates how many orders have been exported to the file.
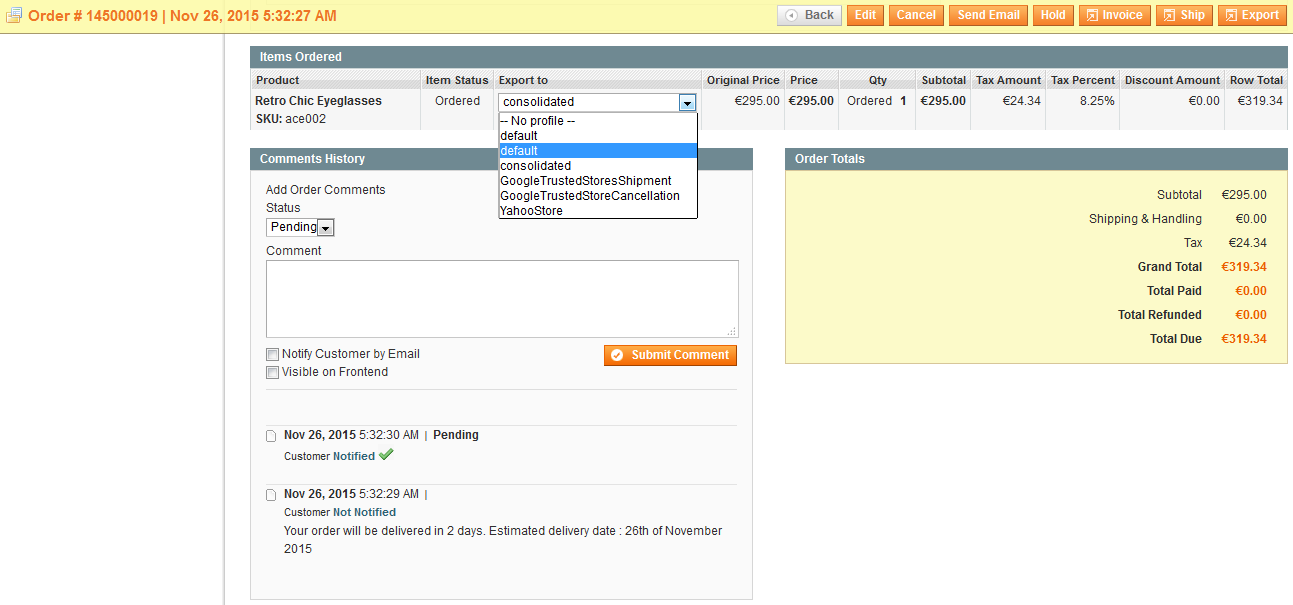
Manually export the orders
Choose an order and click on View in:
SalesOrders
There you can select a profile for each product of the order. For example: default
Go back in:
SalesOrders
In the Exported to column, the order displays:
=> default
This means that the order will be generated to that profile.
Now go back to the order View and click on Export. The order will then be exported to the profile(s) you've defined only if the order is matching with the configuration of the profile.
Export only unmarked orders
2 options are interesting in the Configuration tab of your profile from:
SalesMass Order ExportExport profiles
- Mark each exported order
in:SalesOrders - Export only unmarked orders
If you don't want to export several times the same orders, you can define both options on YES. Then only the unmarked orders will be exported.
If at any time, you want to export a new time an order that has already been exported, you have the possibility to unmark that order by clicking on the cross next to the profile name in:
SalesOrders
Then, when the profile will be run, the order will be exported a new time.
STEP 4: Create your custom attributes
In some cases, you might need to get the value of one attribute that is not available in any of the default instances (order, product, address, payment, invoice, shipment, or credit memo) or you might need to use the value of one attribute but with a computed output.
Mass Order Export allows creating your own customized attributes directly from your admin panel by using some PHP code.
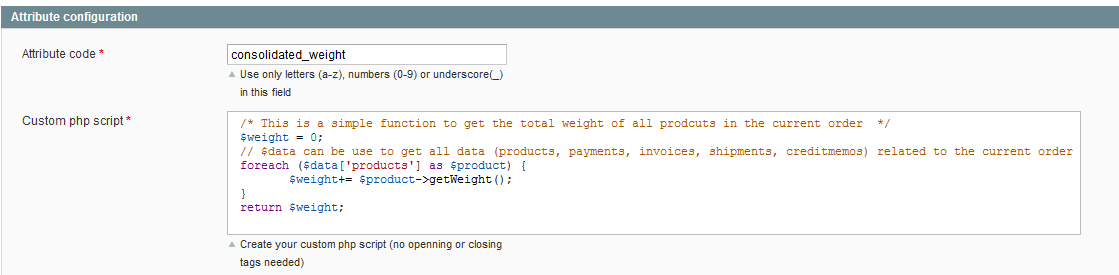
Directions
In order to create a valid customized attribute, you must respect these rules:
- $value is used to store the data that must be returned. You can also use the return instruction.
- $item refers to the item of the current instance, eg :
{your_custom_attribute order} = $item refers to the order instance
{your_custom_attribute product} = $item refers to the current product instance
... - $data is an associative array that contains all the instances data of the current order.
$data["products"] = contains all the product data relative to the current order
$data["payments"] = contains all the payment data relative to the current order
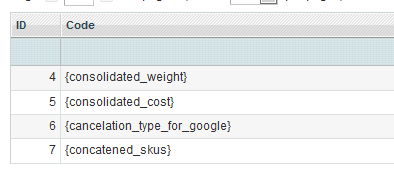
Examples
Below are 3 examples of common customized attributes:
- Get the color for each product of the order
<?
 $product=Mage::getModel('catalog/product');
 $product->load($item->getProductId());
 $value=$product->getColor();
 return $value;
?>
or
<? return Mage::getModel('catalog/product')->load($item->getProductId())->getAttributeText('color'); ?>- Get a consolidated string of all product skus in the order
<? $skus = array();
 foreach ($data['products'] as $product) {
 $skus[]= $product->getSku();
 } return implode(',',$skus);
?>
- Get the status of an order and retrieve a computed value
<? switch($item->getStatus()){
 case 'canceled': $value= 'MerchantCanceled'; break;
 default : $value= 'BuyerCanceled';
 } return $value;
?>


 We use Wyomind's mass order export for a variety of uses. But the most important ones are: double check on the purchase invoices. Did we sell what we purchased and can the differences be explained. Further more we sell across different countries so need to do some paperwork to have our products cross the border. With Mass order export it is a piece of cake to export both order product information and self added constant values which relate to the different countries. The import/export information is automatically generated and distributed to our bookkeeping and customs department.
 Ce module est excellent pour mes exports comptable et tracking. Je l'utilise aussi pour du dropshiping. Le support est au top ! Ne pas hésiter.
 We had a problem with a script to find the orders we needed. Jean-Paul gave excellent superfast support. Now it works perfectly. Thanks!
 The data Mass order export extension is easy to use and to implement. Have used this extension for M1EE and for M2EE and currently is in use for M2EE 2.3.5. However, with the upgrade to 2.3.5 we see some inconsistencies in performance. Nothing that can't be solved, it just requires a bit of time and effort to get it to work again. Whilst the last version was easier to configure, the current version allows more flexibility as you can create unique data comands.
 If your webshop in magento starts to run a bit and you are in a market with many competitors, the price pressure is high and the margins are low. With many orders and weekly price adjustments, it is difficult to monitor the overview of profitability. Thanks to Wyominds export tool, we can. The weekly export gives us a direct overview of how much we have left over per order and what the webshop has delivered last week. That gives you peace of mind.
 Great extension, works as expected. If there are any technical issues support staff are very good
 We've been using Wyomind extensions for years and always have great support. The Order Export module is superb and allows so much flexibility. The support team are always quick to react and help us to resolve any issues.
 I m using wyomind extensions more than 4 years for different websites. The order export tool extension have amazing functionality and meet your requirements. Bug free and professional coding the support is excellent. I would recommend to buy extension from wyomind.
 Hello, the extension works as expected. The support is reactive and helpful.
 Support reacts quick and helps me out fast.
 Purchased, installed, and support helped us customize it exactly how we needed it with some complex code to manage vat numbers, and helped us set the export time to every 10 mins. Great product and service - saved us lots of time and admin from our old solution.
 Fast and really nice support. Has saved us a lot of work. We can only recommend Wyomind and this extension.
 As said in the title this extension is very professional and flexible.You can export whatever attribute you want in whatever format you want. A problem I found is the export profiles are exported on the "checkout_submit_after_all" event, so if you redirect your client to a payment platform the export will occur before the payment is confirmed (so this can be an issue with you orders state for example). So I had to manually change the event in which the export is listening but it seems that this is causing a problem to mark orders as "exported" but as this part of the code is obfuscated I can't find where it's bugged... I hope I will get this problem fixed with the support which is reactive.
 The Order export extension gave us access to all the order data we needed along with very flexible custom attributes. The choice of data delivery by a number of different methods and timed schedules was also very useful. Requests to Wyomind were responded to quickly and efficiently.
 I was looking for a bridge that would allow me to interface Magento 2 to my billing CRM, when I came across this extension that was right for my case. I must say that it works fantastically! The support team is friendly and fast.
 Simple and works, but got some issue and hard to find out how to solve since not lot people use it I guess.
 The order export tool was easy to install and saves us a lot of data entry time entering orders into our ERP system. Highly recommend!
 This module is a very good one as it allows you to create directly via back-end differentiated exporting profiles (i.e. export file formats) for your orders. So, if you use different shipment providers or if you change shipment provider, with this tool you have the flexibility to generate the files you need and pass them to the IT system of your used carrier(s). Also, the extended configuration facility offered by this module gives you the possibility to define what orders to export at a very granular lever.